Introduction
Medicare Easyclaim is a system that allows patients to claim instant Medicare benefits at the practice, via your Tyro EFTPOS terminal while at the surgery. You can process Patient Claiming and Bulk Bill via Medicare Easyclaim using Bluechip’s Integrated Easyclaim functionality. Detailed information on Medicare Easyclaim can be found from the Medicare Easyclaim web site at: http://www.medicareaustralia.gov.au/public/claims/easyclaim.jsp
Tyro and HCN developed the first integrated Medicare Easyclaim solution, which links practice software to the EFTPOS/Easyclaim terminal. Other systems currently offer standalone Medicare Easyclaim through conventional EFTPOS terminals. MedicalDirector and Tyro have worked closely with Medicare and the medical community to improve the EFTPOS-based Medicare Easyclaim solution and further capture the needs of the market. The MedicalDirector Bluechip and Tyro Easyclaim solution streamlines the billing process and negates the need for re-keying information, saving practice staff valuable time.
Tyro and MedicalDirector have also been working with Medicare to produce a simple reconciliation method, especially for bulk billed claims. MedicalDirector Bluechip allows practice staff to reconcile in a similar way to what Medicare Online now does.
Please note that in order to take advantage of this facility you will need to obtain an EFTPOS / Easyclaim terminal from Tyro. The minimum Tyro Production software version compatible with Integrated EFTPOS is 07.01.09. At the time of this writing, the latest version is 08.23.01. The version information for your installed Tyro software can be accessed from the terminal via Menu > Merchant Info.
Please contact Tyro Payment Solution Sales, on (02) 8907 1717, to enquire about obtaining a Tyro EFTPOS/Easyclaim terminal. If at any time you have questions about the terminal or pairing the terminal with MedicalDirector Bluechip you can call Tyro Payments helpdesk at the toll free support number 1300 966 639. Tyro Payments’ trained staff will assist you with any questions you might have about the terminal.
How It Works
Accounts Paid In Full:
1. After the patient/claimant pays their account (using cash, credit card or EFTPOS), their Medicare card details are automatically transmitted from MedicalDirector Bluechip.
2. MedicalDirector Bluechip sends the claim details to Medicare for verification. The claim is checked and an approval is sent back a few seconds later.
3. The patient/claimant then swipes their EFTPOS card through the EFTPOS / Easyclaim terminal, enters their PIN and their benefit is paid into their nominated cheque or savings account a few seconds later.
4. Practice staff give the patient/claimant an EFTPOS receipt to confirm their benefit has been paid.
5. Important: Easyclaim benefits can only be deposited into cheque or savings account.
Bulk-Billing:
1. If the patient is bulk-billed, the patient will press a button on the EFTPOS keypad to assign their benefit to the health service provider. No signature is required.
2. The Claim and patient Medicare card details are automatically transmitted from Bluechip.
3. Claim is checked and approval is sent within seconds.
Part-Paid Accounts:
1. After the patient/claimant pays their account (using cash, credit card or EFTPOS), the user sends the claim details from Bluechip to Medicare.
2. The claim is checked and upon approval, a statement and/or cheque in the provider’s name will be forwarded to the claimant’s address recorded by Medicare. The cheque is then forwarded by the claimant to the provider with any outstanding balance. Where no benefit is assessed as payable, a statement only will be forwarded to the claimant’s address recorded by Medicare.
EFTPOS / Easyclaim Terminals and Settings
To manage your EFTPOS / Easyclaim terminals and device settings, from within Bluechip select Setup > EFTPOS/Medicare Easyclaim > Terminal Configuration.
|
Item |
Description |
|
Test Connection |
Allows you to test the connection between Bluechip and the EFTPOS / Easyclaim terminal. You will be informed as to whether the connection was successful or not. Note that a return of ‘Not Available’ means the terminal is either busy or down, and ‘Unavailable’ means Bluechip cannot obtain the status of the EFTPOS / Easyclaim terminal. |
|
Add Connection |
Click to add a new EFTPOS / Easyclaim terminal. The terminal and PC must both be connected to a network with Internet access. |
|
Update Connection |
This allows you to reconnect or re-pair to a EFTPOS / Easyclaim terminal in the list. |
|
Remove Connection |
Removes the pairing between Bluechip and the selected EFTPOS / Easyclaim terminal. |
|
Default Terminal checkbox |
Allows you to select the default EFTPOS / Easyclaim terminal for use by Bluechip. If there is more than one EFTPOS / Easyclaim terminal listed and no default has been selected, you can indicate the device you wish use on-the-fly by selecting one from the list of those available. This is handy if you have multiple EFTPOS / Easyclaim terminals accessible to this computer and your primary terminal is currently busy. |
Configuring Bluechip for Online Claiming
Setting up a Batch Type
You must create two batch types in Bluechip - one for Patient Claiming and one for Bulk Bill.
1. Select Setup > Practice > Batch types from the Bluechip Main window.
2. Click  to create a new batch type for Medicare Online
3. Enter the name ‘Patient Claims' and select the method 'Medicare Patient Claim'.
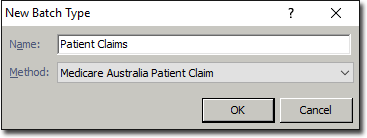
4. Click 
5. Click  to configure the Medicare Online Parameters.
6. Select the Location and Authentication tab, and enter your Location ID and a unique password. These will have been sent to you by Medicare.
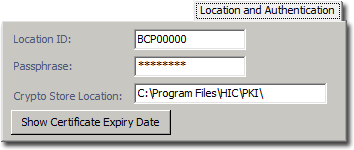
7. In the Crypto Store Location field enter the store location directory. Ensure you have selected the medicare australia.psi file and the "C:\Program Files\MEDICARE AUSTRALIA\PKI\" directory is displayed as the Store Location, providing "C" is your local system directory/drive.
8. Enter the PSI Store password that you created in the previous step and click the Save button. If you have installed Bluechip onto a server/network, enter or browse for either:
"X:\Program Files\Medicare Australia\PKI\" where X is the letter of the relevant mapped network drive on which you created the PSI Store, or
"\\SERVER\Program Files\Medicare Australia\PKI\" where SERVER is the name of the computer on which you created the PSI Store is located (indicated in the previous step as the "Store Location), and assuming that Program Files is a share on the Server.
On the Medicare Australia System tab, enter the Server and Recipient settings as follows:
"www2.medicareaustralia.gov.au/pext" is entered as the "Medicare Australia Server" and
"ebus@medicareaustralia.gov.au" is entered as the "Medicare Australia Recipient".
9. Click to save the changes.
10. Repeat this process to create a batch type for Bulk Bill, using the name ‘Bulk Bill’ and the method ‘Medicare Australia Bulk Bill’.
11. Continue to Setting up a Class.
Setting up a Class
You must create two classes in Bluechip, one for Patient Claiming and one for Bulk Bill.
1. Select Setup > Practice > Classes from the Bluechip Main window The Class Setup window appears.
2. Click and enter the class name ‘Patient Claim’ with the abbreviation ‘PC’.
3. Select (none) in the Copy from class section. Click The class is added to the list of account classes.
4. Repeat this process to create a class for Bulk Bill, using the name ‘Bulk Bill’ and the abbreviation ‘BB’.
5. Continue to Associating Classes with Batch Types.
Associating Classes with Batch Types
You must associate each class you created with its corresponding batch type.
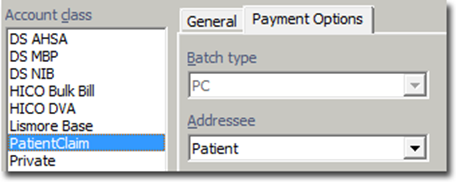
1. Select Setup > Practice > Classes.
2. Select the Patient Claim class that you want to be able to batch.
3. Select the Payment Options tab. From the Batch Type drop-down menu, select ‘PC’.
4. Repeat this process to associate your Bulk Bill class with its corresponding Bulk Bill batch type.
5. Continue to Setting up a Practitioner’s Classes.
Setting up a Practitioner’s Classes
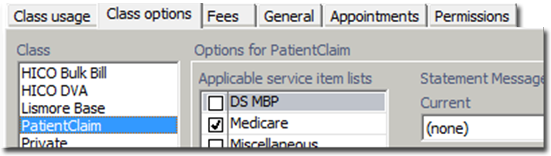
1. Select Setup > Practitioner > Practitioner Details. The Practitioner Setup window appears.
2. Select the Practitioner record. Tick the Patient Claim check box.

3. Select the Class Options tab. Select the ‘Patient Claim’ class, and then tick the ‘Medicare’ check box.
4. Click to save the changes.
5. Repeat this process for each class you wish this practitioner to use, and for each practitioner.
6. Continue to Creating Patient Accounts.
Creating Patient Accounts
Within each patient’s record, you must configure the types of accounts they can be invoiced against.
1. Open a patient’s record and locate the Accounts section.
2. Click  The New Account window appears.
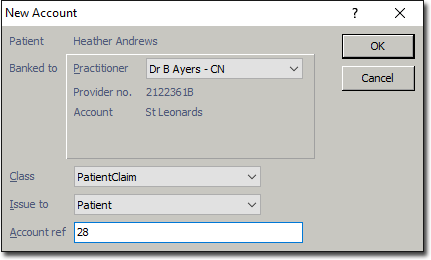
3. Select the patient’s practitioner from the associated drop-down menu.
4. From the Class drop-down menu, select the Patient Claim class you associated with this practitioner earlier.
5. Click You will be presented with the Account Details window. Configure other settings here as desired (please consult the Bluechip Help for information).
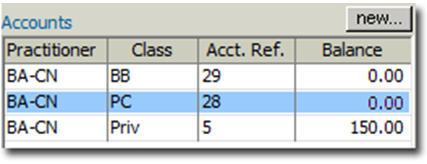
6. Click You will be returned to the patient’s record, where you can now see the new account for Patient Claim (PC) is available.
7. Repeat this process if you wish to create a Bulk Bill account for this patient also.

Claiming with Medicare Easyclaim
The following sections explain how to process different claims with Medicare Easyclaim.
o Fully-Paid Patient Claims
o Part-Paid Patient Claims
o Bulk-Bill Claims
The following items are not accepted through Medicare Easyclaim:
o In-hospital items
o ACIR information
o Bulk bill claims more than 2 years from date of service
o Patient claims more than 2 years from date of service
o Time duration dependent items
o Notional charges
o Patient claims pathology items excepting group 9 items
o Bulk bill pathology items which are self-deemed or rule 3 exemptions
o Patient claims and bulk bill claims with non-standard referrals
o Items where the charge exceeds $9,999.99
o Department of Veterans’ Affairs (DVA ) claims
o Radiation Oncology items
If you attempt to process a claim type not accepted by Medicare Easyclaim you will be prompted accordingly, and given the option to process the claim via Medicare Online as the alternative.
In the unfortunate event that Medicare Easyclaim is not available at the practice the practice needs to issue the patient/claimant an account/statement and advise the patient/claimant to lodge their claim through an alternate channel, i.e. at the appropriate Medicare office. Bulk Bill claims need be the completed as with the current existing processes. Since Medicare Easyclaim works independent from EFTPOS services, it is possible that Medicare is available while EFTPOS is not and vice versa.
Fully-Paid Patient Claims
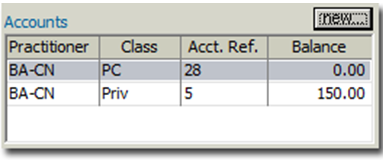
1. Open the patient’s record and locate the Accounts section.
2. Locate and double-click the Patient Claim account to open it.
3. Select the Invoices tab.
4. Click  A new invoice is started.
o You may be prompted to verify the patient with Medicare if you have not previously done so.
5. Within the new invoice, add Service Items as desired.
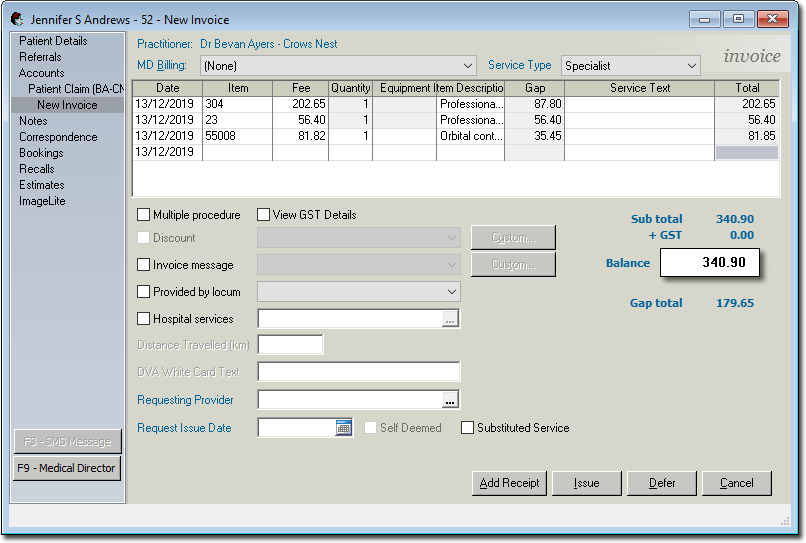
6. You will be prompted to select the Date of Issue. Alter it if desired, and then click
7. You will be prompted to print the invoice.
8. Select the Receipts tab.
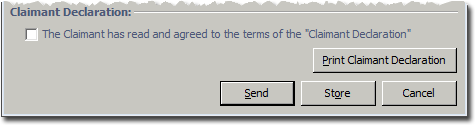
9. Click  and then within the receipt window, enter the following:
o Select EFTPOS Auto as the type of payment.
o Enter the card holder’s Name.
o Enter the Amount of the payment.
o Place a tick in the Allocate check box against each service item you wish to allocate payment to.

10. Click  You will be prompted to enter the date on which the receipt was issued.
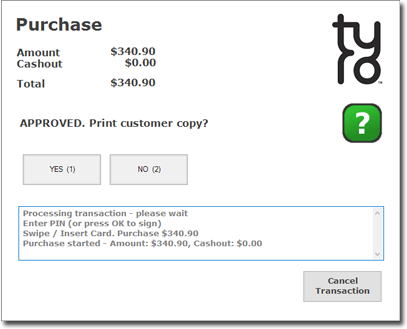
11. Process the payment with your EFTPOS device.
12. Select the Invoices tab again.
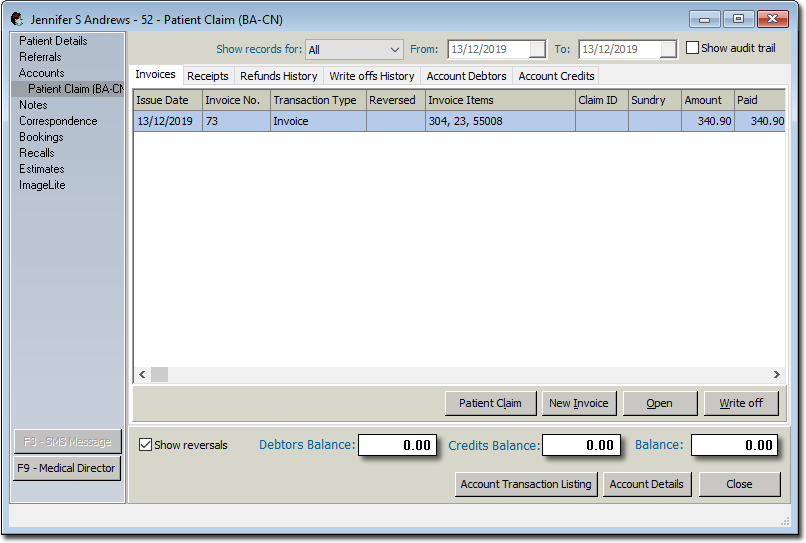
13. Click  The New Patient Claim window appears.

14. Click  The online claim process commences, and you can track its progress on-screen.
15. Once a claim has been submitted and approved by Medicare, the Patient Claim Results window appears.
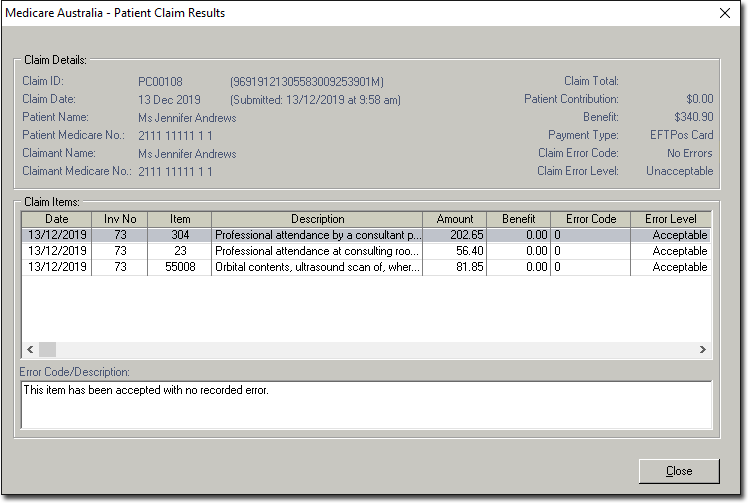
This concludes the steps necessary for processing a part-paid claim via Medicare Easyclaim.
Part-Paid Patient Claims
For Tyro EasyClaim Patient Claims (part-paid), there is no benefit refunded to the Patient’s EFTPOS card via the Tyro Terminal. Rather. a Tyro receipt is printed, and the claim is processed as per the normal Patient Claiming procedure.
1. Open the patient’s record and locate the Accounts section.
2. Locate and double-click the Patient Claim account to open it.
3. Select the Invoices tab.
4. Click A new invoice is started.
o You may be prompted to verify the patient with Medicare if you have not previously done so.
5. Within the new invoice, add Service Items as desired.
6. You will be prompted to select the Date of Issue. Alter it if desired, and then click
7. You will be prompted to print the invoice.
8. Select the Receipts tab.
9. Click and then within the receipt window, enter the following:
o Select EFTPOS Auto as the type of payment.
o Enter the card holder’s Name.
o Enter the Amount of the payment.
o Place a tick in the Allocate check box against each service item you wish to allocate payment to.
10. Click You will be prompted to enter the date on which the receipt was issued.
11. Process the payment with your EFTPOS device.
12. Select the Invoices tab again.
13. Click The New Patient Claim window appears.
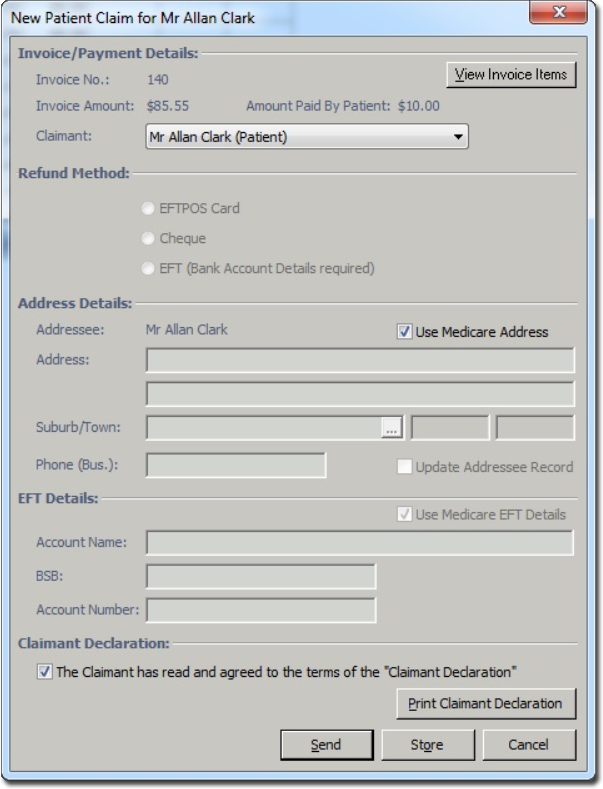
14. Click The online claim process commences.
15. Once a claim has been submitted and processed by Medicare, the Patient Claim Results window appears.

This concludes the steps necessary for processing a part-paid claim via Medicare Easyclaim.
Bulk Bill Claims
1. Ensure you have configured Bluechip to use Medicare Easyclaim, as explained above.
2. Open the patient’s record and locate the Accounts section.
3. Locate and right-click the Bulk Bill account you created earlier. In the example above, it is the ‘BB’ account.
4. From the right-click menu that appears, select New Invoice. You may be prompted to verify the patient with Medicare if you have not previously done so.
5. Within the New Invoice, add Service Items as desired. In the example below, Item 304 has been entered.

6. Click the Issue button to issue the invoice. You may be prompted to select a referral to associate this invoice with.
7. You will be prompted to select the Date of Issue, the default being the current date. Click The Easyclaim process commences
8. On the TYRO terminal, the Practice will be prompted to accept the claim. Accept the claim to continue.
Note: This is an estimate of the benefit. Medicare may adjust the benefit payable in accordance with the rule set out in the Medicare Benefits Schedule.
9. On the TYRO terminal, the patient is prompted to assign their right to the benefit to the Practice by pressing Yes.
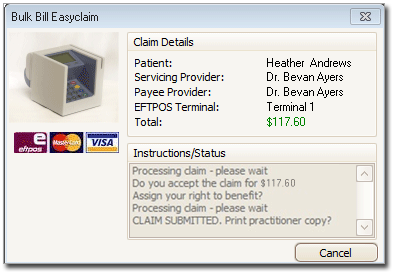
10. Once the patient has assigned the right to benefit, the claim will be processed, and if successful will be submitted.
11. You will have the option to print a Practitioner copy of the submitted claim. Processed claim can be found within Bluechip’s ‘Practice Explorer’ window, under the Medicare Australia menu.
This concludes the steps necessary for processing a bulk bill claim via Medicare Easyclaim.
Medicare Easyclaim Records
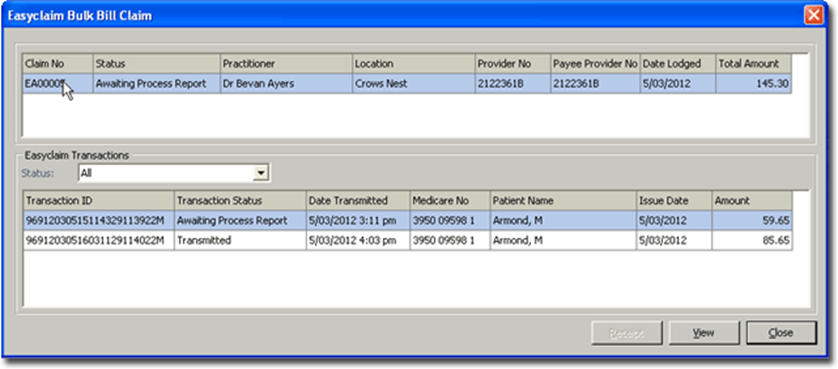
Within Bluechip’s Practice Explorer window, the Medicare Australia menu lists all the claims the Practice has made. Claims made via Medicare Easyclaim are shown with a Claim ID prefix of EA, as shown below.
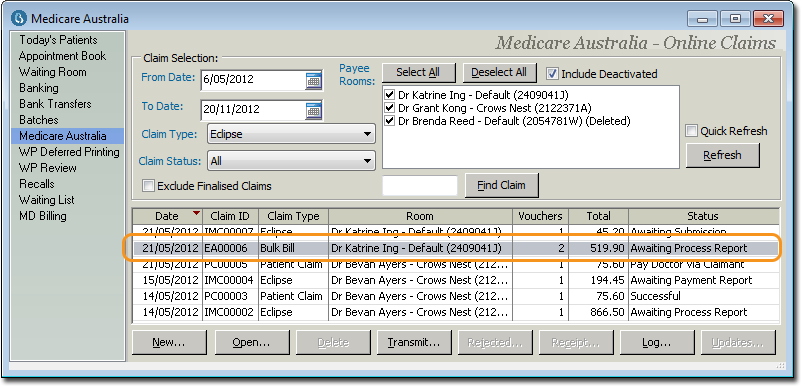
To view the details of a single claim, select the claim and then click  The status of each claim is indicated in this window too. The various status definitions are available below.
Medicare Easyclaim Transaction Status
The following information describes the various Medicare Easyclaim Transaction status, and how to deal with them, where applicable.
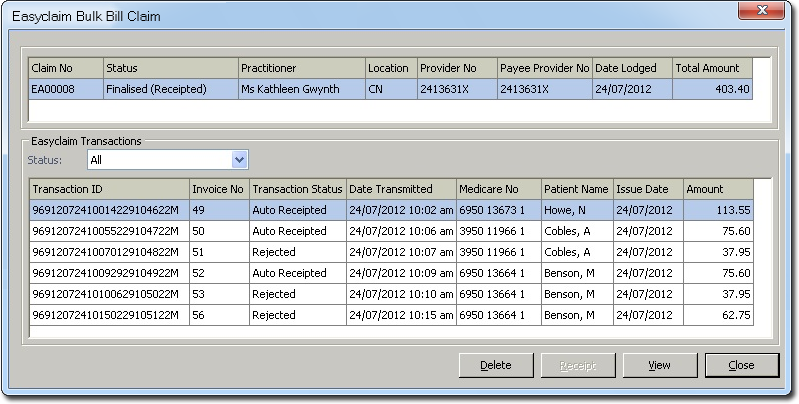
Note: Bulk Bill claims via Medicare Easyclaim are handled as single transactions, although displayed as a ‘batch’ within Bluechip. This will be a change to the current process that Medicare Online claim users are familiar with.
Note: Bulk Bill claims will be deposited in a lump sum, into the account/s you have setup with Medicare.
|
Status |
Description |
|
Transmitted |
First notification after successfully submitting a claim. |
|
Awaiting Process Report |
Status after clicking the Transmit button to retrieve the Process Report. |
|
Awaiting Payment Report |
Status after clicking the Transmit button again after retrieval of the Process Report. Note that if the user allows enough time to retrieve the reports, then at the first instance of clicking Transmit he would also retrieve the payment reports , and the status would change to ‘Ready to Receipt’. |
|
Ready to Receipt |
Status after retrieval of both the process and payment reports. |
|
Rejected |
Status when Medicare rejects all items within the batch. |
|
Processed |
Status when Medicare approved some transactions in the batch and rejected others. |
|
Finalised (Receipted off) |
Status when all transactions of the batch have been receipted-off (either auto receipted, manually receipted or no benefit payable). |
Requesting Easyclaim Bulk Bill Integrated Reports
Medicare Easyclaim Processing/Payment reports can be requested via the Medicare Australia window. Click ![]() to request claim report information from Medicare.
to request claim report information from Medicare.
Open the Practice Explorer, and select the Medicare Australia menu item as shown below. Select the claim and then click ![]()
Filtering Easyclaim bulk bill claims in Bluechip: Via the Practice Explorer ‘Medicare Australia’ menu item, select the Claim Type of ‘Easyclaim’.
View additional details of a claim, including service items and payment details, by selecting the claim and clicking 
![]()