See also: Mail Merge
The Mail Merge utility allows you to recover and re-print failed mail merges.
This utility is helpful if you commenced printing a mail merge but the printer failed during printing. Under such circumstances if you had only been able to print for example the first 50 letters of a 300-letter print job, 250 letters remain. Furthermore, despite some letters failing to print, the entire 300 patients selected for the mail merge will have an indication in their record that a letter had been created. With the Mail Merge Utility, you can resume the failed print run.
To activate the Mail Merge Utility:
1. Locate and double-click the MedicalDirector Maintenance icon ![]() from your desktop. The MedicalDirector Maintenance window appears.
from your desktop. The MedicalDirector Maintenance window appears.
2. Select the Database Tasks > Clinical menu item.
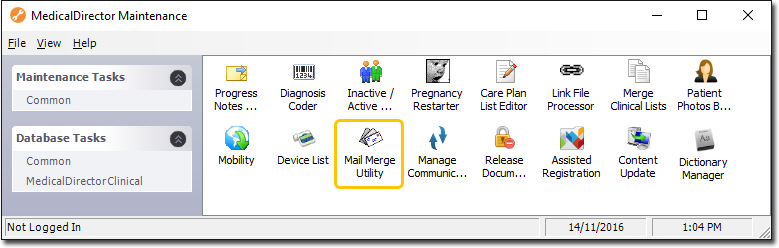
3. Double-click ![]()
(Optional) If this is the first time you have tried to run the Mail Merge Utility during this session of working in MedicalDirector Maintenance, you will be prompted to select a Configuration, and enter your Username and Password.
4. The Mail Merge Utility window appears.

This window displays all of the Mail Merges performed from within MedicalDirector Clinical, regardless of whether they were successfully printed by your printer. From this window locate the particular print run you wish to re-print mail merge letters for.
o You can filter the list by selecting a range of dates to search within and/or by selecting the specific person who performed the print run. After you have selected your search criteria, click  to filter the list.
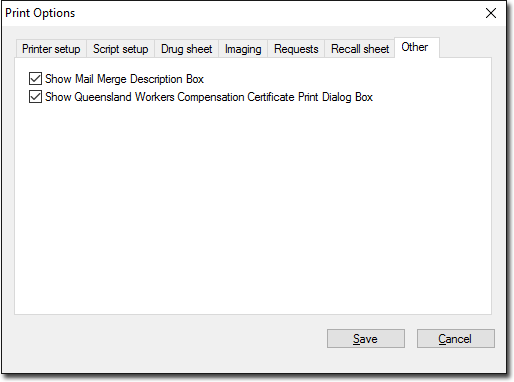
o The Description field further helps you determine which mail merge print run you need to resume. A description for a mail merge can be entered at the time the mail merge is first run via a prompt, if you have first enabled this functionality in Mail Merge Print Options.
5. Double click the specific Mail Merge you wish to re-print letters from. The Mail Merge print run appears, revealing the list of patients for whom the letter was originally designed.
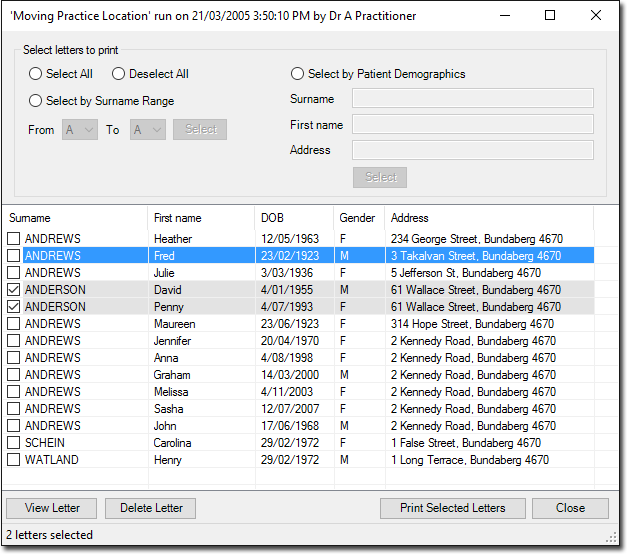
From within this window you select the patients you wish to re-print a mail merge letter for.
6. Modify the list of selected patients for whom you wish to re-print a mail merge letter by;
o Individually selecting each patient's associated checkbox.
o Clicking the Select All or Select None radio buttons.
o Clicking the Select by Surname Range radio button, indicating the range of surnames (by first letter), and clicking the associated  button.
o Clicking the Select by Patient Demographics radio button and then indicating the patient's Surname and/or First Name and/or Address and then clicking . Upon clicking , all of the patients that meet your criteria are selected automatically, including those who in-part meet the criteria. For example, typing 'Ba' in the Surname field will select all patients whose surname begins with Ba.
7. Click  to print the selected mail merge letters.
By ticking the Show Mail Merge Description Box checkbox from within Clinical's Print Options, you will be prompted to enter a description for each mail merge you perform in Clinical. This description is saved, accessible via the Mail Merge utility, and helps to identify which mail merge you would like to resume.