Record a New Pregnancy
1. Within the patient's record,
locate and click  to call the Consult
panel.
to call the Consult
panel.
2. Within
the Consult panel, locate and click 
o It
may be necessary to click  to reveal the Obstetrics button.
The Obstetrics
panel appears.

3. Record/Indicate the following at the top of the panel:
o Gravida: (total number of pregnancies including para, miscarriages and terminations)
o Para: (number of pregnancies past 20 weeks)
o Misc: (Miscarriages)
o TOP: (Termination of pregnancies)
o Blood group
4. To
start a new pregnancy record, click  The
New Pregnancy panel is
displayed.
The
New Pregnancy panel is
displayed.
![]()
5. Enter either the LMP date or the EDC date.
o The EDC date is taken from the patient’s scan results, if available.
o The EDC date can be backdated by 3 weeks.
o When
the LMP or EDC date is entered, a gestation calendar is displayed.
The current gestation week is highlighted in bold.

6. Enter pregnancy information in the following fields:
o Date: the date on which this information was recorded. The default is today’s date.
o Weight (kg): patient’s weight, this may be pre-populated if the patient’s weight has already been entered in the Measurements panel.
o Blood Pressure (S/D): patient’s blood pressure, this may also be pre-populated if the patient’s blood pressure has already been entered in the Measurements panel.
o Oedema: an entry about any fluid retention in the patient.
o Urine: an entry about patient’s urine.
o Clinical Gestation: the gestation week, for example 13.5wks.
o Fundal Height (cm): current length of the patient’s uterus.
o Foetal Heart: entry about the foetal heart, for example found or not found.
o Presentation: how the patient presents.
o Remarks: any comments.
7. From here you can...
o  Add pathology results that
are presented. Continue to Step 8.
Add pathology results that
are presented. Continue to Step 8.
o  To save the pregnancy record. The record
is saved to the Actions panel.
To save the pregnancy record. The record
is saved to the Actions panel.

8. The Pregnancy Pathology Results panel opens.
o The EDC and current gestation is now displayed at the top of the panel.
o There are 3 standard pathology tests for pregnancy. The relevant fields are displayed in the 1st, 2nd, and 3rd tests sections.
o Enter
details about the patient’s immunisation status in the right-hand
section.
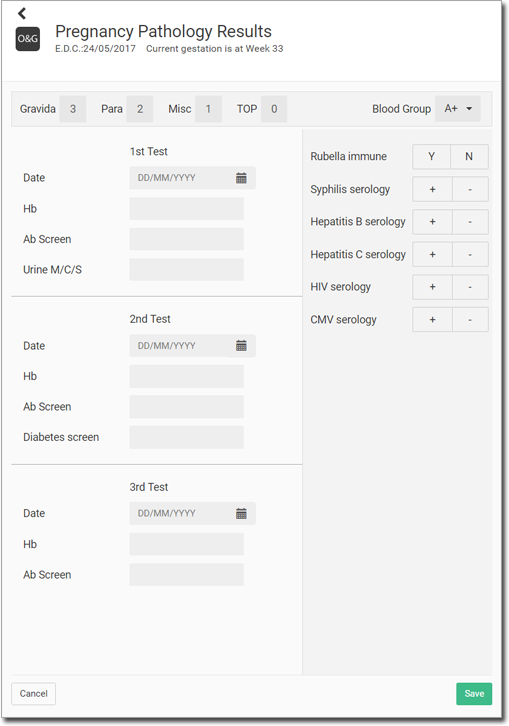
9. Click
to add the pathology
results to the patient’s pregnancy record.
o The pathology results are saved for every consult, not just the current consult.
o The Current Pregnancy panel is displayed again. Add more details if desired.
o When
you record a current pregnancy, the patient is flagged as 'pregnant',
as indicated at the top of their record, and in the Medication
Precautions panel. This cannot be unchecked until End Pregnancy
is selected in the Obstetric panel.

10. Click
 to save the pregnancy record. The record
is saved to the Actions panel.
to save the pregnancy record. The record
is saved to the Actions panel.
Recording Visits
1. Within
the patient's record, locate and click
to call the Consult
panel.
2. Within
the Consult panel, locate and click
o It
may be necessary to click to reveal the Obstetrics button.
The Obstetrics
panel appears. Note the current pregnancy data. You may need to
click  to reveal
this information.
to reveal
this information.

3. To
record updated data regarding this pregnancy, click within the
data.

4. Enter new data for this current visit, such as weight, blood pressure etc.
5. From here you can...
o Add pathology results
that are presented.
o To save the pregnancy record.
Ending Pregnancies
1. Within the patient's record,
locate and click
to call the Consult
panel.
2. Within
the Consult panel, locate and click
o It
may be necessary to click to reveal the Obstetrics button.
3. The
Obstetrics panel appears.
4. To
end a pregnancy, click  The End Pregnancy
panel opens.
The End Pregnancy
panel opens.

5. Enter the following details:
o Finish Date: finish date of the pregnancy.
o Gestation (weeks): weeks of gestation at the end of the pregnancy.
o Outcome: the outcome of the pregnancy.
o Episiotomy/Tear: if the baby was delivered then the episiotomy degree.
o Notes: any notes about the outcome.
o Baby 1 Name: baby’s name.
• For
multiple births, click  to record details of other children.
o Birth Weight (g): baby’s weight at birth.
o Gender
o Feeding: if 'breast' is selected and saved, Breastfeeding is also automatically selected in the Medical Precautions panel.
6. Click
to record the pregnancy as
finished.
o The pregnancy is displayed in the Obstetric History section of the Obstetrics panel.

7. Click
to close the Obstetrics panel.
Recording Past Pregnancies
1. Within the patient's record,
locate and click
to call the Consult
panel.
2. Within
the Consult panel, locate and click
o It
may be necessary to click to reveal the Obstetrics button.
The
Obstetrics
panel appears.
3. Click
 The Past Pregnancy
panel appears.
The Past Pregnancy
panel appears.
o If the patient has no obstetric information recorded, enter the overall history at the top of the panel. This includes Gravida, Para, Misc, TOP, and Blood Group.
![]()
4. Enter the following details about the past pregnancy:
o Finish Date: finish date of the pregnancy.
o Gestation (weeks): how many weeks of gestation.
o Outcome: the outcome of the pregnancy.
o Episiotomy/Tear: if the baby was delivered then the episiotomy degree.
o Notes: any notes about the outcome.
o Baby 1 Name: baby’s name.
• For
multiple births, click
to record details of other children.
o Birth Weight (g): baby’s weight at birth.
o Gender
o Feeding: if 'breast' is selected and saved, Breastfeeding is also automatically selected in the Medical Precautions panel.
5. Click
to save the pregnancy to
the patient's record.
Obstetrics in the Actions Section
When a new pregnancy is recorded in the system and saved, an entry is made in the Actions section of the Consult panel. Click on the entry to make changes.