Overview
Helix provides for the management of multiple Immunisations Schedules, and within each schedule you can specify the range of diseases covered by the schedule, and which vaccines are available to administer. You can also indicate when the schedule becomes active, available for use by your HCPs.
Helix makes the managing of upcoming changes to National or State Schedules easy, because you can make the changes in advance of their activation date, and then forget them, knowing that they will be available to you at the right time.
Alternatively, you can use this system to limit the range of vaccines available to your clinical staff. For example, you may have an excess of a particular vaccine in stock, and you want your HCPs to use this in preference to others.
There are 3 steps to configuring a schedule;
1. Specify which diseases the schedule covers.
2. Specify which vaccines are available to deal with the diseases you selected.
3. Build the schedule, which lists the diseases it covered by it, the types of patients eligible for each vaccination type, and when the schedule is available for use.
Disease Management
Disease management is about indicating which diseases are managed by your practice, and which vaccines you have available to administer to combat each disease you select.
Once you have configured this list of diseases, you can add them to a schedule.
1. Locate and click ![]() at the lower-left.
at the lower-left.
2. Select the Settings option.

The Settings window appears.

3. Within the Clinical section, click  The Immunisation Schedule window appears.
4. Click  The Manage Disease content is displayed.
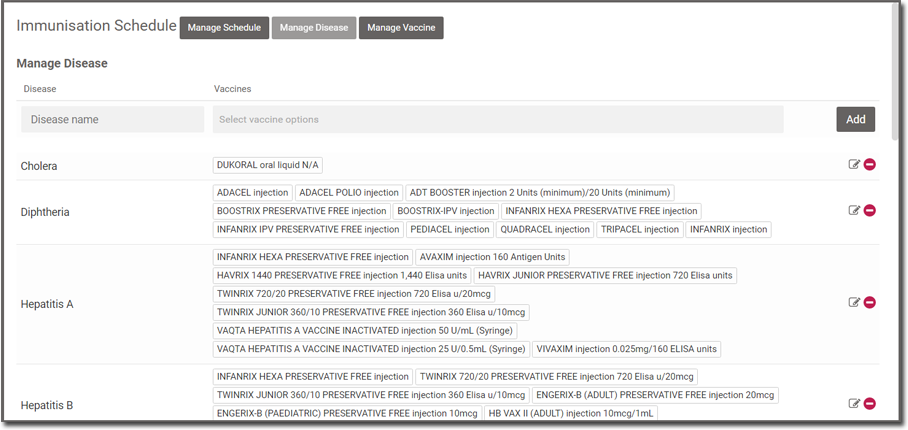
5. Begin by entering the name of the disease you wish to manage. In our example, we have entered "Japanese Encephalitis".

6. Within the Vaccines text box, begin typing the name of the first vaccine you want to associate with the disease. A list of matching vaccines is presented. Select the vaccine you want from the list.
7. Repeat Step 6 for each vaccine you want to associate with the selected disease.
o Include the vaccines for all states.
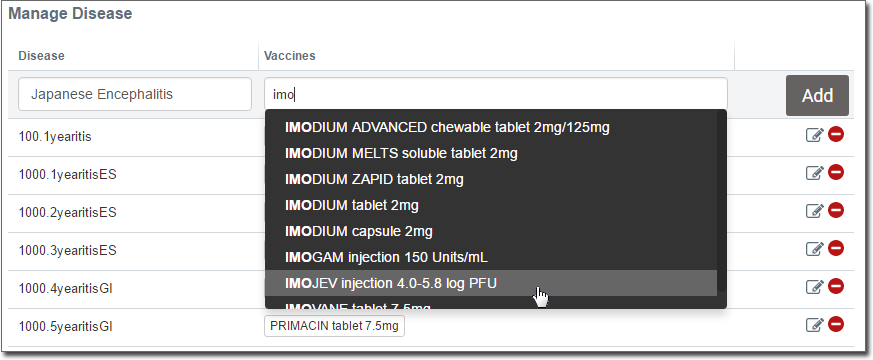
8. When you have added all the vaccines you want, click  to save the disease/vaccine combination to the list.
o You can edit this definition by clicking 
• A disease cannot be renamed if it has been used in a schedule.
o You can delete a definition by clicking 
• To delete an immunisation from the list, there should be no vaccines associated with the disease, and the entry must not have been used in a schedule.
Vaccine Management
The Manage Vaccine table is automatically populated with vaccines entered into the Manage Disease table.
1. Locate and click ![]() at the lower-left.
at the lower-left.
2. Select the Settings option.
The Settings window appears.
3. Within the Clinical section, click The Immunisation Schedule window appears.
4. Click  The Manage Vaccine content is displayed.
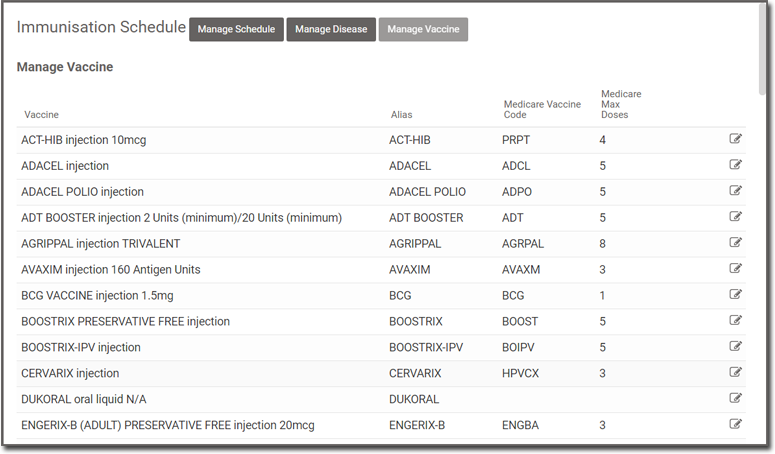
5. To update an Alias to reflect the Immunisations Schedule Input document, click associated with the Alias you wish to edit.
6. Enter the Medicare Vaccine Code and Medicare Max Doses if they exist for the vaccine.
o Do not remove any drug names from the Alias.

7. Click 
o If a vaccine is completely deleted from the Manage Disease table, it is also removed from the Manage Vaccine table.
o If the vaccine is added again to the Manage Disease tab, the Alias, Medicare Vaccine Code, and Medicare Max Doses must be added to the Manage Vaccine table again.
Schedule Management
This section provides instructions for;
Creating a New Schedule
Create an Immunisations Schedule only after you have configured its associated diseases and vaccines.
1. Locate and click ![]() at the lower-left.
at the lower-left.
2. Select the Settings option.
The Settings window appears.
3. Within the Clinical section, click The Immunisation Schedule window appears.
4. Click  The Manage Schedule content is displayed.

5. Enter the following;
o Schedule Name.
o Start Date (if known).
• The start date represents the date at which an active schedule becomes the current schedule across Helix. When you first create a schedule, it is in an 'inactive' state, and remains so until you activate it manually. Inactive schedules are not influenced by the start date you set here.
• The Start Date cannot be earlier than the current date.
• This date is not required when you first create the new schedule, but is required before you can activate it. You can edit the schedule later in order to record this date.
o Notes (as desired).

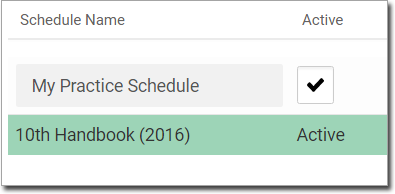
6. Click A new schedule is created with a default setting of Inactive (as shown below).

Editing a Schedule
Editing a schedule allows you to change its Name, Status, Start Date, and Notes only. This does not include managing a schedule's rules.
Note that you cannot edit an Active schedule. If you need to make changes to an active schedule, you can clone it instead, make changes to the clone, and then activate the clone.
1. Locate and click ![]() at the lower-left.
at the lower-left.
2. Select the Settings option.
The Settings window appears.
3. Within the Clinical section, click The Immunisation Schedule window appears.
4. Click The Manage Schedule content is displayed.
5. Locate the schedule you wish to edit, and click its associated button.
o Note that you cannot edit an Active schedule.
6. The schedule switches to edit-mode, at which time you can;
o Modify its name.
o Activate it (see Activating a Schedule for information).
o Modify its Start Date (the date at which an active schedule becomes the current schedule across Helix.).
o Modify its associated notes.

6. Click to save the changes.
1. Locate and click ![]() at the lower-left.
at the lower-left.
2. Select the Settings option.
The Settings window appears.
3. Within the Clinical section, click The Immunisation Schedule window appears.
4. Click The Manage Schedule content is displayed.
5. Locate the schedule you wish to add a rule for, and click it.
o Do not click as this button is reserved for editing the schedule.
![]()
5. To create a rule, use the following information as a guide;
|
Age From |
The age (expressed in weeks, months or years) at which the immunisation is considered due. When the patient reaches this age, you will be prompted that the immunisation is due. |
|
Age To |
The age at which the immunisation is no longer considered due, and shall no longer be prompted for. For example, if you set this value to "4 months", and your patient reaches 4 months of age, the prompt will not appear for them. |
|
Recurring |
Tick the associated check box to indicate that an immunisation can be administered multiple times within the specified age range. Then, indicate how often. For example, the following indicates that the vaccine can be administered every year during the Age From and Age To period: |
|
ATSI |
Tick the associated check box for immunisations that are specific to patients who identify as Aboriginal and/or Torres Strait Islander. |
|
Immunisations by State |
Select relevant vaccines for each state. |


6. Click  The rule is saved, and added to the list of rules for this schedule, located at the bottom of the panel.

o Click  to edit a rule.
o Click  to delete a rule.
7. Repeat steps 5 - 6 for every rule you wish to add to your scheduled.
8. Click  to return to the list of schedules.
Once a schedule has become Active, it cannot be edited. A workaround for this is to clone the schedule, and edit the clone. This may be necessary if Federal or State changes to the schedule require it, for example.
1. Locate and click ![]() at the lower-left.
at the lower-left.
2. Select the Settings option.
The Settings window appears.
3. Within the Clinical section, click The Immunisation Schedule window appears.
4. Click The Manage Schedule content is displayed.
5. Locate the schedule you wish to clone, and click  The clone is created.
o Its Name includes the suffix 'Copy'
o Its Notes field is automatically populated with a description of the clone.

6. You can now;
o Edit the cloned schedule, as you would any other inactive schedule.
• It is recommended that you rename it.
• Remember to check if the Start Date needs to be modified.
• Activate it if required.
o Manage Rules for the cloned schedule, as you would any other inactive schedule.
Activating a Schedule
What is an 'Active' Schedule?
Whilst it is possible to manage multiple Immunisation Schedules, only one of them can be in use, practice-wide, at any time. Furthermore, for a schedule to be in this state, the following must be true;
How to Activate a Schedule
o A schedule should not be made active until all its diseases, vaccines, and rules are added and completed.
o Once a schedule is set to active, editing of its associated diseases, vaccines, and rules is not permitted. However, you can clone the schedule, and modify the clone.
o You cannot activate a schedule if its Start Date matches the Start Date of another active schedule.
1. Locate and click ![]() at the lower-left.
at the lower-left.
2. Select the Settings option.
The Settings window appears.
3. Within the Clinical section, click The Immunisation Schedule window appears.
4. Click The Manage Schedule content is displayed.
5. Locate the schedule you wish to edit, and click
o Note that you cannot edit an Active schedule.
6. Locate and tick the Active check box.
7. Click to save the changes. This schedule becomes active.
o Note that although it is flagged as 'active', it will not actually become available for use during consultations until its Start Date has come to pass.