Before you can select a practitioner to schedule appointments for, you must first add them to the Appointments module - Pracsoft does not automatically populate the Appointments module with practitioners from your Pracsoft database.
![]()
There are two methods for adding practitioners to the Appointments module;
o By manually adding a practitioner to the list of practitioners available to the Appointments module - explained below.
o By
synchronising the Appointments module with
the Pracsoft database.
This method copies all registered practitioners
from the Pracsoft database to the list of practitioners available
to the Appointments module. This method ensures that any practitioners
you had added to the Appointments module manually
will be synchronised with (associated with) those in your MedicalDirector
Pracsoft database. Note that the synchronisation is one-way; practitioners
are copied from Pracsoft to the Appointments module, but not vice-versa.
Important Note: If you manually create
a practitioner (method 1) and do not
synchronise them with Pracsoft, and Pracsoft cannot
automatically find a matching practitioner in the Pracsoft database
(which it will attempt to do), patients you appoint these practitioners
may not be visible in the Waiting Room. Therefore, it is highly
recommended that if you create a practitioner manually, and if
you wish to use them within Pracsoft itself (not just the Appointment
module) you also add them to Pracsoft, and
then perform a synchronisation.
To Synchronise the Appointment Book
1. Open the Appointments module by either;
o Clicking
![]()
o Selecting Waiting Room > Appointment Book.
2. Select
Setup > Practitioners.
The Practitioner
Details window appears.
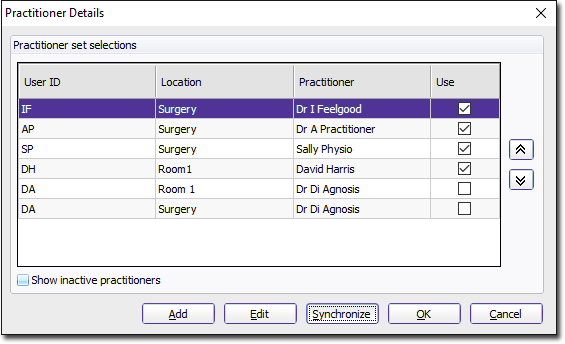
3. Click
 If
there are any registered practitioners in MedicalDirector Pracsoft
that are not currently available to
the Appointments module, you will be prompted to add them, as
shown below.
If
there are any registered practitioners in MedicalDirector Pracsoft
that are not currently available to
the Appointments module, you will be prompted to add them, as
shown below.

4. You
will be returned to the Practitioner Details window, where you
will now be able to see all the new practitioners you brought
over from MedicalDirector Pracsoft to the Appointments module.
5. To ensure these practitioners are visible to the Appointment Book, tick the Use check box.
6. Click
 to
close this window.
to
close this window.