You issue a Private Account, when the patient takes the account (invoice) with them. The following information explains the process of invoicing the patient for service items, for one or more visits.
1. Within the Waiting Room, select the patient's record, and either;
o Select Waiting Room > Record Visit,
o Press F5,
o Click  at the bottom of the Waiting Room window, or
o Right-click the patient's record and select Record Visit from the menu that appears.
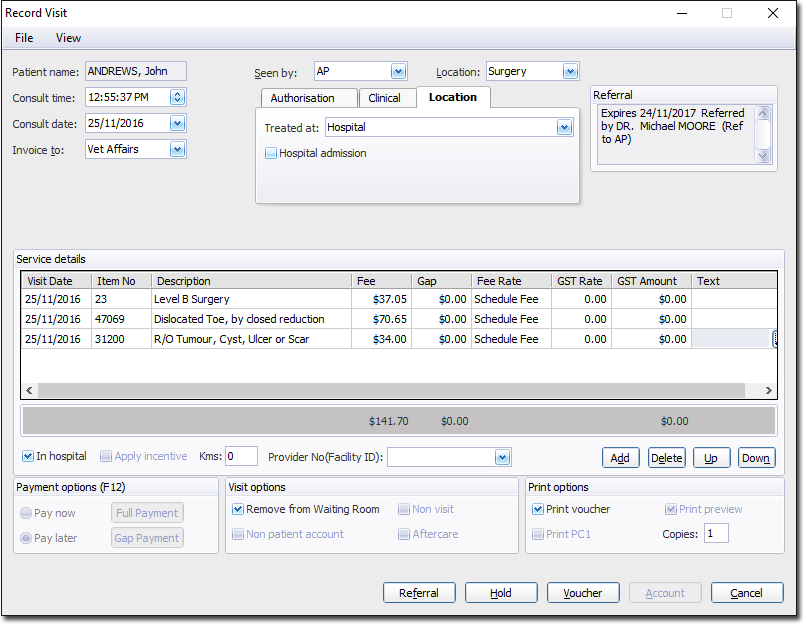
2. The Record Visit window appears.
3. If necessary;
o Select a practitioner from the Seen by Dr drop-down menu, to indicate which practitioner the patient saw during the consultation. A practitioner will be pre-selected if you already indicated which practitioner the patient was scheduled to see via the Appointment Book, or when you placed the patient into the Waiting Room.
o Select the referring Practitioner. If the Practitioner selected in the Seen By Dr. drop-down list is required to have a referral (as indicated in their Practitioner Details window), a Referral button will also be available at the bottom of this window. Click this button to select the referring practitioner for this patient.
o Select the location at which the consultation took place from the Location drop-down menu. You will have multiple locations to select from, only if you have setup the selected practitioner to be available to multiple locations.
o Modify the Consult Time and Date. By default, the date/time is recorded as that when you opened the Record Visit window. You can change this default to display the date/time of the appointment instead. This setting is available on the Patient tab of Global Options. Some caveats to using this option are;
• The 'Use selected appointment time when recording visit' option must be enabled (ticked).
• The patient must not already be in the Waiting Room.
• You must schedule the appointment for the patient.
• You must then select the appointment, and press CTRL + W to add them to the Waiting Room.
• If multiple patients are selected when recording visits, each patient’s consultation time will be set to the time of their own respective appointments.
• If a patient is placed directly in Waiting Room, the, default consultation time will be the current system time, regardless of whether you have the Use appointment times when recording visits option enabled.
4. As you are issuing a Vet Affairs account, select Vet Affairs from the Invoice To drop-down list. After selecting this option a new set of fields appears.

5. Complete selections for each of the Authorisation, Clinical and Location tabs as necessary. Note that all fields must be completed to process a DVA Paperless Claim with Online Claiming. Note also that if you select a location other than 'Rooms' (the default), extra fields will appear on the Record Visit window to allow you to record things such as the distance traveled and the Provider Number (Facility ID)
6. Add and/or Modify Service Details.
o If the practitioner entered Item Numbers during the consultation, the Service Details section will already contain these.
o If you are unsure of a service's item number, select File > Search Std Item List (or press Ctrl+S) to call a search window.
o Add service item text via the Text column for each item, if desired. Pracsoft provides a list of pre-defined examples (approved by Medicare), and you can create your own.
o A maximum of 14 Service Items (including Incentive Items) may be billed simultaneously. If you need to record further items, you must initiate another visit for the patient.
o Service Items can be selected and moved up/down the list via the Up/Down buttons. Re-order Service Items as necessary to comply with Medicare's processing rules. See Changing the Order of Service Items when Recording a Visit for more information.
7. (Optional) If on the Location tab in the Record Visit window you selected a site located external to your practice, you can record the number of kilometres travelled to proved the service. It is a requirement of some service items that this distance be recorded.
8. (Optional) Tick the In Hospital check box to indicate that the service was conducted in-hospital. Upon ticking this box a new drop-down list becomes available where you must select the Provider No (Facility ID).
9. (Optional) If on the Location tab you selected Hospital, you must also now indicate the Facility ID of the hospital you provided the service at.
10. Visit Options
o Indicate whether the patient is removed from the Waiting Room, via the Remove from Wait Room check box. The default is to remove them from the Waiting Room.
o The other options here are not available to Vet Affairs.
11. Print Options
o Indicate whether you want to print a voucher via the Print Voucher check box. You might disable this if for example you need to edit the voucher, or perhaps you have printed them a voucher already (on a blank DB4) and are now billing the patient.
o Indicate how many copies you wish to print.
12. Then, either;
o Click  to issue the voucher now, or
o Click Hold to hold the account. An account on hold can be processed at a later time.
13. After issuing a voucher, you must batch the vet affairs bulk claims. Once claims have been batched they can be sent to Medicare Australia as individual batches or as a group of batches.