This procedure applies to situations when the payer is not the patient.
1. Within the Waiting Room, select the patient's record, and either;
o Select Waiting Room > Record Visit,
o Press F5,
o Click Visit at the bottom of the Waiting Room window, or
o Right-click the patient's record and select Record Visit from the menu that appears.
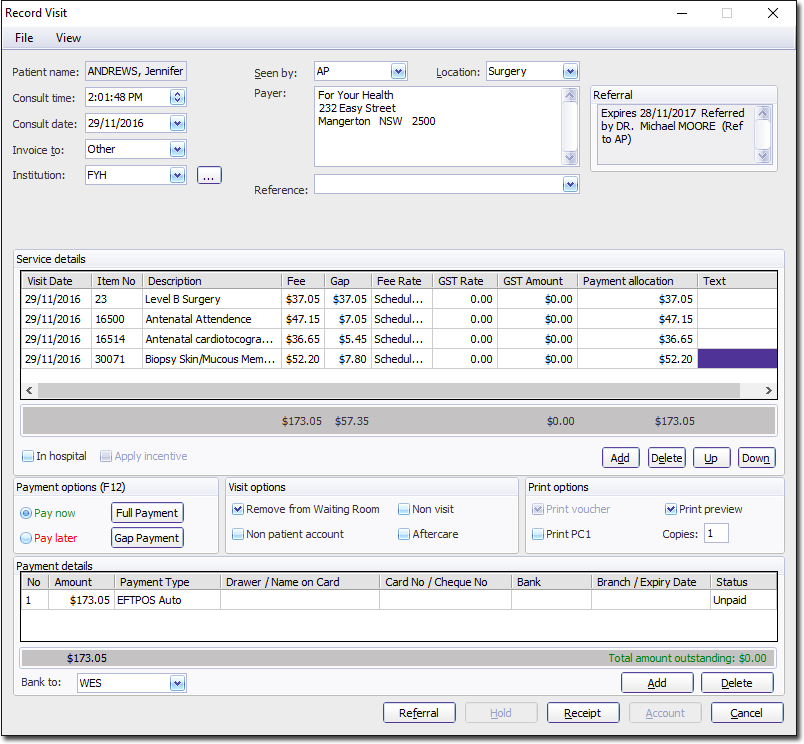
2. The Record Visit window appears.
3. If necessary;
o Select a practitioner from the Seen by Dr drop-down menu, to indicate which practitioner the patient saw during the consultation. A practitioner will be pre-selected if you already indicated which practitioner the patient was scheduled to see via the Appointment Book, or when you placed the patient into the Waiting Room.
o Select the referring Practitioner. If the Practitioner selected in the Seen By Dr. drop-down list is required to have a referral (as indicated in their Practitioner Details window), a Referral button will also be available at the bottom of this window. Click this button to select the referring practitioner for this patient.
o Select the location at which the consultation took place from the Location drop-down menu. You will have multiple locations to select from, only if you have setup the selected practitioner to be available to multiple locations.
o Modify the Consult Time and Date. By default, the date/time is recorded as that when you opened the Record Visit window. You can change this default to display the date/time of the appointment instead. This setting is available on the Patient tab of Global Options. Some caveats to using this option are;
• The 'Use selected appointment time when recording visit' option must be enabled (ticked).
• The patient must not already be in the Waiting Room.
• You must schedule the appointment for the patient.
• You must then select the appointment, and press CTRL + W to add them to the Waiting Room.
• If multiple patients are selected when recording visits, each patient’s consultation time will be set to the time of their own respective appointments.
• If a patient is placed directly in Waiting Room, the, default consultation time will be the current system time, regardless of whether you have the Use appointment times when recording visits option enabled.
4. Select Other from the Invoice To drop-down list. The Select Institutional Payer window appears.
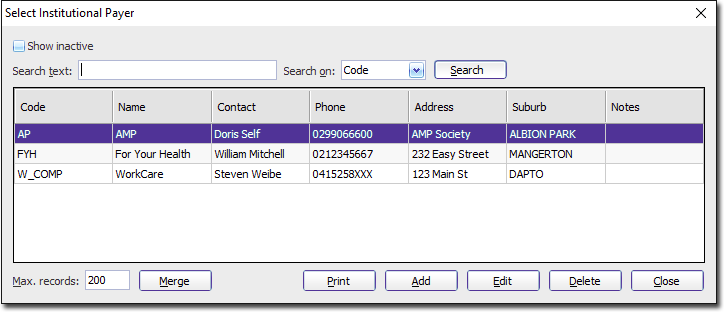
Select an Institutional Payer from those available, and then click Select to confirm. If you wish to select a different Institutional Payer later, simply remove them from the Institution text box on the Record Visit window, and click  to recall the Select Institutional payer window, where you can make another selection. If the Institutional Payer you wish to use is not available, you may need to create them first.
You can search for an Institutional Payer using the criteria at the top of this window.
5. Add and/or Modify Service Details.
o If the practitioner entered Item Numbers during the consultation, the Service Details section will already contain these.
o If you are unsure of a service's item number, select File > Search Std Item List (or press Ctrl+S) to call a search window.
o Add service item text via the Text column for each item, if desired. Pracsoft provides a list of pre-defined examples (approved by Medicare), and you can create your own.
o A maximum of 14 Service Items (including Incentive Items) may be billed simultaneously. If you need to record further items, you must initiate another visit for the patient.
o Service Items can be selected and moved up/down the list via the Up/Down buttons. Re-order Service Items as necessary to comply with Medicare's processing rules. See Changing the Order of Service Items when Recording a Visit for more information.
6. (Optional) Tick the In Hospital check box to indicate that the service was conducted in-hospital. Upon ticking this box a new drop-down list becomes available where you must select the Provider No (Facility ID).
7. Visit Options
o Indicate whether the patient is removed from the Waiting Room, via the Remove from Waiting Room check box. The default is to remove them from the Waiting Room.
o The other options here are not available to Bulk Bill.
8. Print Options
o Indicate whether you wish to view a print preview of the invoice before printing.
o Indicate how many copies you wish to print.
9. Select a payment option;
o Pay Now: After selecting this option, indicate whether the patient makes a Full Payment or Gap Payment by clicking one of the associated buttons. Indicate the payment type and bank account via the associated drop-down lists. Click Receipt to issue a receipt. See Payments and Payment Types for more information.
o Pay Later: After selecting this option, select whether to hold the account (by clicking Hold) or issue the account now (by clicking Account). You may wish to hold the account if the patient is scheduled for another appointment soon, say for example the patient is having pathology tests done and will return for the results, paying later.
The amount outstanding is displayed to the bottom-right of the Payment Details section, as shown in the example above;
-
If an amount is still owed after payments have been made, the owed amount is displayed in red.
-
If the amount owed is paid in full, a balance of $0.00 is displayed in green.
-
If an overpayment has been made, the amount in credit is displayed in green.