SUMMARY:
This report lists all Receipt adjustments, which occurred within the period between the 'From:' and 'To:' dates specified below. It is useful as a reference to see what adjustments have been made within a specified date range.
REPORT OUTPUT:
For each adjustment, the report details:
o Date Adjusted: The date on which the adjustment was entered;
o Receipt Number: The Receipt ID of the receipt that was adjusted;
o Amount: The dollar amount of the receipt that was adjusted (GST exclusive);
o GST: The dollar amount of GST that was included in the adjusted receipt;
o Payment Type: The payment type, eg Cash, Cheque and so forth, that was included in the adjusted receipt;
o Drawer: The payer of the adjusted receipt;
o Transaction Type: The type of adjustment;
o Explanation: The reason that was recorded by the user when entering the adjustment;
o Date Receipted: The date on which the receipt was originally entered; and
o User ID: The ID of the user who entered the adjustment.
DATE SELECTION:
This report can only be based on Report Date. Report Date is a value that cannot be modified, ensuring integrity of the report. That is, if you print the report for a given date range today, and then print it again in twelve months' time, for the same date range, then the two versions of the report will be identical, no matter what reversals may be applied to the receipt in future reporting periods. In terms of this report, the term 'Report Date' refers to the date of entry of the receipt.
To Reconcile the Report |
|
Columns on this Report |
Reconcile Against Report Columns |
Receipt Adjustments Report
|
Accounting Summary Report
|
To Generate a Receipt Adjustments Report
1. Select Reports > All Reports. The Pracsoft Reports window appears.
2. Within the Report Type section, select Receipts.
3. Within
the Report Name section,
select Receipt Adjustments.
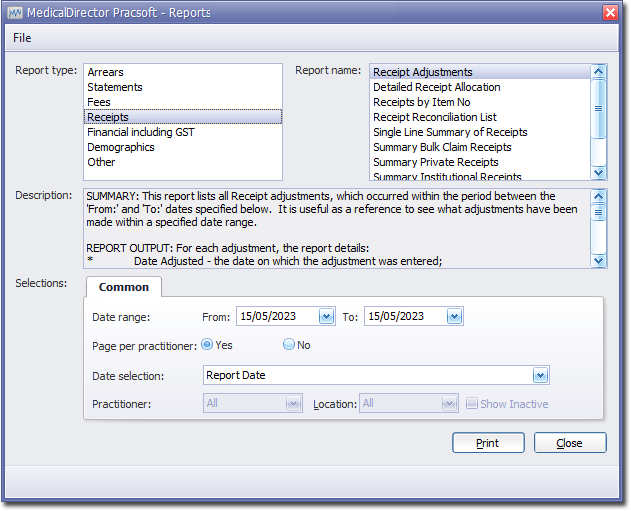
4. Select the Common tab:
o Enter a Date Range for the report.
o Indicate whether results for each practitioner will be printed on separate pages.
o Via the Date Selection drop-down menu, indicate in which order you wish the results displayed.
o Indicate which practitioner/s and location/s you wish to limit the report to.
5. Click Print when you are ready to proceed.