Creating Credit Accounts
1. Select
Admin > Fees.
The Fee Listing
window appears.

2. Click
 A
new row appears within the Fee Listing window (as shown above),
allowing you to create a customised fee
item, as shown above.
A
new row appears within the Fee Listing window (as shown above),
allowing you to create a customised fee
item, as shown above.
o In the Item No column for the new fee, enter the text 'credit'.
o In the Description column for the new fee, enter a description along the lines of 'This is the credited amount for future services'.
o Leave the remaining fields.
3. Click

4. You
will be prompted to save the changes. Click  to confirm. The Fee Listing window will close.
Using a Credit Amount During a Visit
1. When
recording
a visit for the patient or institution,
enter the service item number as 'credit', and the amount paid
as a negative value.

Select to pay the account later, and then save as an Account, giving
the patient a credit of $100 (displayed as -$100).
2. When the patient returns and is actually billed for the service, you record the visit as normal, billed as an Account. Next, you allocate the patient's credit balance to the fees they have outstanding, as explained following.
3. Select
Accounts > Receipts/Payments.
The Payment/Receipts
window appears.
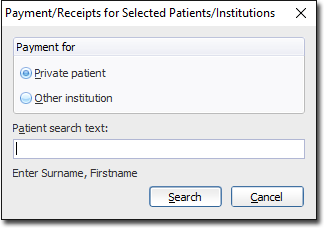
4. Via the Payment For option, indicate whether you wish to search for Private Patient accounts or Institutional accounts.
5. Enter either;
o The patient's name, or
o The institution's 'Payer Code' (or part thereof)
6. Click
Search If
an exact match is not found the following window appears, allowing
you to search for a match. The following example is for Institutional
Payers.
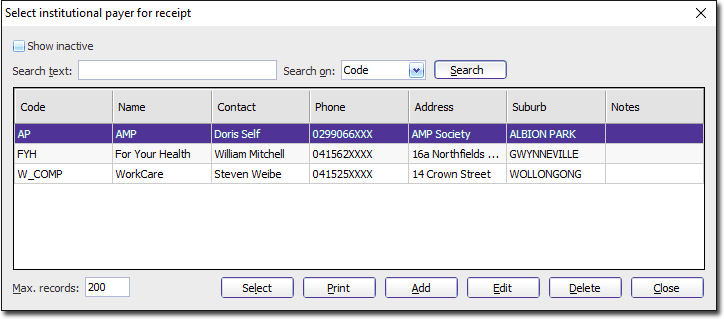
Once you have located the correct patient/institution, click Select
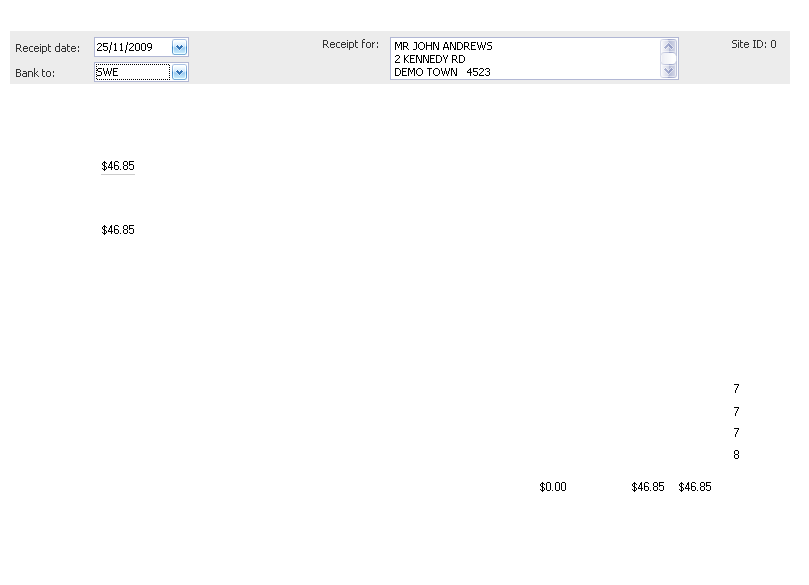
7. The
Receipt window
appears.
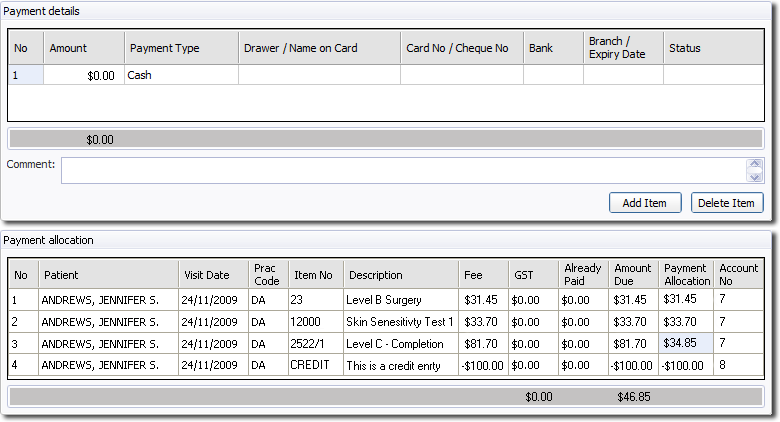
In the example above there are four entries in the Payment Allocation
section; three service items with fees due, and one item of $100
credit. Notice also that Pracsoft assumes that the patient wishes
to use the entirety of their credit to pay all of their outstanding
fees, and in the example above Pracsoft has determined that after
applying the available credit to the fees due, the patient will
need to pay an outstanding balance of $46.85 (indicated in the
Payment Details section). However, it is not compulsory to use
the entirety of the available credit at this time, as explained
following.
8. Make payments using the available credit;
o If the amount of credit equals the total due, the amount showing in the Payment Details section will show as $0.00. In this case, if the patient wishes to use all their credit in this instance, simply click the Receipt button to issue the receipt.
o If the amount of credit is less than the total due and the patient wishes to pay the balance today, simply enter the payment amount(s) into the Payment Details section, as if you were preparing a normal receipt.
o If the amount of credit is less than the total due, but the patient does not wish to pay the balance today, manually adjust the Payment Allocation amount for a selected fee, until the value in the Payment Details section equals $0.00 (which indicates the patient pays nothing today).
In the following example, credit has been applied to the first two fee items (to pay them in full), with the third item being manually applied a payment equivalent to the remainder of credit after the first two items were paid, i.e. $34.85 [$100 (total available credit) minus $65.15 (item 1 + item 2)].
Then, simply click Receipt to issue a receipt for this
account. In the example above the patient would still owe the
practice $46.85 (as shown at the bottom of the Payment Allocation
section), which they can pay at a later date.
o If the amount of credit is more than the total due, manually adjust the value in the Payment Allocation field for the credit entry, until the amount showing in the Payment Details section shows $0.00.
In the following example, the patient has credit of $100, and owes $33.70 in fees. Upon opening the Receipt window, the value at the Payment Allocation field for the credit entry would have read -$100. This value has then been manually modified until it matches the amount necessary to pay the fee items owed, entered as a negative value (in this case, -$33.70).
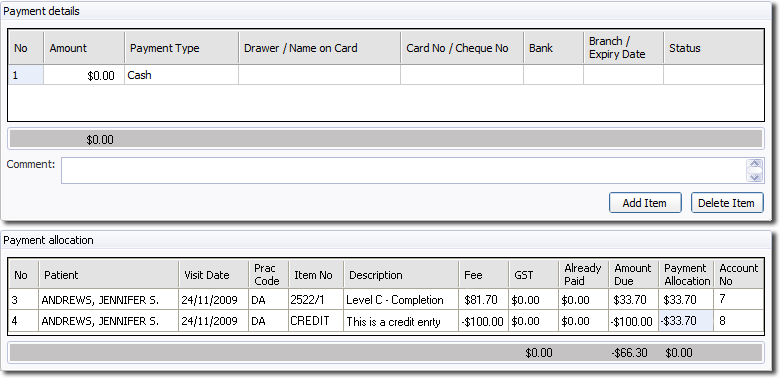
Then, if necessary double-click the Amount field in the Payment
Details section (to refresh it). The value should now read $0.00,
to indicate that the patient needs to pay nothing. Then, simply
click  to issue a receipt for this account.