About My Health Record
My Health Record (previously known as the Personally Controlled Electronic Health Record, or 'PCEHR') is an Australian Government initiative to allow patient information to be accessed securely online, making it easier to share information between healthcare professionals. Further information is available at https://myhealthrecord.gov.au/.
Clinical is compatible with the My Health Record system, allowing you to view Clinical Document Architecture (CDA) documentation that was created for the patient at another Practice (for example), as well as giving you the means to add your own patient documentation to the System, which can then be accessed by other clinicians.
Documents managed via My Health Record are done so securely, and your Practice will require HI Signing and HI Encryption Certificates, as well as the My Health Record Certificate itself to access the System. These can be obtained via https://myhealthrecord.gov.au/ after registering. Furthermore, patients who register can elect to secure their medical records with a password. Clinicians will then require this password in order to access their patient's records from the My Health Record System.
About the My Health Record Assisted Registration Tool
The My Health Record Assisted Registration tool provides you with the means to help your patients register for an eHealth record at your practice, asserting their identity, and then uploading their application electronically. If successful, the patient will be registered almost immediately, and you can begin uploading clinical information straight away via MedicalDirector Clinical.
It is recommended you are familiar with the guidebook 'Assisted Registration: a guide for Healthcare Provider Organisations', available here.
Before You Begin
o It is recommended you are familiar with the guidebook 'Assisted Registration: a guide for Healthcare Provider Organisations', available here.
o It is recommended you are familiar with My Health Record and its configuration and usage of in Clinical. Information is available from within the Clinical Help, and online at http://medicaldirector.com/gp+cl+ehealth/resources
The Practice HPI-O number must be recorded within Clinical via Tools > Options > Practice tab.
The HI Encryption Certificate must be imported within Clinical via Tools > Options > PKI tab.
The HI Signing Certificate must be imported within Clinical via Tools > Options > PKI tab.
The My Health Record Certificate must be imported within Clinical via Tools > Options > PKI tab.
For each user in Clinical, indicate whether or not they have permission to access the My Health Record Assisted Registration tool - within the user's record in Clinical, tick the My Health Record Assisted Registration check box to grant permission to the tool.
See 'Editing Practitioners / Nurse Practitioners' in the MedicalDirector Clinical Help for further information.
Registering Adult Patients with the My Health Record System
The following information describes running the Assisted Registration tool from within the MedicalDirector Maintenance Suite. You can also access the tool;
o Via a shortcut on your desktop 
Via the Windows Start Menu > All Programs > MedicalDirector > MyHealthRecord ART
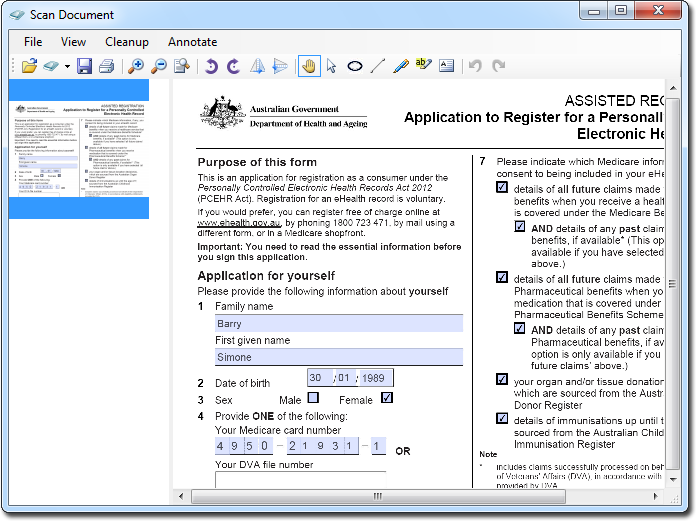
1. Ensure that your patient has completed and signed the hard-copy form, 'ASSISTED REGISTRATION: Application to Register for a Personally Controlled Electronic Health Record', available here.
2. Locate and double-click the MedicalDirector Maintenance icon ![]() from your desktop. The MedicalDirector Maintenance window appears.
from your desktop. The MedicalDirector Maintenance window appears.
3. Select the Database Tasks > Clinical menu item.
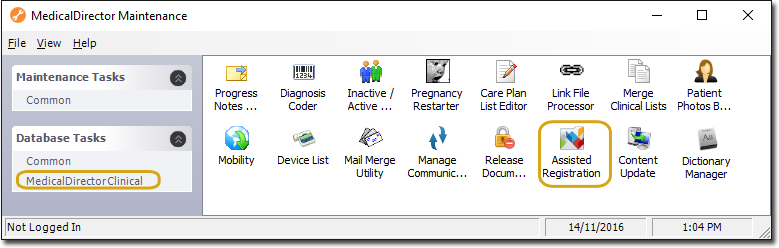
4. Double-click ![]()
(Optional) If this is the first time you have tried to access the Assisted Registration tool during this session of working in MedicalDirector Maintenance, you will be prompted to select a Configuration, and enter your Username and Password.
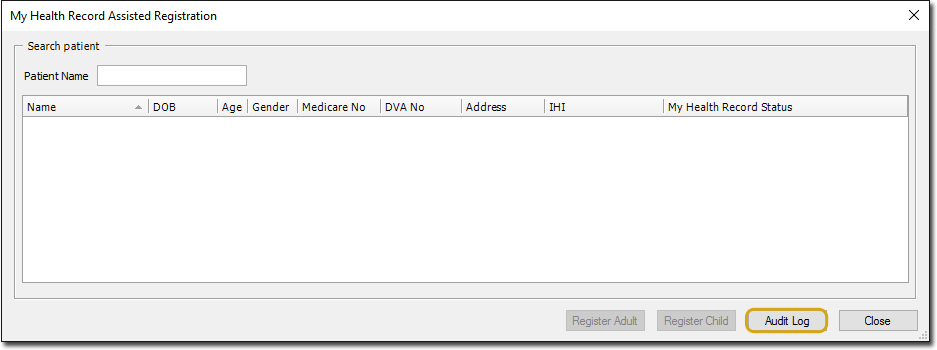
5. The My Health Record Assisted Registration window appears. Search for the patient you wish to register with the My Health Record system. As you begin typing, the list of patients is populated dynamically.
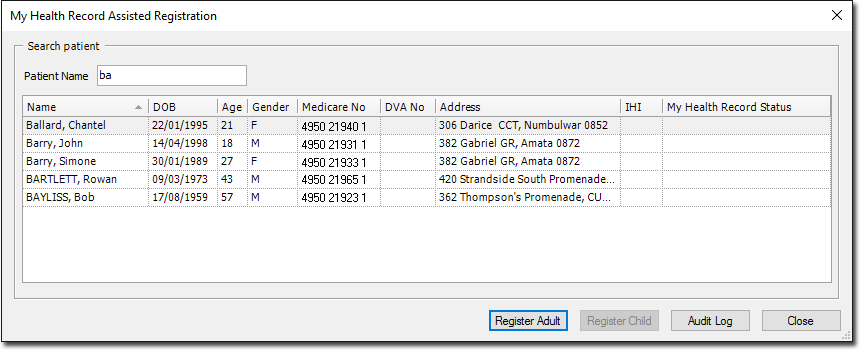
6. Locate and select the patient you wish to register, and then click 
7. The My Health Record Assisted Registration form appears.
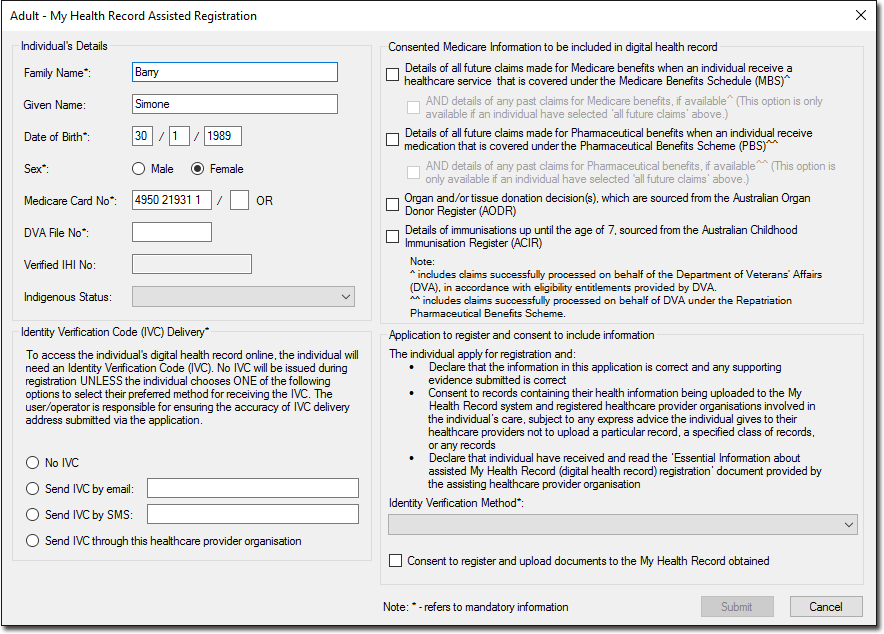
Use the following table as a guide to completing this form.
|
Section |
Description |
|
o Family Name Given Name Date of Birth Sex Medicare Card number (including individual reference number) or DVA number |
|
|
o No IVC Send IVC by email Send IVC by SMS Send IVC through this healthcare provider organisation |
|
|
o All new (and optionally past) MBS information be made available via the My Health Record system All new (and optionally past) PBS information be made available via the My Health Record system All AODR information be made available via the My Health Record system All ACIR information be made available via the My Health Record system |
|
|
o Indicate how the patient's identity has been verified by you by selecting an option from the drop-down list provided. Verify that your patient has signed the hard-copy registration form by ticking the Application Form Signed check box. • If you wish to scan the hardcopy registration form, do so now using your scanning software, and then continue to Step 7. |
• If you wish to import the hard-copy registration form instead, close the scanning software. You will be presented with the Scan Document window with which you can import the document. Continue afterwards to Step 7.
For detailed information about using Clinical's 'Scan Document' window, see Scanning Documents and/or Importing Documents within the Clinical Help.
7. If at Step 6 you chose to import or scan your patient's hardcopy registration form, continue now to Step 8. Otherwise, continue to Step 9.
8. After scanning/importing your patient's hardcopy registration form, click  on the Scan Document window. The document will be saved to the patient's record, available via the Documents tab with a default Subject of My Health Record Assisted Registration' and Description of 'Signed Assisted Registration Form'.
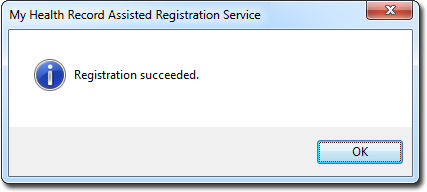
9. On the My Health Record Assisted Registration form, click  to submit the registration request. You will be notified upon successful registration. This message will vary depending on the Identity Verification Code (IVC) delivery method you selected at Step 6.
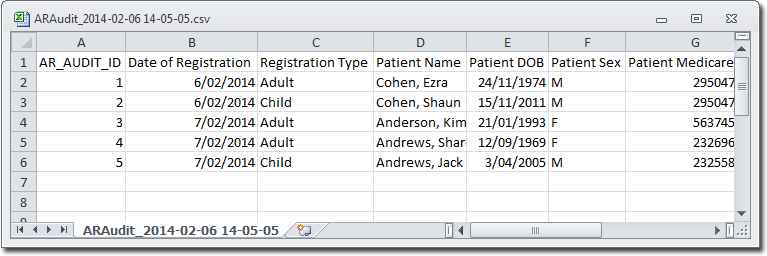
Audit Log
A log of assisted registrations is available by clicking  on the My Health Record Assisted Registration window.
Click this button to generate the Audit Log, at which time you will be prompted to save the .CSV log file to a location of your choosing. The following example shows an Audit Log file opened with Microsoft Excel.