Inserting a Table
1. Within your letter, position the cursor where the table is to be inserted.
2. Select Table > Insert > Table. The Insert Table window appears.
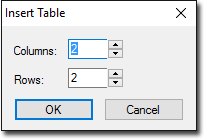
3. Select the number of columns and rows for your table. You can always add or remove columns and rows later.
4. Click OK to confirm your selections and create the table.
Modifying Tables
Resizing Tables
Table columns can be widened or narrowed by using the mouse. This is achieved by dragging the columns borders horizontally to suit. Rows will automatically resize to fit their contents.
Adding Columns or Rows
1. Place your insert point into the cell next to which you wish to add a column or row.
2. Select Table > Insert > ...
3. ...and one of the following options;
o Column to the Left (of your insert point)
o Column to the Right (of your insert point)
o Row Above (your insert point)
o Row Below (your insert point)
4. The column or row is added to your table. Note that it is not possible to add multiple columns or rows simultaneously.
Delete Columns, Rows, or Entire Tables
1. Select the column(s) or row(s) you wish to delete. If you wish to delete the entire table, simply click your insert point anywhere in the table.
2. Select Table > Delete > ...
3. ...and one of the following options;
o Table (deletes the entire table)
o Columns (deletes the selected columns)
o Rows (deletes the selected columns).
Formatting Tables
1. Select the cells you wish to format.
2. (Optional)For text and paragraph formatting within a cell, see Formatting Text and Formatting Paragraphs respectively.
3. (Optional)To format the table structure, select Table > Properties. The Table Properties window appears.
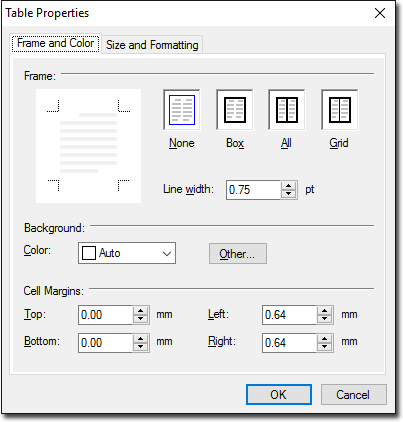
4. Make adjustments to the format from the following options, as desired;
o Frame: By default ,although you can see the table cells on your letter, they are not printed. This feature adds a printed border to selected cells. To create a printable border, first select enter a Line Width, and then click within the thumbnail preview (the Frame section on the Table Properties window) to apply each border. The example above shows that a 1.5pt line has been applied to the upper and left borders of the cell. Note that you cannot change the border colour.
o Background: By default, each cell has no background colour. To change the background of selected cells, select a colour from the standard 16-colour Windows palette drop-down menu, or click  to select from a 48 colour palette or create your own custom colour.
o Vertical Alignment: This is the vertical alignment of the contents of each selected cell.
o Text Distances: This is the spacing between each cell border and its contents.
Working with Tables
Moving within a Table
The mouse and keyboard can be used to move between cells within a table;
o Clicking within a table cell moves the insert point to that cell.
o To move between cells using the keyboard use the arrows keys, TAB keys or SHIFT+TAB keys.
Selecting Table Content
The mouse and keyboard can be used to select cells within a table and text within cells;
o Click and drag the mouse over the table to select the cells, or hold the SHIFT key and use the arrow keys to extend a selection.
Viewing Grid Lines
Grid lines are displayed on the window only to assist in document layout. They are not printed. To hide or display the grid lines of all tables in a letter select Table > Grid Lines from the menu bar. This menu option is ticked when active. If lines need to be printed refer to formatting, above.