Access to Options is provided via user permissions.
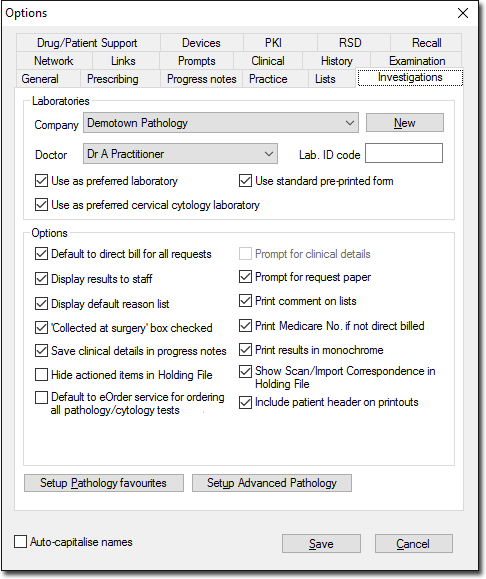
Laboratories
The Laboratories section contains settings specific to each laboratory within the Company drop-down menu. To change these settings for a given company, select a valid company name. If the company is not listed, click New to add one to your Address Book. Consider also that you must enter a valid company alias.
o Unless otherwise arranged, Investigations requests and results your practice sends and receives are flagged as being for the practice. However, you can organise with your Laboratory to have requests and results associated with specific practitioners. To do this, select a practitioner from the Doctor drop-down menu, and then enter a unique code for that practitioner in the Lab ID Code text box. It is recommended that you consult your laboratory to arrange the Lab ID code for each practitioner, as each laboratory might have a naming convention they prefer to use.
o One laboratory can be flagged as the default for all Pathology Requests by selecting the laboratory from the Company drop-down menu, and then ticking the Use as Preferred Laboratory check box. If you select a SDS-based laboratory as your default, you will be able to access eOrders for requesting tests electronically.
o One laboratory can be flagged as the default for all Cervical Cytology Requests by selecting the laboratory from the Company drop-down menu, and then ticking the Use as Preferred Cervical Cytology Laboratory check box. This can be the same laboratory as your default for Pathology Requests, or it can be a different one. If you select a SDS-based laboratory as your default, you will be able to access eOrders for requesting tests electronically.
o Tick the Use Standard Pre-Printed Form check box to print requests onto forms supplied by your laboratory. Removing the tick from this box will print the same request data, but include the name of the laboratory from your Company drop-down menu (it is assumed that paper supplied by the laboratory includes the company name).
If after printing a request onto a supplied form, you find the printed text doesn't line-up correctly on the form, you can make adjustments to the printout via Clinical Print Options.
Other Check Boxes |
|
Default to Direct Bill All Requests |
|
Display Results to Staff |
|
Display Default Reason List |
|
Collect At Surgery Box Checked (Healthlinks.net) |
|
Save Clinical Details in Progress Notes |
|
Hide Actioned Items in Holding File |
|
Prompt for Clinical Details |
|
Prompt for Request Paper |
|
Print Comment On Lists |
|
Print Medicare Number if Not Direct Billed |
|
Print Results in Monochrome |
|
Show Scan/Import Correspondence in Holding File |
|
Hide actioned items in the Holding File |
|
Include Patient Header on Printouts |
|
Default to eOrder service for ordering all pathology/cytology tests |
|
Pathology Favourites
When recording a Pathology Request,
the upper section of the default Pathology Request Portal window
displays your 10 most-frequently used pathology requests. This
list is not dynamically-generated, and must be defined by you
in advance using the Pathology Favourites window, as shown following.
To record your Pathology Favourites:
1. Click
the  button.
2. The
Pathology Favourites
window appears.
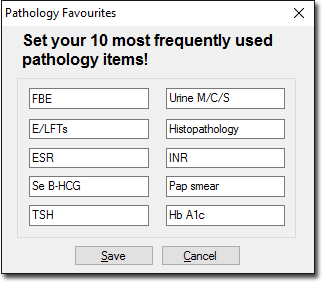
3. Remove a current entry by highlighting it and pressing the DELETE key on your keyboard.
4. Type the new pathology request you want to appear in the favourites list.
5. Click Save to confirm your entry.
Setup Provider Requests
To send and receive Investigations Request data electronically, you must configure Clinical with the correct settings for each of the laboratories you correspond with. See Managing Communications for detailed information.