See also: Documents
Which Workflow Meets the Needs of your Practice?
Consider which of the following scenarios apply to your practice.
|
|
|
Via the Patient’s Clinical Window |
|
|
|
|
|
|
|
Via the Holding File |
Workflow 1 - Via the Scan/Import Correspondence Window
(store to the patient's record)
The Scan/Import Correspondence Windows is available to all users.
1. Log into
Clinical as any user, select File
> Scan/Import Correspondence. The Scan/Import
Correspondence window appears. When opening this window,
the default view is filtered to display only those items scanned
or imported by the user currently logged into Clinical. To display
items scanned/imported by all users, click the ![]() button.
button.

Please see Scan/Import
Correspondence Window for detailed information about this
window.
2. Choose whether to import or scan a document by clicking the associated button in the upper tool bar;
o If you choose to import a document, you will be asked to select a document to import. Skip to Step. 6.
o If you choose to scan a document, the scanning utility will appear. Continue now to Step 3.
3. If
you have chosen to perform a scan, your third-party scanning software
will be called upon. It is with this software you perform the
scan, after which you will be returned to Clinical and presented
with the Scan Document window.
![]()
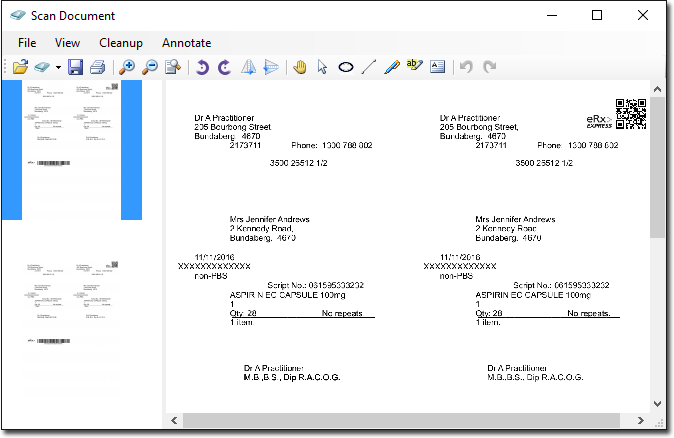
4. Upon
completing the scan you will be able to see a preview of the scan
you have conducted, along with all the other scans you have added
to this document. Each thumbnail on the left-hand side of this
window represents a page that you have either scanned or imported
into this document. The example below shows that the current document
consists of two scanned pages. From here you can delete pages,
rearrange pages, and add annotations.
Please see Scanning Documents
for more information about this window.
5. Click
the  button to save the current document.
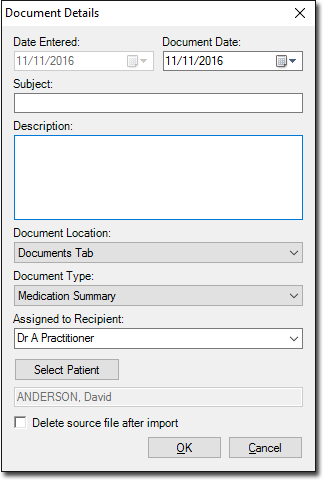
6. The
Document Details window
appears. Enter details as desired. It is advisable to associate
this document with a patient, and assign it to a recipient at
this time also.
7. Click the OK button to confirm and save the information. You will be returned to the Save/Import Correspondence Window.
This concludes the steps for scanning/importing documents into the Scan/Import Correspondence window. Documents added to Clinical in this way will appear within the Holding File, ready to be actioned by a recipient, after which they will be removed from both windows, and stored within the patient’s record.
Workflow 2 – Via the Patient’s Clinical Window
This method is not available to users with ‘Basic’ access.
1. Within
the patient’s Clinical Window,
select either of the Correspondence,
Results, Letters,
or Documents tabs. You can import/scan
from any of these tabs, and then move the resulting document between
tabs if you wish. As the Correspondence tab displays a culmination
of documents from other tabs, it will be used for the remainder
of this example workflow.
Please see Correspondence Tab
for detailed information about this window.
2. Choose whether to import or scan a document by clicking the associated button in the upper tool bar;
o If you choose to import a document, you will be asked to browse to and select a document to import. Skip to Step. 6.
o If you choose to scan a document, the scanning utility will appear. Continue now to Step 3.
3. If
you have chosen to perform a scan, your third-party scanning software
will be called upon. It is with this software you perform the
scan, after which you will be returned to Clinical and presented
with the Scan Document window.
![]()
4. You
will be able to see a preview of the scan you have conducted,
along with all the other scans you have added to this document.
Each thumbnail on the left-hand side of this window represents
a page that you have either scanned or imported into this document.
The example below shows that the current document consists of
two scanned pages. From here you can delete pages, rearrange pages,
and add annotations.
Please see Scanning Documents
for more information about this window.
5. Click
the
button to save the current document.
6. The
Document Details window
appears. Enter details as desired. The Subject and Document Type
is required information. As you have scanned/imported this document
within a specific patient’s record, it is assumed that it belongs
to this patient, and as such they will be selected by default,
as shown in the following image. You can always associate it with
another patient if you wish. It is advisable to assign this document
to a recipient at this time also.
7. Click the OK button to confirm and save the information. You will be returned to the Clinical Record.
This concludes the steps for scanning/importing documents directly to the patient’s record.
Workflow 3 – Via the Scan/Import Correspondence Window
(store to the Holding File - Manual Transfer)
This workflow assumes you have the Show Scan/Import Correspondence in Holding File option un-ticked. This option is available via Investigations options.
The Scan/Import Correspondence window is available to all users.
1. Log into
Clinical as any user, select File
> Scan/Import Correspondence. The Scan/Import
Correspondence window appears. When opening this window,
the default view is filtered to display only those items scanned
or imported by the user currently logged into Clinical. To display
items scanned/imported by all users, click the ![]() button.
button.
Please see Scan/Import
Correspondence Window for detailed information about this
window.
2. Choose whether to import or scan a document by clicking the associated button in the upper tool bar;
o If you choose to import a document, you will be asked to select a document to import. Skip to Step. 6.
o If you choose to scan a document, the scanning utility will appear. Continue now to Step 3.
3. If
you have chosen to perform a scan, your third-party scanning software
will be called upon. It is with this software you perform the
scan, after which you will be returned to Clinical and presented
with the Scan Document window.
![]()
4. Upon
completing the scan you will be able to see a preview of the scan
you have conducted, along with all the other scans you have added
to this document. Each thumbnail on the left-hand side of this
window represents a page that you have either scanned or imported
into this document. The example below shows that the current document
consists of two scanned pages. From here you can delete pages,
rearrange pages, and add annotations.
Please see Scanning Documents
for more information about this window.
5. Click
the
button to save the current document.
6. The
Document Details window
appears. Enter details as desired. It is advisable to associate
this document with a patient, and assign it to a recipient at
this time also.
7. Click the OK button to confirm and save the information. You will be returned to the Save/Import Correspondence Window, where the new record is now available.
8. With
the current result selected, click the  button. The result is removed from the Scan/Import
Correspondence window and placed within the Holding
File ready for the recipient to action it.
button. The result is removed from the Scan/Import
Correspondence window and placed within the Holding
File ready for the recipient to action it.
This concludes the steps for scanning/importing result into the Scan/Import Correspondence window. Results added to Clinical in this way will appear within the Holding File, ready to be actioned by a recipient, after which they will be removed from both windows, and stored within the patient’s record.
Workflow 4 – Via the Scan/Import Correspondence Window
(store to the Holding File - Automatic Transfer)
This workflow assumes you have the Show Scan/Import Correspondence in Holding File option ticked. This option is available via Investigations options.
The Scan/Import Correspondence window is available to all users.
1. Log into
Clinical as any user, select File
> Scan/Import Correspondence. The Scan/Import
Correspondence window appears. When opening this window,
the default view is filtered to display only those items scanned
or imported by the user currently logged into Clinical. To display
items scanned/imported by all users, click the ![]() button.
button.
Please see Scan/Import
Correspondence Window for detailed information about this
window.
2. Choose whether to import or scan a document by clicking the associated button in the upper tool bar;
o If you choose to import a document, you will be asked to select a document to import. Skip to Step. 6.
o If you choose to scan a document, the scanning utility will appear. Continue now to Step 3.
3. If
you have chosen to perform a scan, your third-party scanning software
will be called upon. It is with this software you perform the
scan, after which you will be returned to Clinical and presented
with the Scan Document window.
![]()
4. Upon
completing the scan you will be able to see a preview of the scan
you have conducted, along with all the other scans you have added
to this document. Each thumbnail on the left-hand side of this
window represents a page that you have either scanned or imported
into this document. The example below shows that the current document
consists of two scanned pages. From here you can delete pages,
rearrange pages, and add annotations.
Please see Scanning Documents
for more information about this window.
5. Click
the
button to save the current document.
6. The
Document Details window
appears. Enter details as desired. It is advisable to associate
this document with a patient, and assign it to a recipient at
this time also.
7. Click the OK button to confirm and save the information. You will be returned to the Save/Import Correspondence Window. Note that this record will also be visible in the Holding File.
8. With
the current result selected, click the button. The result is removed from the Scan/Import
Correspondence window and placed within the Holding
File ready for the recipient to action it.
This concludes the steps for scanning/importing result into the Scan/Import Correspondence window. Results added to Clinical in this way will appear within the Holding File, ready to be actioned by a recipient , after which they will be removed from both windows, and stored within the patient’s record.
Workflow 5 – Via the Holding File
This is accessible to practitioners and users with Full Access where the ‘Display Results to Staff’ Investigations option is enabled.
1. Log into
Clinical as a practitioner, select Correspondence
> Check Holding File. You will be prompted to select
one or more recipients whose results you wish to examine.
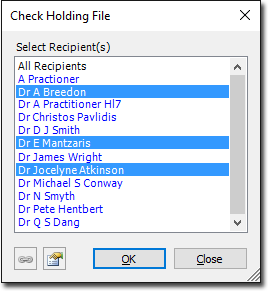
2. From this window select the recipient(s) whose results you wish to examine:
o Select a single recipient by clicking their name, and then clicking the OK button to open the Holding File to display only their results. Alternatively you can double-click a name to select them and open the Holding File.
o Select multiple recipients by clicking each name. To deselect a name, simply click it again. Then, click the OK button to open the Holding File to display only the results of the selected recipients.
o Select
all recipients by clicking the All
Practitioners option. Clicking the OK
button then opens the Holding File to display results for all
recipients. Alternatively you can double-click the All
Practitioners option to simultaneously select all recipients
and open the Holding File.
Note that, as making a selection from this window locks the results
associated with the selected recipient, it is recommended that
you select only a specific recipient, as selecting All Practitioner
will prevent others from accessing any results whilst you have
the Holding File open.
3. You
will be presented with the Holding
File.

4. Choose whether to import or scan a document by clicking the associated button in the upper tool bar;
o If you choose to import a document, you will be asked to select a document to import. Skip to Step 7.
o If you choose to scan a document, the scanning utility will appear. Continue now to Step 5.
5. If
you choose to perform a scan, your third-party scanning software
will be called upon. It is with this software you perform the
scan, after which you will be returned to Clinical and the Scan
Document window.
![]()
6. Upon
completing the scan, you will be able to see a preview of the
scan you have conducted, along with all the other scans you have
added to this document. Each thumbnail on the left-hand side of
this window represents a page that you have either scanned or
imported into this document. The example below shows that the
current document consists of two scanned pages. From here you
can delete pages, rearrange pages, and add annotations.
Please see Scanning Documents
for more information about this window.
7. Click
the
button to save the current document. The Document
Details window appears. Enter details as desired. It is
advisable to associate this document with a patient, and assign
it to a recipient at this time also.
8. Click the OK button to confirm and save the information. You will be returned to the Holding File.
This concludes the steps for scanning/importing documents into the Holding File.
From within the Holding File, you can now;
o Associate a selected record with a different patient.
o Assign a selected record to a different recipient.
o Modify a document’s details.
o Action results/records.
o Add Recalls.
o Indicate on which tab within the Clinical Window a selected document should reside once saved to the patient’s record.
o View the digital signature (if available) associated with any selected document.
o View an audit trail of modifications made to a selected record.
Please see The Holding File for further information.