There are a number of ways you can prescribe medications, all of which can only be performed from within a patient's Clinical Window:
- Select the Current
Rx tab and then to add a new item, click
 or press F3 or
right-click within the current medications list and select
New Item from the menu. The Select Drug window appears. Proceed
to Step 1 below, or
or press F3 or
right-click within the current medications list and select
New Item from the menu. The Select Drug window appears. Proceed
to Step 1 below, or - To back-date a script, select the Current
Rx tab and then to add a new item, enter the 'Script Date'
as required at the bottom of the Current Rx tab, click or press F3 or right-click within the current
medications list and select New Item from the menu. The Select
Drug window appears. Proceed to Step 1 below, or
- Prescribe from your Drug
Favourites list (should you have any favourites saved),
by clicking
 in the toolbar. The Select Drug window appears. Proceed to
Step 1 below, or
in the toolbar. The Select Drug window appears. Proceed to
Step 1 below, or - Select a medication from within MDref. Within in MDref, highlight the item
you wish to prescribe and then click
 at the bottom-left of the MDref Explorer window. The Enter
Dose window appears. Proceed to Step 2 below, or
at the bottom-left of the MDref Explorer window. The Enter
Dose window appears. Proceed to Step 2 below, or
1. The Select
Drug window appears.
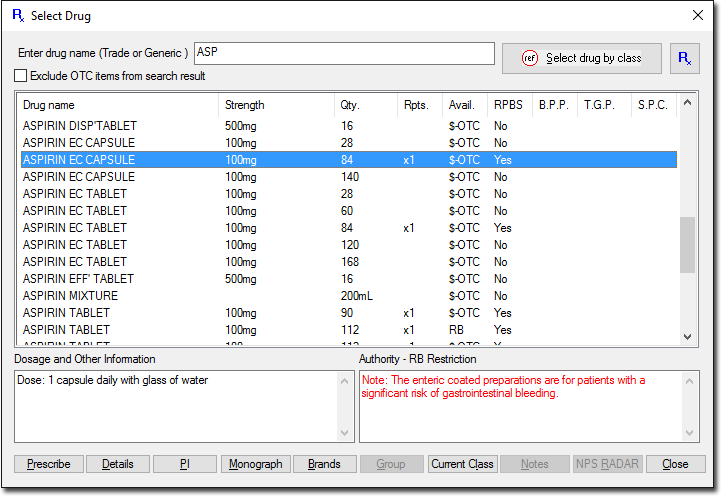
Select an item by either:
o Typing
the name of the medication into the Enter Drug Name text box (you
need only type the first few letters for a search to commence),
and double-clicking the drug or selecting the drug and clicking
o Accessing
the MDref Class Browser by clicking  and
selecting a drug from there
and
selecting a drug from there
o Displaying
your favourites list by clicking
on the Select Drug window, and selecting
a drug from the list that appears
• PBS - Pharmaceutical Benefits Scheme
• RPBS - Restricted Pharmaceutical Benefits Scheme
• B.P.P. - Brand Price Premium
• T.G.P. - Therapeutic Group Premium
• S.P.C. - Special Patient Contribution
2. (Optional) You can further filter the list of medications by:
o Ticking the Exclude OTC... check box to refresh the medications list to hide Over-The-Counter medications,
o Clicking
 to show generically equivalent brand names
with the same strength as the highlighted item,
to show generically equivalent brand names
with the same strength as the highlighted item,
o Clicking
 to display all members of the Therapeutic
Group to which the selected medication belongs. This button is
only available to medications that belong to a Therapeutic Group,
to display all members of the Therapeutic
Group to which the selected medication belongs. This button is
only available to medications that belong to a Therapeutic Group,
o Clicking
 to display all items
from MDref that are in the same
therapeutic class as the highlighted item.
to display all items
from MDref that are in the same
therapeutic class as the highlighted item.
o Right-clicking a medication, and selecting the 'Single and Multi-Ingredient Products' option, which allows you to see other medications that contain at least one of the same ingredients of the selected medication. See Single and Multi-Ingredient Products for more information.
3. Click
to prescribe your medication of choice.
4. (Optional) Once you have selected the medication, you may be notified of any possible drug interactions.
5. (Optional)
If you have an existing Limited Prescription for this patient,
a prompt is displayed. Select the most suitable option for your
patient to continue.
o  - Updates the Script date to today's date.
o  - Changes the prescription to a regular prescription.
o  - Updates the script record to mark this script
as completed.
- Updates the script record to mark this script
as completed.
o  - Removes the script from the Current Rx tab.
o  - Ignores the prompt. This prompt will appear again
next time you access this Patient's Clinical Record.
- Ignores the prompt. This prompt will appear again
next time you access this Patient's Clinical Record.
6. The
Enter Dose window appears. It is within this window that you record
data about the dosage of the medication you are prescribing. You
can also access Product Information
about the medication via 
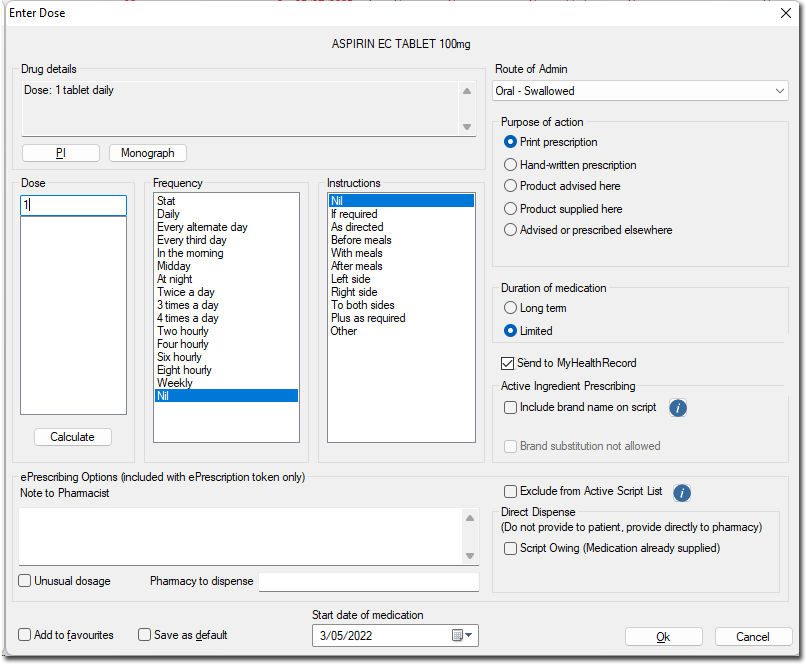
7. Set the dosage (using the Dose Calculator if desired).
8. Select a frequency.
9. Indicate instructions as required, from either the list provided or by using stored text from the MedicalDirector Clinical Glossary.
10. Choose a Route of Administration from the list provided.
11. Select one of the Purpose of Action options, including:
o Product Advised here. Allows you to recommend a medication that does not require a script to be printed, such as cough syrup.
o Product Supplied here. Allows you to administer a medication without printing a script. For example, you may wish to administer a medication that you stock at your practice.
12. Select the Duration of Medication; Long Term or Limited. The default is Limited, which can be altered via Prescribing Options.
13. Long Term. Allows you to prescribe an on-going medication. When the medication runs out it is assumed it will be renewed (e.g. insulin injections for diabetes). Long Term medications remain on the Current Rx tab until manually deleted.
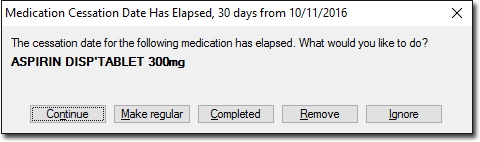
14. Limited. Allows you to issue the prescription for once-off or limited duration medication (e.g. cough medicine). Limited medications remain on the Current Rx tab even when the estimated duration expires, at which time a prompt will notify you of the cessation upon opening the patient's record.
15. (Optional)
Tick the MyHealthRecord Consent check box to indicate that you
have the patient's consent to add details of this prescribed medication
to the patient's My Health Record
record. An indication of the patient's consent is displayed under
the MyHealthRecord Consent column on the Current
Rx tab.
This check box is only available if the following conditions have
been met;
o You have enabled My Health Record
o You
have enabled ePrescribing
This check box is ticked by default, unless the patient has set
their record privacy to 'non-advertised' via the My Health Record
consumer portal (a check for this setting is made upon opening
the patient's record in MedicalDirector Clinical). If during the
consultation the patient changes their mind, and grants consent
to upload a given medication to their My Health Record, you can
tick this check box now. Under such circumstances, patient consent
must be granted per medication i.e. this check box will be un-ticked
for subsequent medications until such a time as the patient logs
onto the consumer portal and changes their record privacy.
Scripts approved for uploading to the My Health Record System in
this manner are transferred when you print the script.
16. (Optional) Tick the Include Brand Name on Script check box if you wish to print the medication's associate brand name on the script. See Active Ingredient Prescribing for more information.
17. (Optional) Tick the Brand Substitution Not Allowed check box if required.
18. (Optional) Tick the Exclude from Active Script check box
19. (Optional) Tick the Script Owing check box to print a QR code to fax/email the pharmacy directly, instead of handing to the patient.
20. (Optional)
Tick the Add to Favourites check box to add the drug to a favourites
list, which is accessible when prescribing via
21. (Optional) Ticking the Save as Default check box saves the dosage, instructions and duration so they are available next time the drug is selected.
22. Record the start date of the medication. The default date is the current date.
23. Click
 when you are ready to continue.
24. (Optional) If the medication is an Authority Item you will be prompted accordingly. See Authority Items for further information.
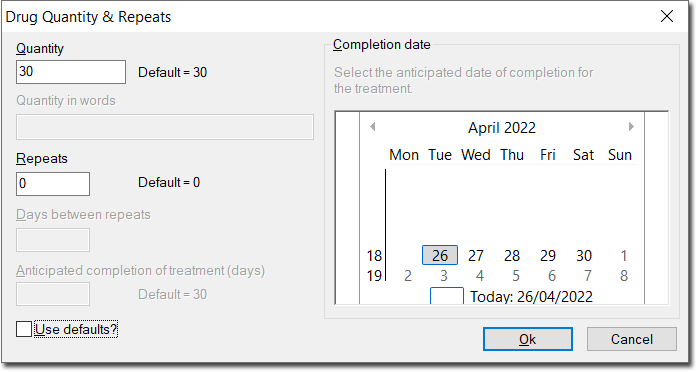
25. You
will be prompted to confirm the drug
quantity and repeats. Modify if necessary and click to continue.
This prompt will differ slightly, depending on whether you are
prescribing a limited or regular medication. It is possible to
disable the prompt for regular medications via Prescribing
Options.
26. (Optional) If you are prescribing a PBS/RPBS Restricted Benefit medication, you will be prompted accordingly. See PBS/RPBS Restricted Benefit Medications for further information.
27. The Reason for Medication window appears, prompting you to record a reason for the medication. This is optional, so if you wish not to record a reason click Close
o See also the Diagnosis Coder.
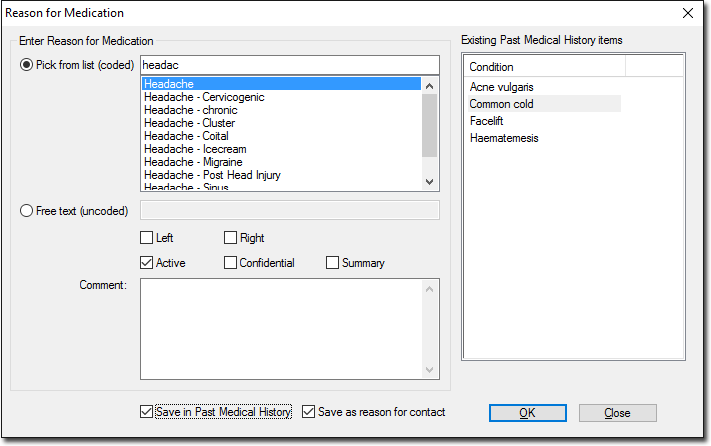
If you choose to enter a reason, either;
o Pick a hard-coded reason by typing the first few letters of the reason into the Pick from List (Coded) text box, and then selecting the reason from those that appear in the corresponding list, or
o Enter a custom reason by selecting the Free Text (Uncoded) option and then typing the reason into the corresponding text box, or
o Select an existing reason from the Existing Past Medical History Items list.
o The following options are also available from this window:
• Save in Past Medical History check box. Ticking this check box will save the Reason for Medication to the patient's Past History tab. Enabling this check box also makes available the Active, Confidential and Summary check boxes.
• Save as Reason for Contact check box. Ticking the Save as Reason for Contact check box will add a corresponding note to the patient's Progress Notes.
• Left and Right check boxes. The Left and Right check boxes allow items to be marked as either on the left side of the body, right side of the body or by ticking both, bilateral.
• Active check box. Ticking this check box will save the Reason for Prescription to the patient's Past History tab and flag it as an active condition.
• Confidential check box. Ticking the Confidential check box prevents the item from being printed on letters, Pathology/Radiology requests, or in printed history summaries for the patient's chart. It is provided so that sensitive items (e.g. termination of pregnancy) will not appear on a referral for an eye examination, for example.
• Summary check box. The Summary check box allows items to be marked as summary items. They will appear on printed summaries and on letters/request forms (provided they have not been marked as Confidential). If not marked as a summary item, the item will appear on-screen, but will not appear on any printed output. This prevents the printed summaries, letters and request forms from becoming too lengthy with relatively trivial entries i.e. only items of significant importance in the patient's Past History should be marked as Summary items.
28. Click
when you are ready to continue.
29. The Select Drug window reappears, awaiting further prescriptions (this functionality can be disabled via Prescribing Options).
o Proceed with the prescribing of further items if you wish, or click Close to cease.
o Prescriptions that you have added now appear within the patient's Current Medications List (Current Rx tab), and are flagged as ready for printing.
30. Print scripts as required.
The following table lists the script codes available |
|