In Clinical, you update a recall when you want to;
o Complete (end) a once-only recall, or
o Complete (end) the current instance of a recurring recall, after which a new instance of it is created automatically. An example of this is an annual health assessment, where you wish the patient to be recalled annually; a recurring recall is created, and upon the patient's first return visit, the recall is marked as completed, after which the system automatically generates a new recall, scheduled for the same period (i.e. due in a year's time, in this example).
Updating Recalls from within the Patient's Record
In the following example, a patient has returned to our practice for his annual diabetes review after receiving our recall notification. We now wish to mark this recall instance as completed, and generate a new recall, for next year's diabetes review.
1. Select Clinical > Recall. The Recall Items window displayed.
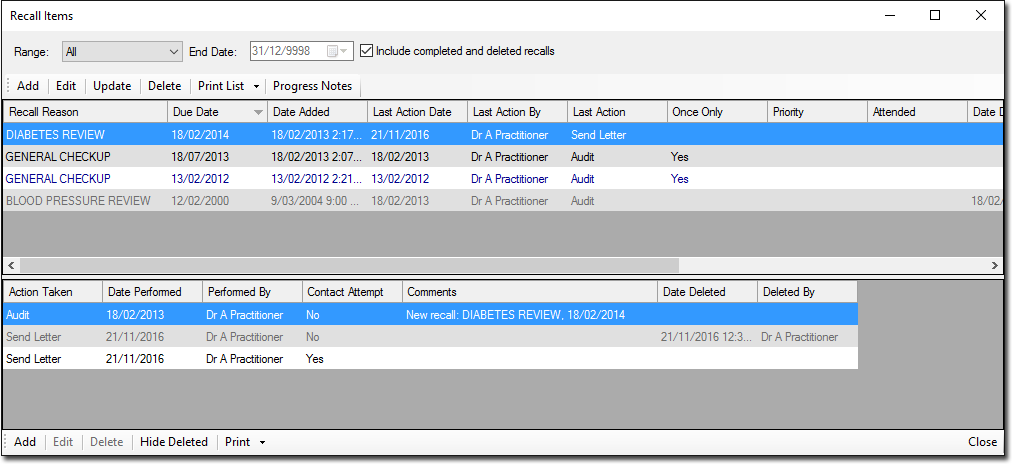
2. Select the recall you wish to update.
In the example above, we have selected the patient's Diabetes Review. In this instance is it a recurring recall - the patient has returned for their review, and as such we need to mark this recall as completed, after which a new Diabetes Review recall will be generated automatically for us.
3. Click Update. The Update Recalls window appears. Notice in this example that the window indicates we have selected 1 Recurring recall to update.
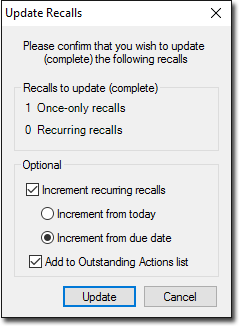
4. Optionally;
o Tick the Increment Recurring Recalls check box. This will automatically generate a new recall for each selected recurring recall. Then, indicate whether you want to;
• Increment from today: Regardless of when a recall's next due date was going to fall, it is calculated from today, instead.
• Increment from due date: The recall's next due date occurs as per its pre-defined schedule.
o Tick the Add to Outstanding Actions List check box. An Outstanding Action is simply a reminder notice about the patient that appears on-screen upon opening the patient's record. See Outstanding Actions for more information.
5. Click  to confirm your selections. You will be prompted that the update was successful. If you elected to increment the recurring recall, a new recall will now appear within the patient's Recall Items window.
Updating Recalls via the Search Recalls Module
1. From the Clinical main screen, select Search > Recall.
2. MedicalDirector Clinical's list of Recalls opens, and you are automatically prompted to select criteria for conducting a search of upcoming recalls, using the Recall Search Criteria window. See Recall Searches for information on key features of this window.
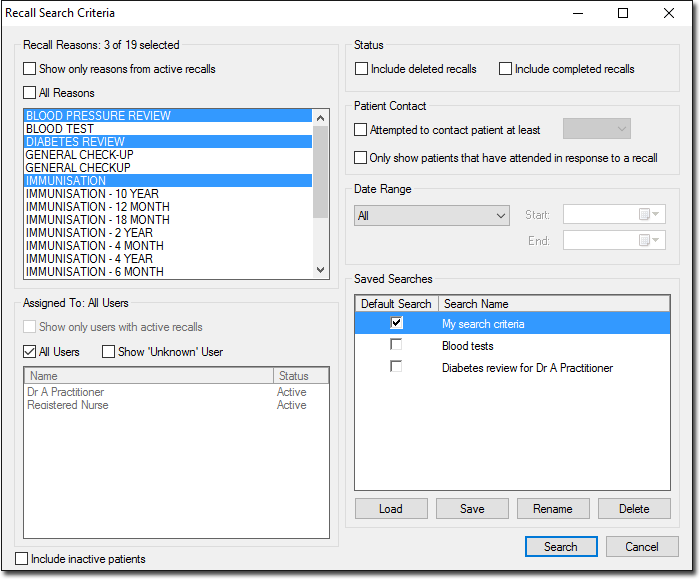
3. Enter the criteria you wish to search for. Click  when you are ready to conduct the search.
4. The Search Recalls list becomes populated with your search results. See Recall Searches for information on key features of this window.
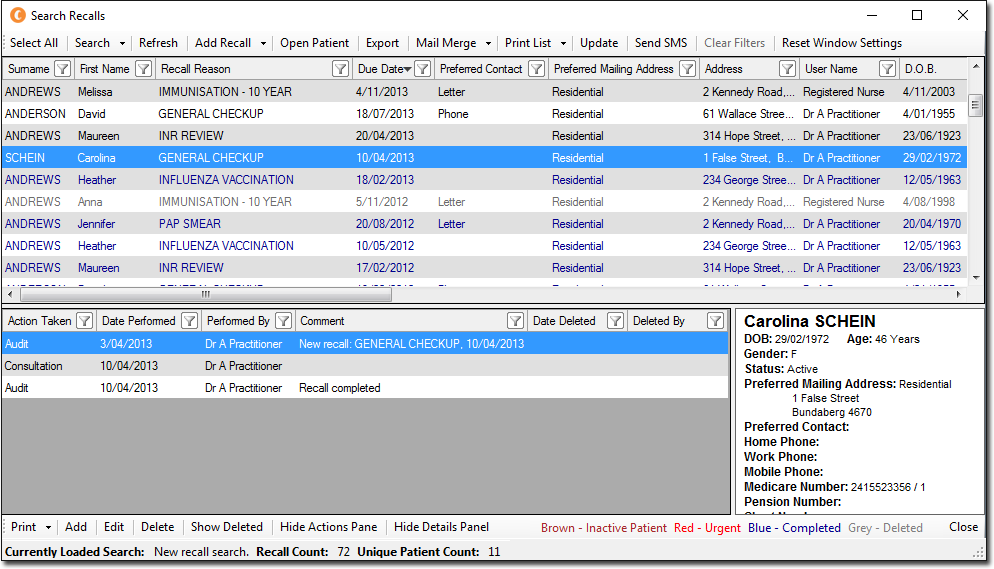
5. Select one or more recalls to update, and then either;
o Click Mail Merge to conduct a Mail Merge for the selected recalls. Continue now to Step 6.
o Click Print List to print the list of selected recalls. Continue now to Step 6.
o Click Update. Continue now to Step 7.
6. After conducting one of the above, the Update Recalls window appears. Notice in this example that the window indicates we have 1 Recurring recall selected to update. Indicate that you do wish to update (complete) these recalls, by selected the associated option.
Optionally;
o Tick the Increment Recurring Recalls check box. This will automatically generate a new recall for each selected recurring recall. Then, indicate whether you want to;
• Increment from today. Regardless of when a recall's next due date was going to fall, it is calculated from today, instead.
• Increment from due date: The recall's next due date occurs as per its pre-defined schedule.
o Tick the Add to Outstanding Actions List check box. An Outstanding Action is simply a reminder notice about the patient that appears on-screen upon opening the patient's record. See Outstanding Actions for more information.

7. After conducting one of the above, the Update Recalls window appears. Notice in this example that the window indicates we have 1 Recurring recall selected to update.
o Tick the Increment Recurring Recalls check box. This will automatically generate a new recall for each selected recurring recall. Then, indicate whether you want to;
• Increment from today. Regardless of when a recall's next due date was going to fall, it is calculated from today, instead.
• Increment from due date: The recall's next due date occurs as per its pre-defined schedule.
o Tick the Add to Outstanding Actions List check box. An Outstanding Action is simply a reminder notice about the patient that appears on-screen upon opening the patient's record. See Outstanding Actions for more information.
9. Click OK / to confirm your selections. You will be prompted that the update was successful.