Adding Recalls via the Search Recalls Module
You might use this method if you wanted to generate a list of patients with due recalls, so that you could mark the recalls as completed, and then generate a new set of recalls for the same set of patients, en masse. Whilst this method can be used for managing the recalls of an individual patient, it is not recommended - this is best performed via the patient's record.
If you wish to generate recalls for a group of patients, and you are unsure as to whether any of them have a current recall, you can do this via the Patient Search module, as explained below.
1. Select
Search > Recall. MedicalDirector
Clinical's list of Recalls opens, and
you are automatically prompted to select criteria for conducting
a search of upcoming recalls, using the Recall
Search Criteria window.
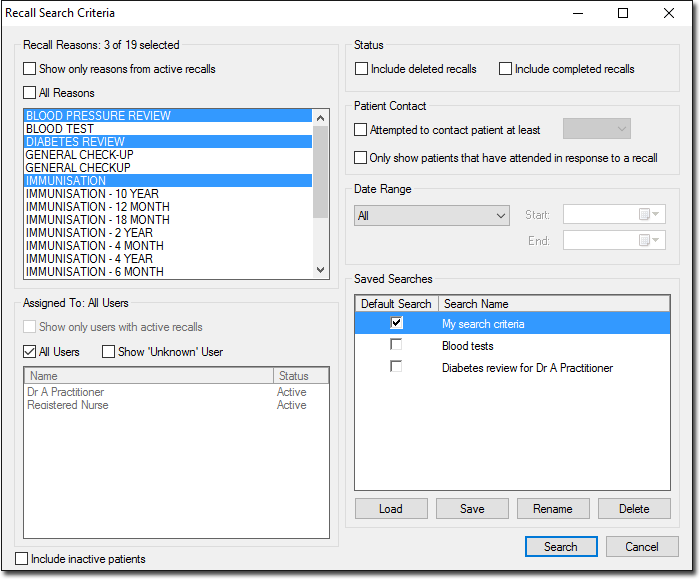
2. Conduct a search for recalls.
The purpose of conducting this search is to
gain access to the  button on the search results window, and this button is only
available if there are actual results present. If after conducting
a search, you find that the criteria you selected presented
0 results, simply conduct a new search, and modify the criteria
as necessary.
button on the search results window, and this button is only
available if there are actual results present. If after conducting
a search, you find that the criteria you selected presented
0 results, simply conduct a new search, and modify the criteria
as necessary.
The Search Recalls list becomes populated with your search results. Proceed directly to Step 3.
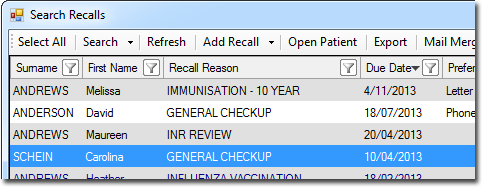
3. Select the patients you wish to generate a new recall for.
4. Click Add Recall. The Add Recall: Multiple Patients Selected window appears. If you have selected a single patient record, this window would read 'Add Recall'.
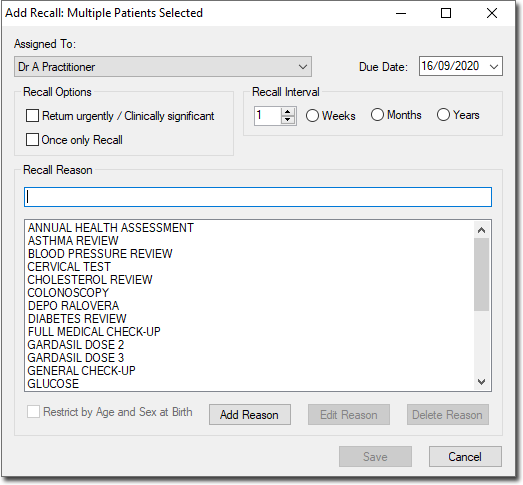
5. Specify the criteria for the Recall you wish to create.
o Indicate the Practitioner/User the Recall is being created on behalf of. The practitioner/user currently logged in is selected by default. For non-clinical users, this item is initially left blank.
o Indicate the reason for the Recall. You can select a reason from the list provided, or you can add a new reason to the list. Tick th Restrict by Age and Sex at Birth to show only reasons suitable for the age and/or sex at birth of the selected patient (only available if you have selected a single patient record). If you select a reason from the list, its schedule settings are loaded for you automatically. You can modify these if you wish, and such modifications will not affect the reason definition, nor will they affect any Recalls already saved.
o If there are no suitable Recall reasons in the list, you can create one from here.
o Indicate whether this is a once-only Recall, or a recurring Recall. For recurring Recalls, you must also indicate the interval between Recall visits.
o Indicate the Recall date;
• For once-off Recalls, this is the date on which you wish the patient to return to the practice.
• For recurring recalls, this is the date on which you wish the first return visit to occur.
6. Click Save to add the Recall to the record of each selected patient.
Adding Recalls via the Patient Search Module
Use this method if you want to generate recalls for a group of patients, en masse. This method is not suitable for managing the recalls of an individual patient - this is best performed via the patient's record.
Note that if your intention is to locate patients who already have recalls recorded against their record, specifically so you can update (complete) these recalls, and perhaps generate new recalls for the group of patients, use the Search Recalls module instead, as explained above.
This method assumes you have an understanding of how the Patient Search module works.
1. From the Clinical front screen, select Search > Patient. The Patient Search module appears.
2. Conduct a search for the patients you wish to generate a recall for.
3. Locate
and click the Add Recall
button at the bottom of the search results. The Add
Recall: Multiple Patients Selected window appears.
4. Specify the criteria for the Recall you wish to create.
o Indicate the Practitioner/User the Recall is being created on behalf of. The practitioner/user currently logged in is selected by default. For non-clinical users, this item is initially left blank.
o Indicate the reason for the Recall. You can select a reason from the list provided, or you can add a new reason to the list. Tick Restrict by Age and Sex at Birth to show only reasons suitable for the age and/or sex at birth of the selected patient (only available if you have selected a single patient record). If you select a reason from the list, its schedule settings are loaded for you automatically. You can modify these if you wish, and such modifications will not affect the reason definition, nor will they affect any Recalls already saved.
o If there are no suitable Recall reasons in the list, you can create one from here.
o Indicate whether this is a once-only Recall, or a recurring Recall. For recurring Recalls, you must also indicate the interval between Recall visits.
o Indicate the Recall date;
• For once-off Recalls, this is the date on which you wish the patient to return to the practice.
• For recurring recalls, this is the date on which you wish the first return visit to occur.
5. Click Save to add the Recall to the record of each selected patient.
Adding Recalls via the Patient's Record
1. Select Clinical > Recall. The Recall Items window displayed.
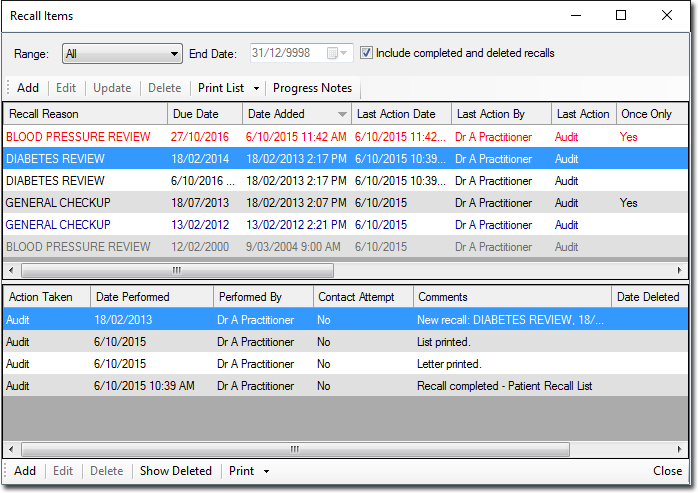
2. Click Add The Add Recall window appears.
3. Specify the criteria for the Recall you wish to create;
o Indicate the Practitioner/User the Recall is being created on behalf of. The practitioner/user currently logged in is selected by default. For non-clinical users, this item is initially left blank.
o Indicate the Recall due date;
• For once-off Recalls, this is the date on which you wish the patient to return to the practice.
• For recurring recalls, this is the date on which you wish the first return visit to occur.
o Indicate whether the patient is to return urgently and/or there is clinical significance to the recall.
o Indicate whether this is a once-only Recall, or a recurring Recall. For recurring Recalls, you must also indicate the interval between Recall visits.
o Indicate the reason for the Recall. You can select a reason from the list provided, or you can add a new reason to the list. Tick Restrict by Age and Sex at Birth to show only reasons suitable for the age and/or sex at birth of the selected patient. If you select a reason from the list, its schedule settings are loaded for you automatically. You can modify these if you wish, and such modifications will not affect the reason definition, nor will they affect any Recalls already saved.
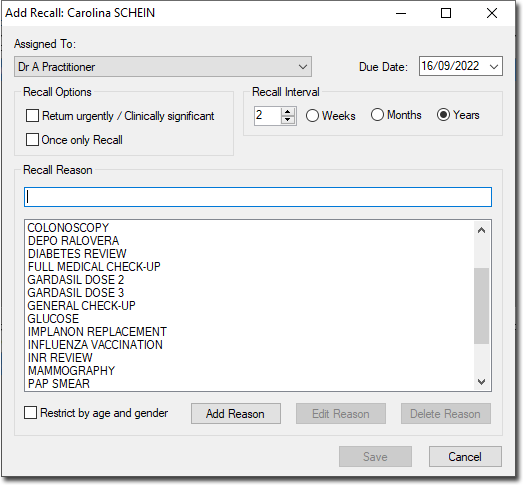
4. Click Save to add the Recall to the selected patient's record.
Editing Recalls
Only active Recalls can be edited, and only via the patient's record.
1. Select Clinical > Recall. The Recall Items window displayed.
2. Locate the Recall you wish to edit, and either;
o Double-click the recall, or
o Select it, and click Edit.
The Edit Recall window appears.
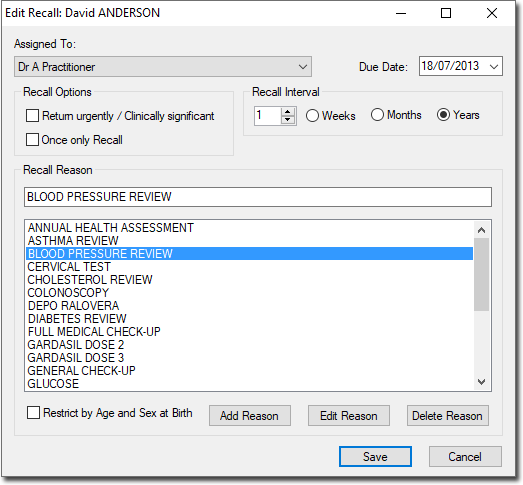
3. Modify the criteria of the Recall;
o Indicate the Practitioner/User the Recall is being created on behalf of. The practitioner/user currently logged in is selected by default. For non-clinical users, this item is initially left blank.
o Indicate the reason for the Recall. You can select a reason from the list provided, or you can add a new reason to the list. Tick Restrict by Age and Sex at Birth to show only reasons suitable for the age and/or sex at birth of the selected patient. If you select a reason from the list, its schedule settings are loaded for you automatically. You can modify these if you wish, and such modifications will not affect the reason definition, nor will they affect any Recalls already saved.
o Indicate whether this is a once-only Recall, or a recurring Recall. For recurring Recalls, you must also indicate the interval between Recall visits.
o Indicate the Recall date;
• For once-off Recalls, this is the date on which you wish the patient to return to the practice.
• For recurring recalls, this is the date on which you wish the first return visit to occur.
4. Click Save