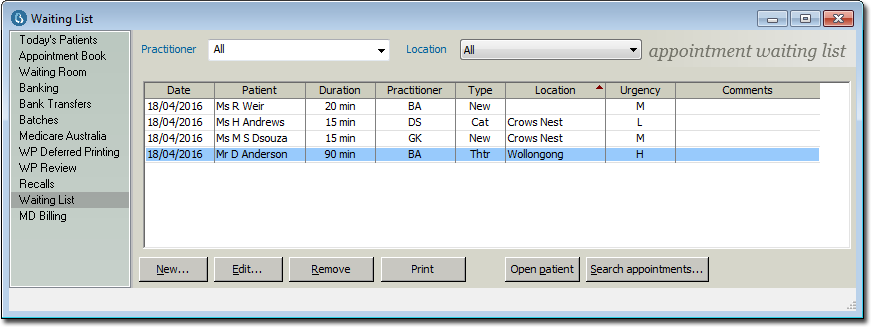
The Waiting List provides a mechanism for creating and managing a list of patients when no suitable free slots are available in the Appointment Book. Once a slot becomes free, patients can be transferred from the Waiting List to the Appointment Book. The Waiting List should not be used for making general patient appointments, nor should it be confused with either the Waiting Room or a patient's Bookings window.
The Waiting List window is available from the Margin Menu in the Patient Explorer, as shown in the image below.
The following information explains how to add a patient to the waiting list, and then how to transfer a patient from the Waiting List to the Appointment Book.
o To Add a Patient to the Waiting List
o To Transfer a Patient From the Waiting List to the Appointment Book
To Add a Patient to the Waiting List
1. In the Practice Explorer select Waiting List from the Margin menu. The Appointment Waiting List window appears. See Waiting List Window for more information about this window.
2. Click  to select a new patient to add to the Waiting List. Once you have selected a patient, the New Waiting List Entry window will appear.
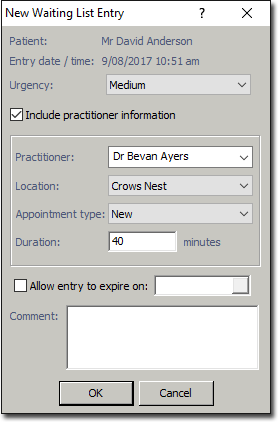
3. Select the urgency of the appointment from the associated drop-down list. The urgency determines how high up the Waiting List a patient appears; a patient with a High urgency rating will appear in the waiting list before a patient with a Medium urgency rating, and so on.
4. (Optional) To assign the patient to a particular Practitioner, tick the Include Practitioner Information check box. This eases the process of transferring the patient to the practitioner's Appointment Book later. Then you can;
o Specify the practitioner.
o Indicate the location at which the appointment will take place. If the selected practitioner works at multiple locations, and these have been recorded in BC Secure, each location will appear in this list to select from.
o Specify the type of appointment.
o Indicate the estimated appointment duration.
5. (Optional) If there is a date beyond which it is impractical to have a particular patient in the Waiting list, you can enable the Allow Entry to Expire On check box. This activates the date field from which you can select a date. Examples where this may be useful include:
o Booking the patient for the next free slot and adding them to the Waiting List in case a session becomes available sooner (the waiting list entry would become redundant after the date of the actual appointment).
o A patient may need to be seen by a particular date, beyond which there would be little point in offering them a vacancy. The check box does not need to be selected in order to continue. When the expiry date has passed, the entry remains in the Waiting List, but is italicised to indicate that it has expired.
6. (Optional) Enter comments into the associated text box as desired.
7. Click  to save the Waiting List entry.
To Transfer a Patient From the Waiting List to the Appointment Book
1. In the Practice Explorer select Waiting List from the Margin menu. The Appointment Waiting List window appears. See Waiting List Window for more information about this window.
2. Select the patient in the waiting list.
3. Click  The Find Free Appointment Slot window appears.
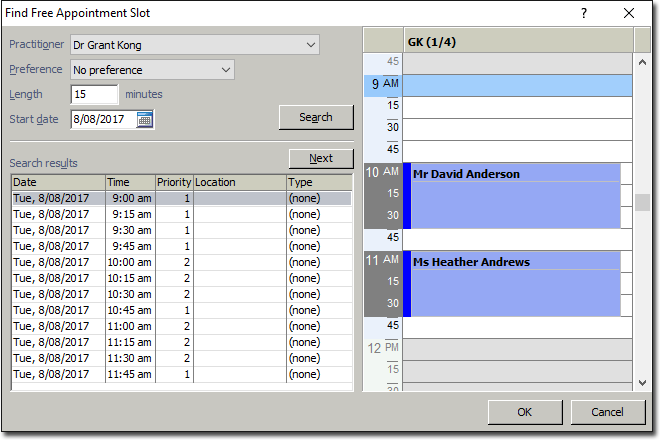
If you had previously nominated a Practitioner and which appointment type you would like, when the Find Free Appointment Slot window appears it automatically displays the scheduled appointments that meet your criteria. See Finding Free Appointment Slots for more information on how to use this window.