Bluechip offers three different label formats as standard. It is also possible to create or import others. The three standard formats offered are:
o Avery 7163, 14 to a sheet laser labels,
o Seiko Smart Label 2RLE (36x89mm), and
o Seiko Smart Label SRL (101x54mm).
To print labels on a different format, contact the MedicalDirector Help Desk to obtain an appropriate template. Note also that Bluechip does not support the printing of labels on dot-matrix printers.
Managing Label Templates
1. Select Setup > Templates > Reports. The Report Setup window appears.
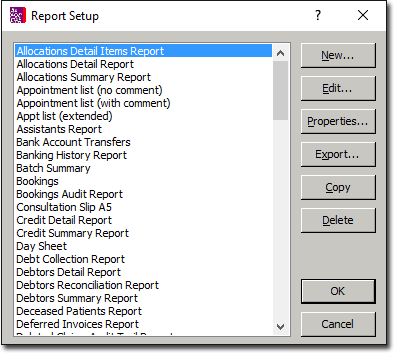
o To add a label, continue now to Step 2.
o To edit a label template, locate and select the label template and then click  Your template is opened in Microsoft Word, where you can make the necessary changes. For further information about modifying label templates, continue now to Step 7, below.
o To copy a label template, locate and select the label template and then click  You will be prompted to give the copy a name, after which you will be returned to the Report Setup window where your new labels template will be available.
o To delete a label template, locate and select the label template and then click  You will be prompted to confirm this action.
2. Click  The New Report Template window appears.

3. Enter a name for the new label template.
4. From the Report Type drop-down list, select Labels.
5. (Optional) Enter a description for the new label template into the associated text box.
6. Click  to confirm your settings. The New Report Template window closes, and Bluechip opens Microsoft Word, ready for you to design your new label template, a possible example of which is shown below.
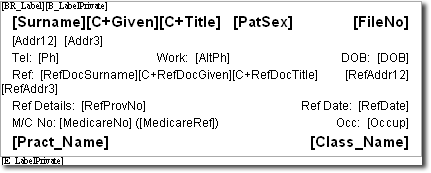
To make it easier to read and edit the template, view it in Normal View, by selecting View > Normal in Microsoft Word.
Notice that at the beginning of the example labels template above, are the fields [BR_Label] and [B_LabelPrivate]. The [BR_Label] field indicates the beginning of the label template. The [B_LabelPrivate] field indicates the beginning of the label that is specific to the Private class. After the first section of the Private label, is the field [E_LabelPrivate]. This field indicates the end of the Private label.
Each label needs to contain both of these sections, and each class must have a label setup, or you will not be able to print labels for the missing classes.
At the end of the template, is the [ER_Label] field, which indicates the end of the labels template. Ensure there is only one [BR_Label] field and one [ER_Label] field in any labels template. The [BR_Label] field must be at the beginning of the template, and the [ER_Label] field must be at the very end of the template.
7. Modify your labels template as necessary. When you have finished, simply close Microsoft Word, and you will be returned to Bluechip, where the label template is now ready for use.
Printing Labels
1. Open the patient's record.
2. Select the Accounts menu item.

3. Select the account you wish to print labels for.
4. Click  The Print Report window appears.
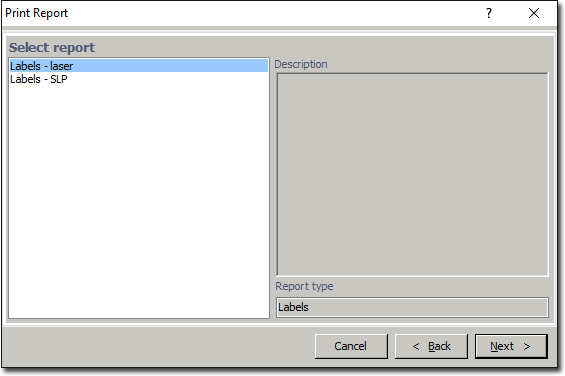
5. Select a report 'type' from those provided.
6. Click  to continue. The Print Labels window appears.
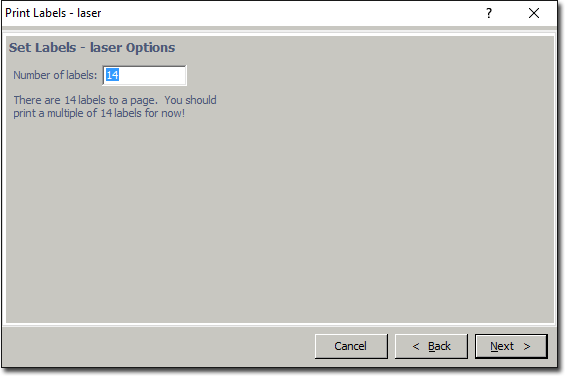
7. Indicate the number of labels you wish to print.
8. Click to continue. Set other print options as desired, and then click to print the labels.
