Preparing to Migrate old Health Fund Contacts to the new HFM Format.
o Ensure Bluechip is not running on any computer.
o Ensure a Backup has been performed.
o Ensure you have a username and password for accessing BC Secure.
1. Running the Health Fund Migration Wizard
Please skip this step if already performed during your Bluechip 2.6 upgrade.
The Wizard can run on any computer that has Bluechip installed and only needs to be performed once for each database. After completion, all other computers with Bluechip connected to the same database will also be automatically updated.
Any existing Letterhead templates affected by this conversion will be amended. Once this wizard has completed, MedicalDirector recommends that you ensure that your customised templates are displaying correctly. Should you encounter any problems, please contact MedicalDirector Customer Service on 1300 300 161 (option 2).
1. Using Windows Explorer, locate and run hfmmigwizard.exe. Typically, it is located in C:\Program Files (x86)\Health Communication Network\Bluechip\Tools
2. When prompted, log in as a user with BCSecure access. The MedicalDirector Bluechip Health Fund Membership Migration Wizard appears.
3. Click the Next button to continue. The following screen appears, allowing you to choose the Class associated with the Health Fund Contact details.
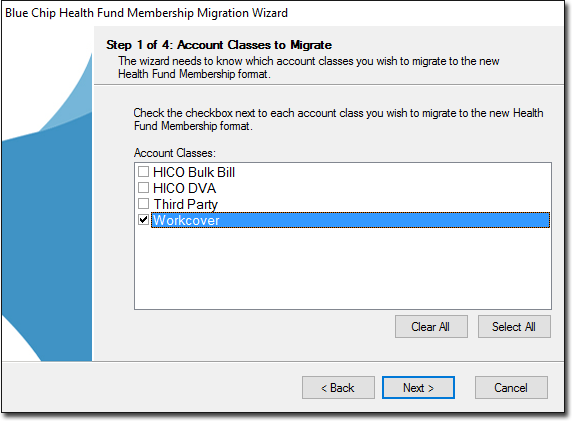
4. Select the required classes you are looking to migrate across to the new HFM format and click the Next button to continue.
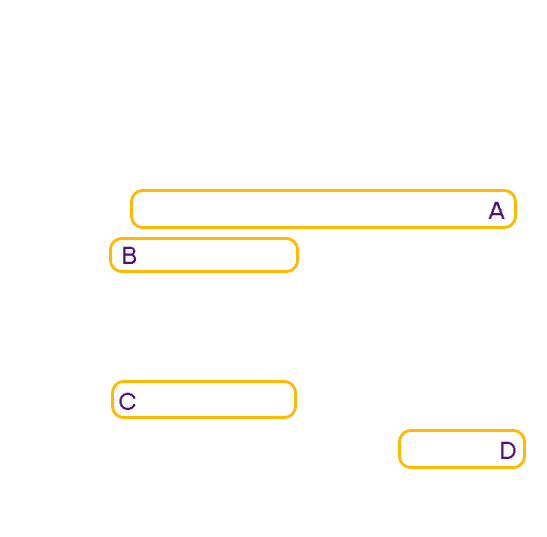
5. On the next screen that appears, click the Map Fields button to continue. The following screen appears allowing you to map the fields.
A: Ensure the correct Company Group is selected (in majority cases, it will be Health Fund)
B: This is the Number Field in the Account Details screen. This will allow you to Map the Number field to the new HFM format. (e.g. Health Fund No to MembershipNo)
C: This is the Text Field for Account Details. This is usually mapped to the Account Name. (e.g., Contributors Name to Account Name)
D: Repeat for all the classes that were selected to migrate across to the new HFM format.
6. Once all Classes are mapped, click the OK button to move to the next screen for Review.
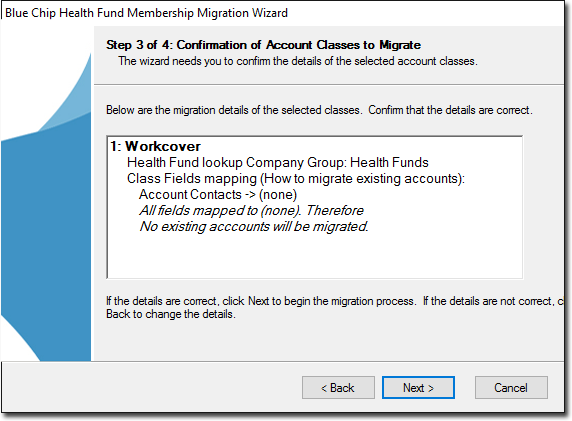
7. Click the Next button to start the Migration process.
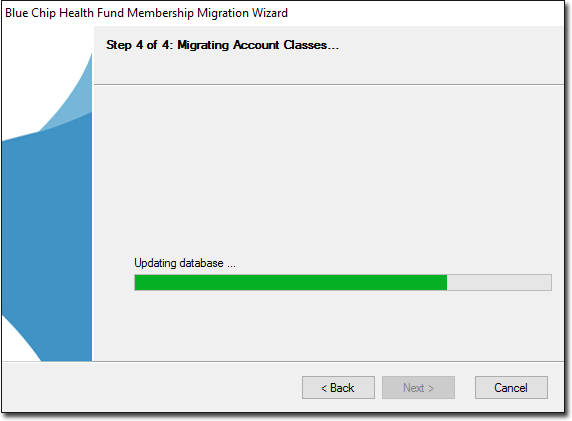
8. Click  to finish when prompted.
1a. After-Migration Process: Changing old HF Fields to the new HFM Fields
Once the migration process has gone through, the [Letter heads Templates], [Labels Templates], [WP Templates] and [Recall Templates] will need to be changed accordingly to bring up the required information.
Below are a few of the most common fields that they might need.
o [HFMAccountName]
o [HFMMembershipNumber]
o [HFMLevelOfCover]
o [HFMExpiryDate]
There are more available fields under WP Fields > Health Fund Membership. Use Find and Replace to make the task easier.
2. Set the Addressee Type for the ‘Health Fund’ Company Groups to ‘Health Fund’
Please skip this step if already performed during your Bluechip 2.6 upgrade.
1. Within Bluechip, select Setup > Lists > Company Groups.
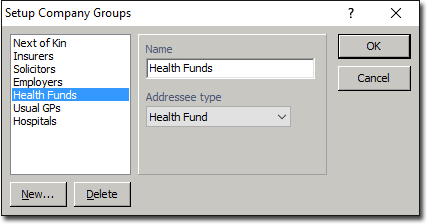
2. Select Health Funds and change the Addressee Type to ‘Health Fund’.
3. Associate a Fee List to each Health Fund
Please skip this step if already performed during your Bluechip 2.6 upgrade.
1. Within Bluechip, retrieve your Health Fund companies by selecting File > Open and from the List drop-down choose ‘Health Funds’.
2. Then select a Health Fund and click on Open. The Company Details screen appears.
3. Next to Fee List, select the Fee List that is associated with the Health Fund.
4. Click the Save icon ![]() at the top left of the Bluechip window to save the company details.
at the top left of the Bluechip window to save the company details.