Overview
Once you have successfully submitted an Inpatient Medical Claim via ECLIPSE, details of the claim and its status appear in the Medicare Australia menu, which is available from within the Practice Explorer, as shown below.
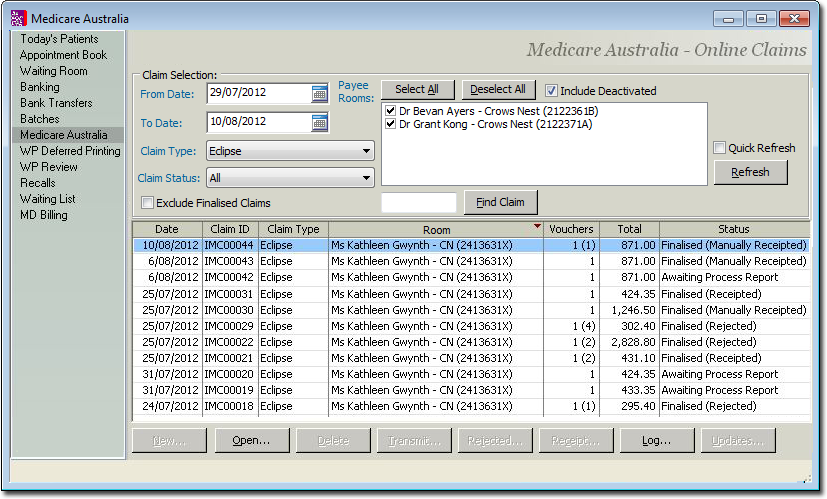
o The status of each claim is clearly indicated within this window. It is important to understand that a claim whose status is 'Ready to Receipt' may actually contain individual service items that have been rejected (explained below), but that overall the claim was accepted, whereas a claim whose status is 'Ready to Finalise (R)' has been completely rejected. See IMC Claim Process Status Messages for more information about the statuses available.
o Claims that have been fully processed (finalised receipted or finalised rejected) are hidden by default, but can be revealed by ticking the associated check box at the top-left of the window.
o Claims remain in a status of 'Processing' until you manually check for a status update by selecting the claim and clicking ![]() This action checks for status messages from both ECLIPSE (for transmission validation) and Medicare or the associated Health Fund (for Service Item validation). You can select multiple claims and check on their statuses simultaneously by holding down either the Shift or Ctrl key and clicking the left mouse button.
This action checks for status messages from both ECLIPSE (for transmission validation) and Medicare or the associated Health Fund (for Service Item validation). You can select multiple claims and check on their statuses simultaneously by holding down either the Shift or Ctrl key and clicking the left mouse button.
o A transmitted, processed and finalised claim has a status of either 'Finalised (Receipted)' of 'Finalised (Rejected)' as shown in the example above. Upon refreshing the window (by clicking  or re-opening the window), such claims will no longer be visible. Un-tick the Exclude Finalised Claims check box to reveal them.
To Finalise a Receipt or Rejection
1. Select the claim within the Inpatient Medical Claiming window, and then click either the  or
or  button. These buttons become available only to claims that have a status of 'Ready to Receipt' or 'Ready to Finalise (R)'. Subsequently, either the IMC Claim Receipt or Rejected Items window appears. The example below shows the former, and in this particular example two items within the claim have been accepted but a third has been rejected. Error codes and rejection messages can be found at the bottom of this window for any selected service item.
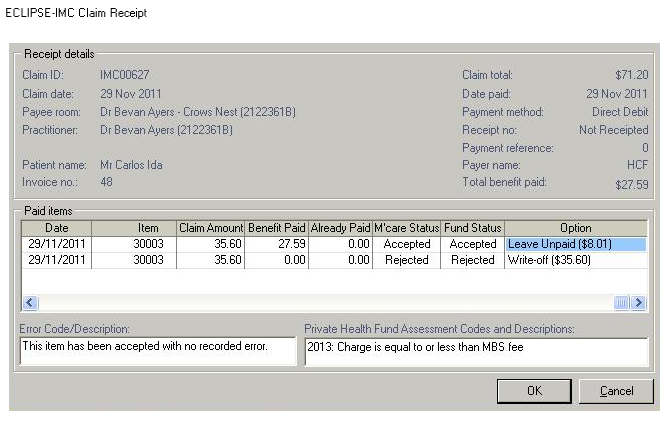
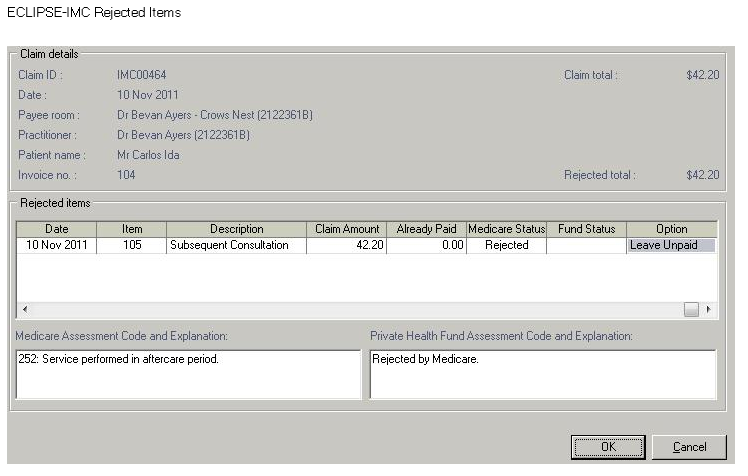
2. For each item in the claim, select an option to action from the Option column. Different options are available by clicking within the Option field to reveal a drop-down list of choices.
o Service items whose status is 'Accepted' can be simply left with the option to 'Accept' them; no further action is required on your part.
o Service items whose status is 'Rejected' will be flagged as 'Leave Unpaid' by default, as shown in the example above. Items marked as Leave Unpaid can be receipted against manually, or the invoice can be adjusted and resubmitted as a new claim. Alternative you can chose the Option of 'Write-Off', to write-off the rejected service item.
o For partially-accepted claims, if the benefit paid is greater than claimed amount, 'Sundry Invoice/Leave Overpaid' options are available.
o For partially-accepted claims, if the benefit paid is less than claimed amount, 'Write-off/Leave Unpaid' options are available.
3. Click  when you are ready to proceed. After clicking :
o For 'accepted items', a receipt is generated.
o For 'write-offs', a write-off is generated for the unpaid amount.
o For 'sundry invoices', a sundry invoice is generated for overpaid amounts.
o For 'leave unpaid', the unpaid amount is left outstanding.
o For 'leave overpaid', the excess amount is allocated to an overpayment.
4. You will be returned to the IMC Online Claims list in the Practice Explorer, ready to finalise the next receipt or rejection.
Manually-Receipting IMC ECLIPSE Claims
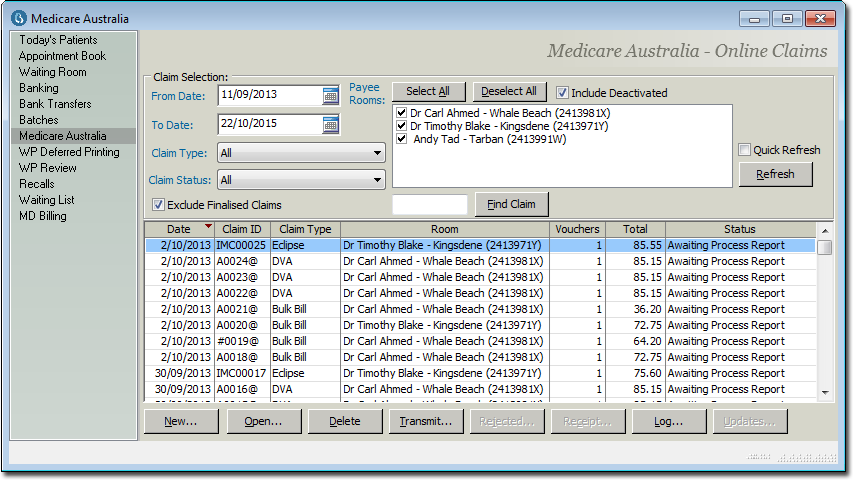
It may be necessary to manually-receipt an Inpatient Medical Claim made through Medicare ECLIPSE if the claim status if the claim is not finalised. This may occur if Medicare fails to supply the associated processing/payment reports for the claim.
Once you have successfully submitted a claim, you must wait five days before you may manually receipt it, as indicated by the button becoming available, as shown in the image below.
To Manually-Receipt a Claim:
1. To begin manually-receipting an ECLIPSE claim, locate the claim you wish to receipt, and either;
o Double-click the claim.
o Select the claim, and click 
The ECLIPSE-IMC Claim Results window appears.
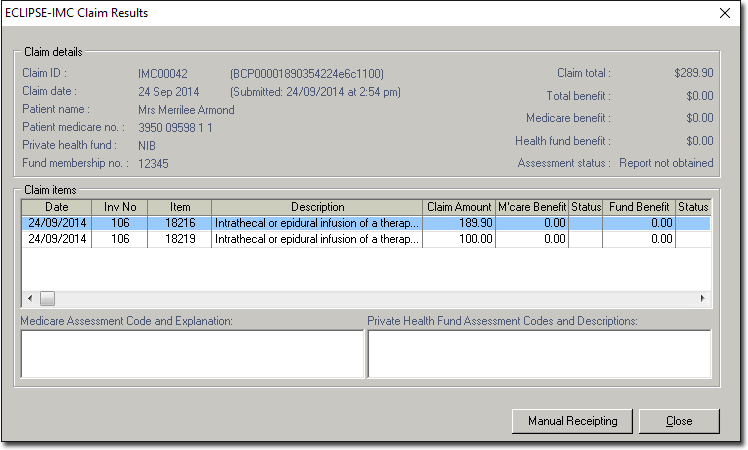
2. Click 
o For claims that do not have a status of either 'Finalised' or 'Awaiting Payment Report', upon clicking you will be prompted with the following message;
![]()
• If you select 'No', the process is cancelled and you are returned to the ECLIPSE-IMC Claim Results window.
• If you select 'Yes', you will be presented with the New Receipt window (see Step 3).
o For claims that have a status of 'Awaiting Payment Report', upon clicking you will be prompted with the following message;
![]()
• If you select 'No', you will be presented with New Receipt window to manually receipt the claim (see Step 3).
• If you select 'Yes', Bluechip automatically creates a receipt for the claim based on the amount details given in the Processing Report and finalises the claim, after which the status of the claim reads 'Manually Receipted'.
3. You will be prompted to confirm that you wish to manually-receipt the claim, after which the New Receipt window appears.