Set-up for Medicare Online DVA Streamlined
Before You Begin
o Pre-printed DB4 forms are not supported by Medicare Online. Once you have setup Bluechip to use Medicare Online, you will not be able to print on pre-printed DB4 forms.
o If using an ISA Firewall, please contact Medicare for specific setup instructions.
To Setup Medicare Online on your Computer
o Ensure you have enrolled with HeSA to use Medicare Online using the application facility at www.hesa.com.au.
o Apply and receive from HeSA the necessary PKI Certificates and associated Personal Identification codes.
o Register the Medicare Online certificates.
o Setup your system to use Medicare Online. The procedure for doing this will depend on whether you are using Location Certificates only, or a combination of Location Certificates and Individual Practitioner Certificates.
Enable Bluechip to use Medicare Australia Online
1. Select Setup > Practice > Options from the Bluechip main window. The Options window appears.
2. Select the General tab.
3. Select the Use Medicare Australia Online check box.
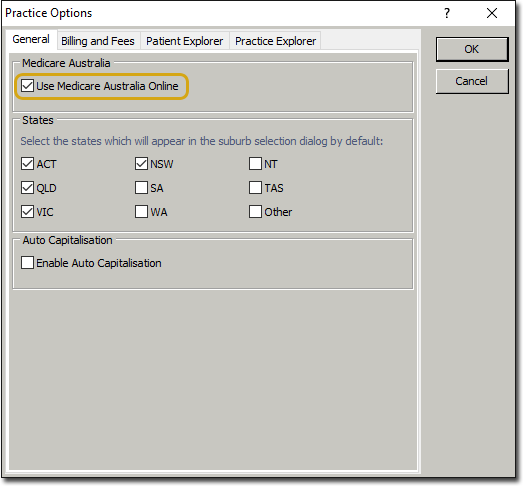
4. Click  to exit the window and save the details.
Setup a Batch Type for Medicare Online DVA Streamlined
1. Select Setup > Practice > Batch Types. The Batch Setup window appears.
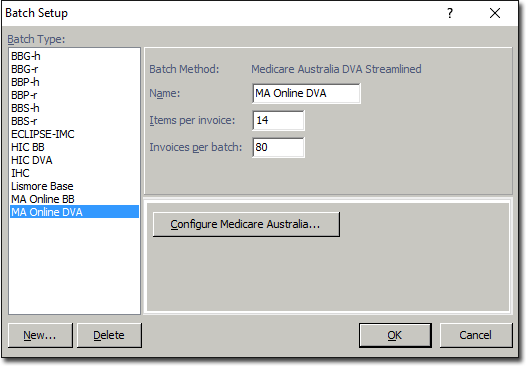
2. Click  The New Batch Type window appears. Enter the following settings;
o Name: MA Online DVA
o Method: Medicare Australia DVA Streamlined
3. Click You are returned to the Batch Setup window. Enter the following settings;
o Items per invoice: 14
o Invoices per batch: 80
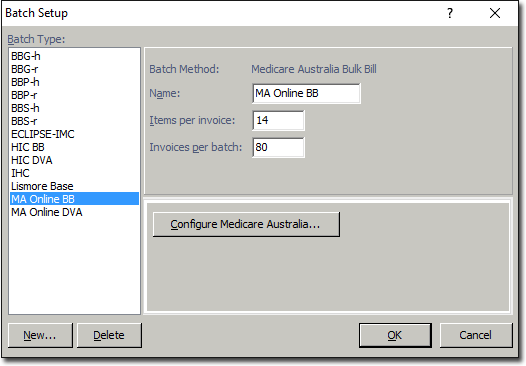
4. Click  The Medicare Australia Setup window appears.
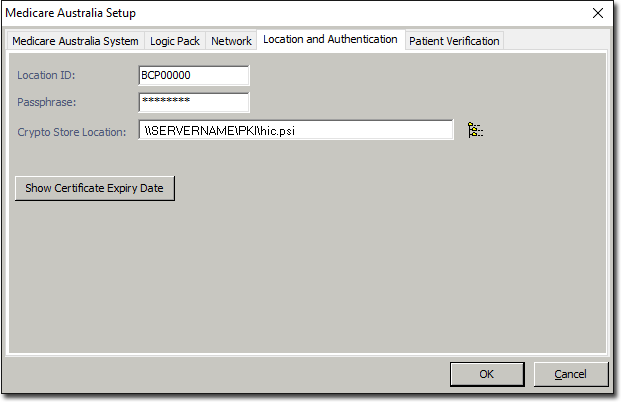
5. Select the Location and Authentication tab.
o Enter your Location ID and Passphrase, as supplied to you by Medicare.
o In the Crypto Store Location field click the  button to navigate to the store location directory. Ensure you have selected the Medicare.psi file and the "C:\Program Files\Medicare\PKI\" directory is displayed as the Store Location (assuming "C" is your local system directory/drive).
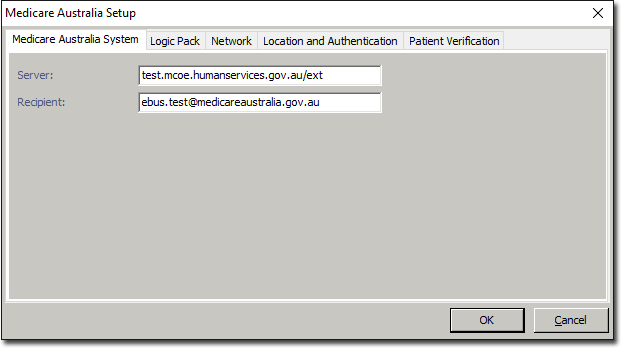
7. Select the Medicare Australia System tab. Enter the following settings;
o Server: www2.medicareaustralia.gov.au/pext
o Recipient: ebus@medicareaustralia.gov.au
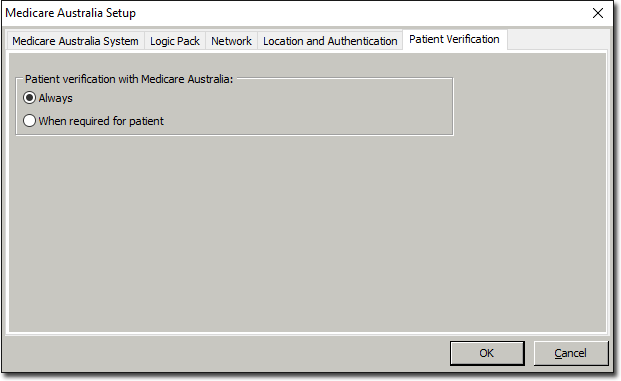
8. Select the Patient Verification tab. Indicate when you wish to perform an online patient verification with Medicare;
o Always: Verification is performed for every patient, whenever you create a new invoice for them.
o When Required for Patient: A verification is performed whenever you create a new invoice for a patient, provided you have ticked the 'Verify Patient Before Invoicing' check box on the Patient Details window.
9. Click to save the changes. You will be returned to the Batch Setup window.
10. Click
Setup a Class for Medicare Online DVA Streamlined
Before You Begin
Ensure you have setup a Batch Type for Medicare Online DVA Streamlined.
Setting-up a Class for Medicare Online DVA Streamlined
1. Select Setup > Practice > Classes from the Bluechip Main window The Class Setup window appears.
2. Click The Copy window appears. Enter the following settings;
o Copy from class: (none)
o Name: MA Online DVA
o Abbreviation: MADVA
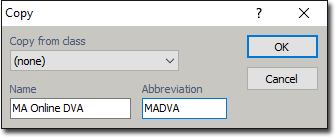
3. Click The class is added to the list of account classes.

Setup a Class to use a DVA Streamlined Batch Type
Before You Begin
Ensure you have;
o Setup a Batch Type for Medicare Online DVA Streamlined
o Setup a Class for Medicare Online DVA Streamlined
Setting-up a Class to use a DVA Streamlined Batch Type
1. Select Setup > Practice > Classes. The Class Setup window appears.
2. Within the Account Class list, select the MA Online DVA class, so that it can be configured for batching.
3. Select the Payment Options tab.
4. Via the Batch Type drop-down list, select MA Online DVA.

5. Click
Setup a Practitioner to use the DVA Streamlined Class
Before you begin, ensure you have;
o Setup a Batch Type for Medicare Online DVA Streamlined.
o Setup a Class for Medicare Online DVA Streamlined.
o Setup a Class to use a DVA Streamlined Batch Type.
Setting-up a Practitioner to use the DVA Streamlined Class
The following steps must be performed for each practitioner who wishes to the use the DVA Streamlined class.
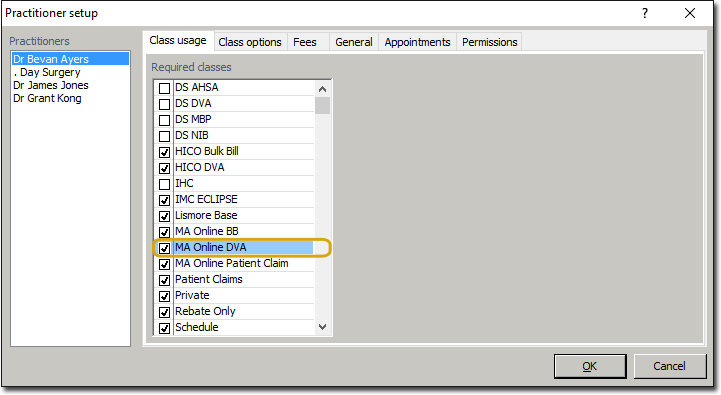
1. Select Setup > Practitioner > Practitioner Details from the Main menu. The Practitioner Setup window appears.
2. Select the Class Usage tab (it should be displayed by default).
3. Via the Practitioners list, select the practitioner whose classes you wish to manage. Their list of Required Classes will be displayed. Classes that are ticked are those that the practitioner has been granted association with.
4. Within the Required Classes list, tick the MA Online DVA option.
5. Select the Class Options tab.
6. Within the Class list, select the MA Online DVA class.
7. Within the Applicable Service Item Lists list, tick the Veterans option (classes established using a Medicare Online DVA batch method can only be associated with the Veterans service item list).
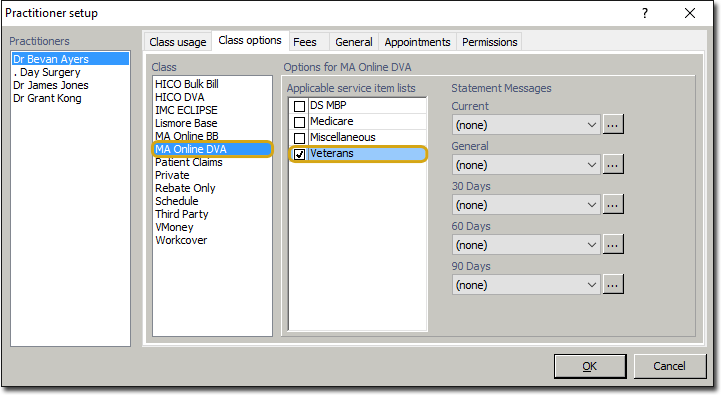
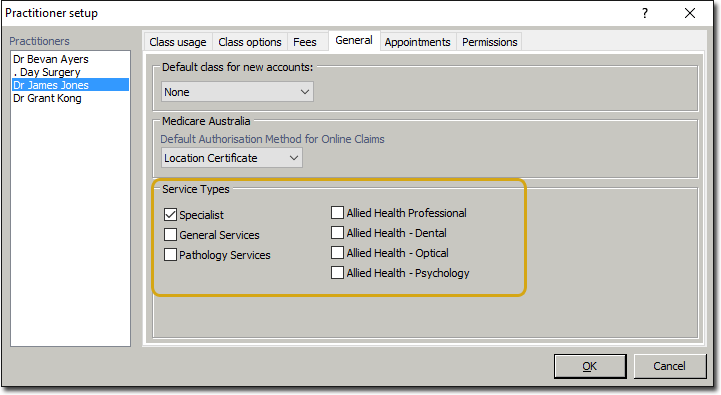
8. Select the General tab.
9. Within the Service Types section, indicate which service types this practitioner offers.
10. Click to save the changes.
Setup a Service Type List for DVA Items
To use DVA Claims, DVA-specific Service Items (in addition to the standard Medicare Items) may be required. To enable these items to be entered and associated with a DVA Streamlined class, a separate service item list must be setup.
Setup a DVA Service Item List
1. Select Setup > Lists > Service Items. The Service Item Lists window appears.
2. Click and enter the name 'DVA' and abbreviation 'DVA' for the new service item.
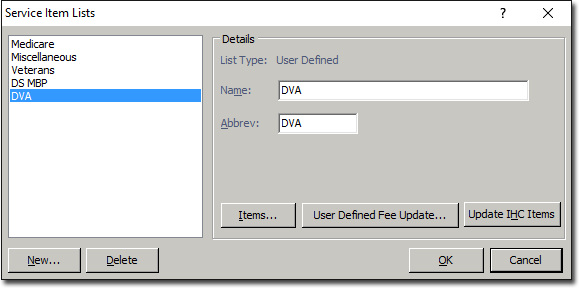
3. Click  to add items specifically for DVA claiming. The DVA list is for items specific to the DVA, for example CN01 (Clinical Notes), CC01 (Consultation), CP20 (Medication Review) and so forth. This should not include any MBS items.
4. Click to save these details.
Creating Invoices for Medicare Online Streamlined DVA
1. Open a patient record and select Accounts from the menu.
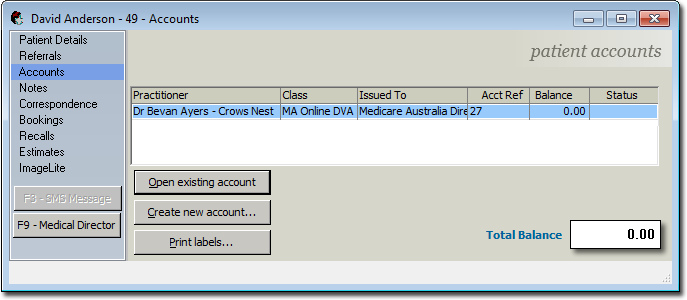
2. Within the list of accounts, locate and double-click the MA Online DVA account. The details of the MA Online DVA account are presented to you.
3. Select the Invoices tab.
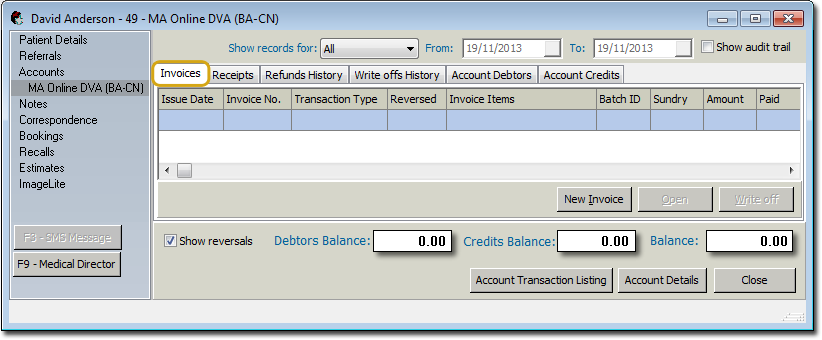
4. Click  You may be prompted to initiate a patient verification for the patient. The DVA Verification window appears if one of the following conditions is met;
o The Always option is selected on the Patient Verification Tab of the MA Online DVA batch settings, or
o The Verify Patient Before Invoicing check box is ticked on the Patient Details window.
If the verification is unsuccessful, you may continue to issue the invoice regardless, or cancel as required. After the OPV has been completed, Medicare may return details of updates to patient information. These updates can be automatically applied to the patient information held in Bluechip, at your discretion. Other advisements as to the eligibility of the patient to receive benefits may also be supplied.
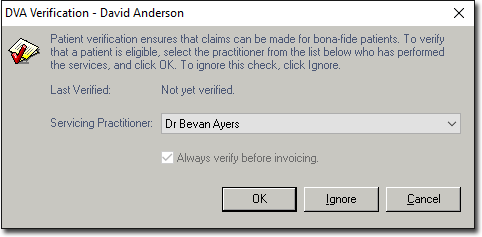
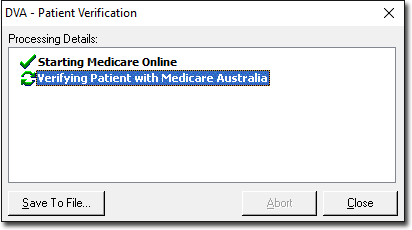
5. If you chose to continue with verification, select the Servicing Practitioner via the associated drop-down list, and click The DVA - Patient Verification window appears.
o To save the file, click the Save to File... button.
o To abort the verification, click the Abort button.
o To skip the verification or proceed after verification and continue to the new invoice, click the Close button.
6. The New Invoice window appears. Add Service Items to the invoice as desired.
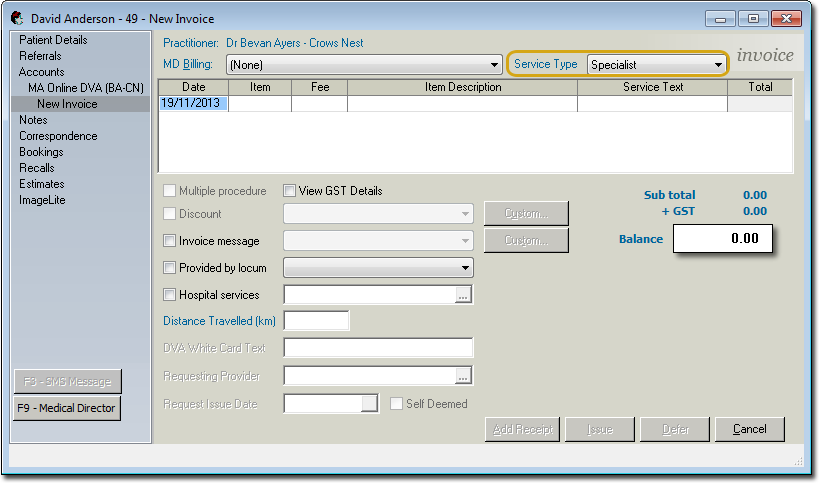
o Via the Service Type drop-down list, indicate the type of service the practitioner has performed for this invoice.
• If you select 'Pathology', you can also then record the Requesting Provider and Request Issue Date via the associated fields on this window. Alternatively, you can indicate that the request was self-deemed. A practitioner's service types are managed via General Practitioner Settings.
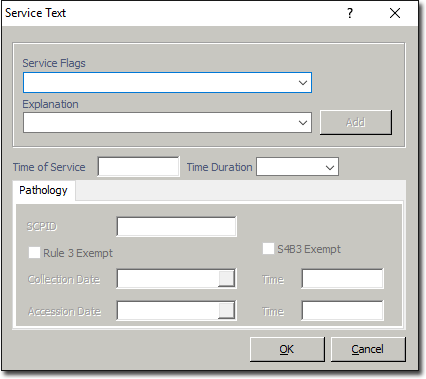
• If you select 'Pathology', you must also record the SCPID. Locate the Service Text field and click the associated  button to call the Service Text window.
o If the service is provided in-hospital, tick the Hospital Services check box and select an associated hospital via the button.
o To add information for a given Service Item (which is sent to Medicare along with the Service Item), locate the Service Text field and click the associated button to call the Service Text window. Select the information required from the drop-down menu or enter text and click
7. When you are ready to issue the invoice, click  The Select Referral window appears.
8. Select the appropriate referral details and click 
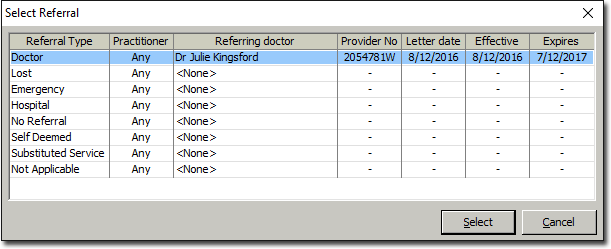
Medicare Online requires the selection of a current referral from the list of entered referrals, or a referral override type (where applicable). The Override referral types are only shown when creating invoices for Medicare Online account types. The Hospital referral type is also not allowed to be used for non-hospital services.
In addition to these restrictions, the servicing provider cannot be the referring Practitioner. In this instance, a referral override of 'Self Deemed' must be used.
9. You are prompted to issue the invoice. Click
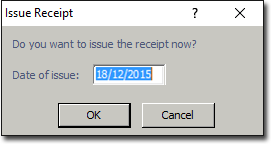
10. You will be prompted to print a Medicare DB4 form, for presenting to the patient to sign, after which the Invoice is issued to Medicare, and is waiting on processing.
This concludes the steps necessary for creating an invoice for Medicare Online DVA Streamlined.
Sending Invoices to Medicare Australia Online
1. Ensure you have created invoices to send to Medicare.
2. Open the Practice Explorer and select Medicare Australia from the margin menu. The Medicare Australia Online Claims window appears.
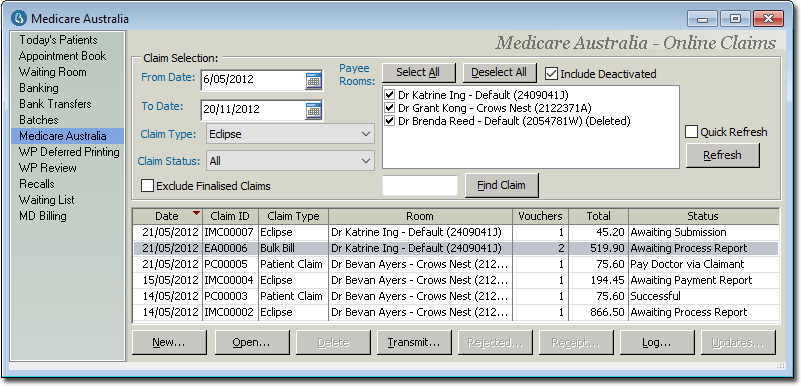
o Multiple claims can be selected and processed together by highlighting the required claims. The claims can also be sorted to group like claims before selecting them.
o Right-click the list of payee rooms to allow selection/de-selection of all rooms.
o To edit an existing claim, select the Claim and click the Open button. Edit the claim details and transmit as required.
o To delete an existing claim, select the Claim and click the Delete button.
• The claim must be deleted on the same day which it was submitted.
• Medicare must be notified by phone that the claim is to be deleted.
• A reason for the deletion must be entered (allows for space up to 128 characters).
• The user must confirm that they have contacted Medicare to delete the claim.
• Should Medicare provide some reference for the deletion, this should be entered in the reason text for future reference.
• Once the claim has been deleted, invoices attached to the claim will be available for selection with new claims.
• No transmission is involved with the deletion process.
• Unlike deleting an un-submitted claim, all "same day deleted" claims will remain viewable in the claims list.
3. Click the New button to begin a new batch of claims. The New Medicare Australia Claim window appears.
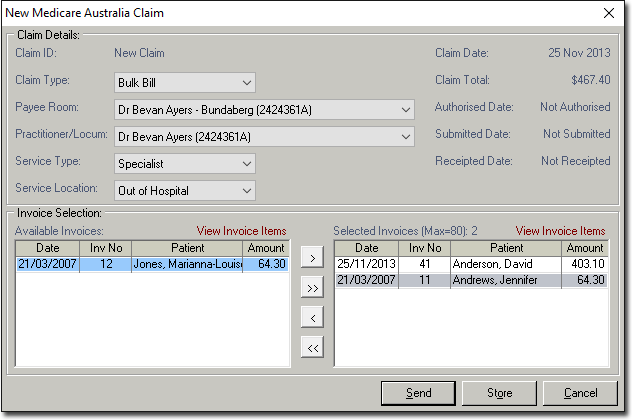
4. Select the Claim Type, Payee Room, Practitioner, Service Type, and Service Location for the claim.
o Note that if in General Practitioner settings you have indicated that the practitioner has only one Service Type, the Service Type drop-down menu here will default to the corresponding Type. On the other hand, if the practitioner has multiple Service Types there will be no default selected here, and you must manually select one.
o The available invoices that meet these criteria are displayed in the lower section of the window.
• To view details of an invoice, select the invoice and click View Invoice Items (located on the top right hand corner of the Available Invoices and Selected Invoices sections).
5. Select the > or < buttons to move selected invoices into and out of the claim. Select the >> or << buttons to move all invoices into and out of the claim.
o Claims may be selected by dragging and dropping the invoice with the mouse. Resubmitted invoices are displayed in red text. A maximum of 80 claims can be batched simultaneously.
6. Click  to authorise, but not immediately transmit the claim, or click the Send button to send the items to Medicare. The Medicare Online Claim Authorisation window appears.
o The authorisation required will depend on how you have setup Bluechip and your agreement with Medicare.
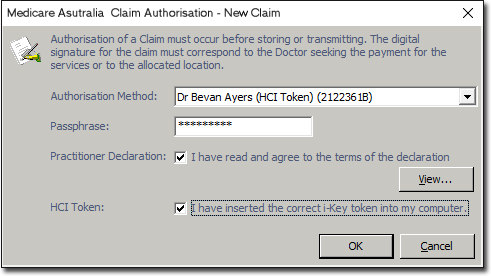
7. Click to send the transaction. The Medicare Australia - Authorising Claim window appears.

8. Click  once the processing has completed. You are returned to the Medicare Online Claims window.
9. Select a claim to delete if required and click  The Claim Delete Reason window appears.
o The Claim Delete Reason window only displays when deleting a claim that was submitted on the same date as the deletion. Claims submitted on prior dates cannot be deleted. If deleting a claim that has been authorised, but not submitted, a standard yes/no prompt is displayed.
o The practice must contact Medicare and arrange the same-day deletion, before deleting the claim in Bluechip. To facilitate this, the button remains disabled until the user selects the box that confirms they have contacted Medicare.
10. Click  to view the transmission log for the selected claim. The Medicare Online Claim Transmission Log is displayed.
![]()
11. Click  to view items rejected by Medicare during processing of the selected claim. The Medicare Australia Claim Rejected Items window appears.
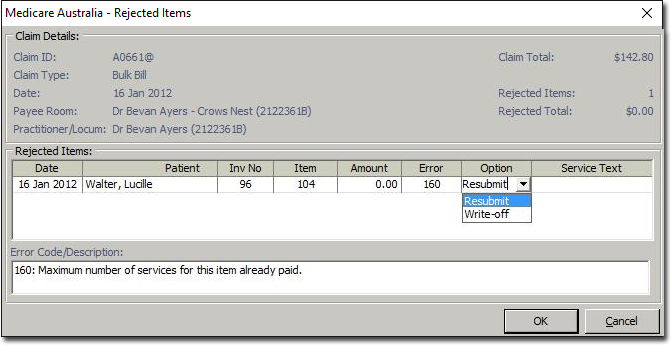
12. Select the option suitable to your practice accounting methods and click to resolve the item.
o Items that are not fully paid may be written off or left unpaid and referred to the patient for payment (based on your practice procedures). Items that are overpaid will result in a Sundry Invoice being created to which the residual funds are allocated. Sundry payments made by Medicare can also be receipted.
o Items that have been are rejected, and for which no amount has been paid, may be resubmitted. The resubmission process involves Bluechip writing off the original invoice, copying it, attaching the copied invoice item to a new invoice and entering service text for the invoice item to allow the claim to be referred to the Medicare Officer for consideration.
• You must attach the new invoice to a new claim and submit it to Medicare for payment.
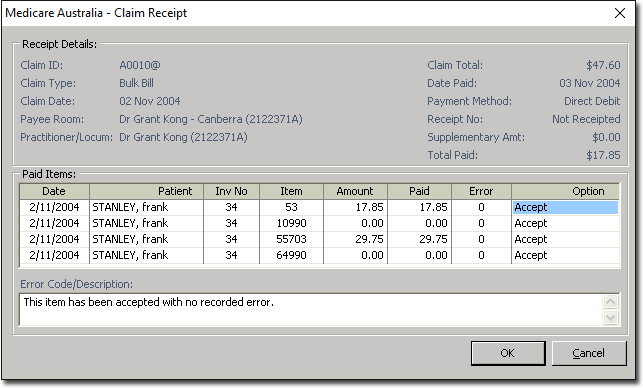
13. Click  to receipt items returned from Medicare. The Medicare Australia Claim Receipt window appears. For items not paid in full, select the option suitable to your practice accounting methods and click to receipt the item.
14. Click  to update patient information with details returned from Medicare. The Patient Updates window appears.
When submitted patient information differs from that held by Medicare, corrected patient information is returned with the processing report. This information can then be used to update the Bluechip record for the patient using the Updates button.
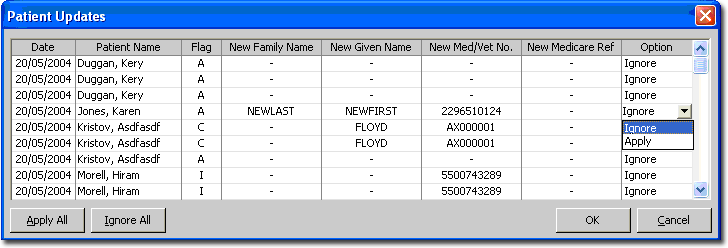
15. Select the appropriate option for each patient record, or click  or
or 
16. Click The patient records are updated with the relevant information from Medicare.