Setting up a Batch Type
You must create two batch types in Bluechip - one for Patient Claiming and one for Bulk Bill.
1. Select Setup > Practice > Batch types.
2. Click  to create a new batch type for Medicare Online
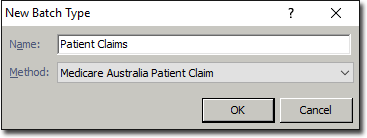
3. Enter the name 'Patient Claims' and select the method 'Medicare Australia Patient Claim'.
4. Click 
5. Click the Configure Medicare Australia button to configure the Medicare Online Parameters.
6. Select the Location and Authentication tab and enter your Location ID and a unique password. These will have been sent to you by Medicare.
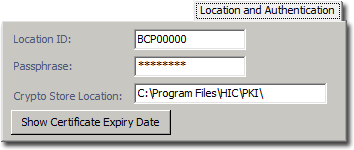
7. In the Crypto Store Location field enter the store location directory. Ensure you have selected the hic.psi file and the "C:\Program Files\Medicare\PKI\" directory is displayed as the Store Location, providing "C" is your local system directory/drive.
8. Enter the PSI Store password that you created in the previous step and click the Save button. If you have installed Bluechip onto a server/network, enter or browse for either:
o "X:\Program Files\Medicare\PKI\" where X is the letter of the relevant mapped network drive on which you created the PSI Store, or
o "\\SERVER\Program Files\Medicare\PKI\" where SERVER is the name of the computer on which you created the PSI Store is located (indicated in the previous step as the "Store Location), and assuming that Program Files is a share on the Server.
On the Medicare System tab, enter the Server and Recipient settings as follows:
o "www2.medicareaustralia.gov.au/pext" is entered as the "Medicare Server" and "ebus@medicareaustralia.gov.au" is entered as the "Medicare Recipient".
9. Click to save the changes.
10. Repeat this process to create a batch type for Bulk Bill, using the name 'Bulk Bill' and the method 'Medicare Bulk Bill'.
11. Continue to Setting up a Class.
Setting up a Class
You must create two classes in Bluechip; one for Patient Claiming and one for Bulk Bill.
1. Select Setup > Practice > Classes from the Bluechip Main window The Class Setup window appears.
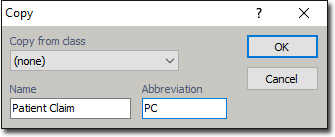
2. Click the New... button and enter the class name 'Patient Claim' with the abbreviation 'PC'.
3. Select (none) in the Copy from class section. Click The class is added to the list of account classes.
4. Repeat this process to create a class for Bulk Bill, using the name 'Bulk Bill' and the abbreviation 'BB'.
5. Continue to Associating Classes with Batch Types.
Associating Classes with Batch Types
You must associate each class you created with its corresponding batch type.
1. Select Setup > Practice > Classes from the Bluechip Main window.
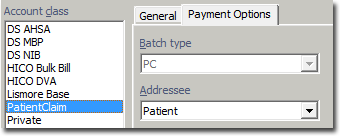
2. Select the Patient Claim class that you want to be able to batch.
3. Select the Payment Options tab. From the Batch Type drop-down menu, select 'PC' (or Patient Claims).
4. Repeat this process to associate your Bulk Bill class with its corresponding Bulk Bill batch type.
5. Continue to Setting up a Practitioner's Classes.
Setting up a Practitioner's Classes
1. Select Setup > Practitioner > Practitioner Details. The Practitioner Setup window appears.
2. Select the practitioner record and then tick the Patient Claim check box.
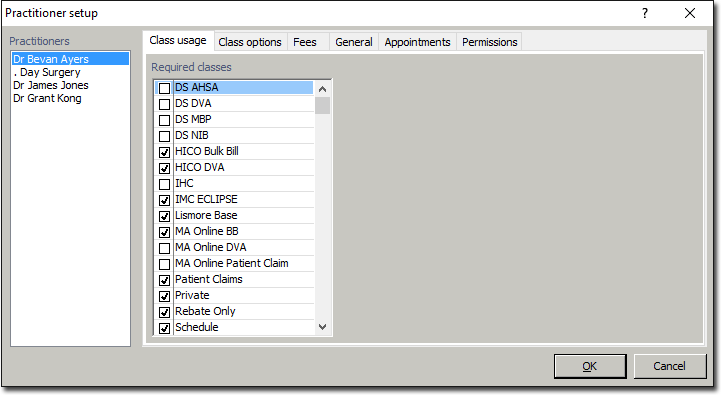
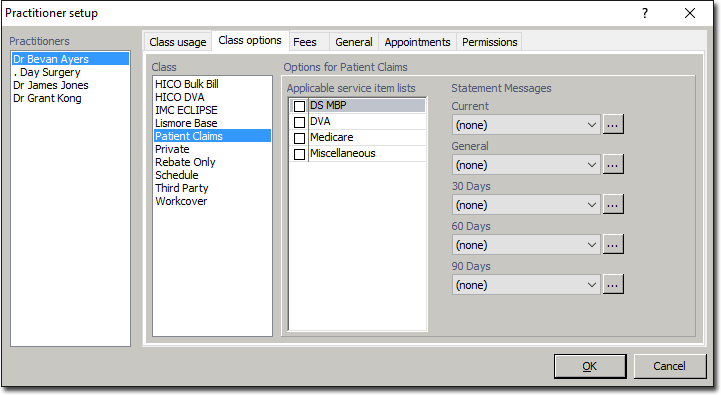
3. Select the Class Options tab. Select the 'Patient Claim' class, and then tick the 'Medicare' check box.
4. Click the button to save the changes.
5. Repeat this process for each class you wish this practitioner to use, and for each practitioner.
6. Continue to Creating Patient Accounts.
Creating Patient Accounts
Within each patient's record, you must configure the types of accounts they can be invoiced against.
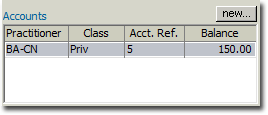
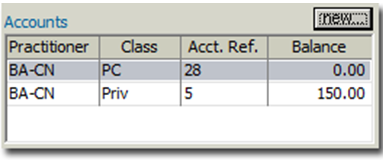
1. Open a patient's record and locate the Accounts section.
2. Click the New… button. The New Account window appears.
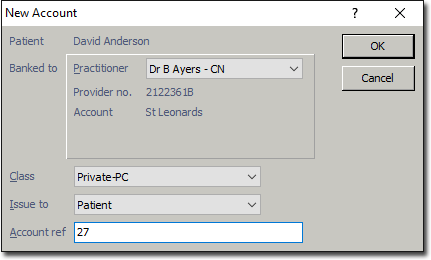
3. Select the patient's practitioner via the Practitioner drop-down menu.
4. From the Class drop-down menu, select the Patient Claim class you associated with this practitioner earlier.
5. Click the button. You will be presented with the Account Details window. Configure other settings here as desired.
6. Click the button. You will be returned to the patient's record, where you can now see the new account for Patient Claim (PC) is available.
7. Repeat this process if you wish to create a Bulk Bill account for this patient also.