Starting the Wizard
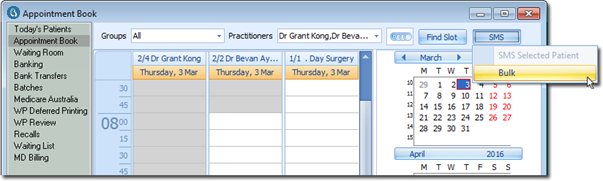
1. Open Practice Explorer and select Appointment Book from the margin menu.
2. Locate
and click  , and select ‘Bulk’
from the menu that appears.
, and select ‘Bulk’
from the menu that appears.
3. The Bulk SMS Wizard appears.
o The first
page of the wizard is an introduction and prompts the user to click 
o Pressing ESC should cancel the wizard at this point.

4. Proceed now to Step 1: Selecting and Editing the SMS Message
Step 1: Selecting and Editing the SMS Message
In this step, you design the message that will be sent to patients. The message can consist of;
o A pre-defined template.
o A pre-defined template you then modify.
o A blank message you then add to.
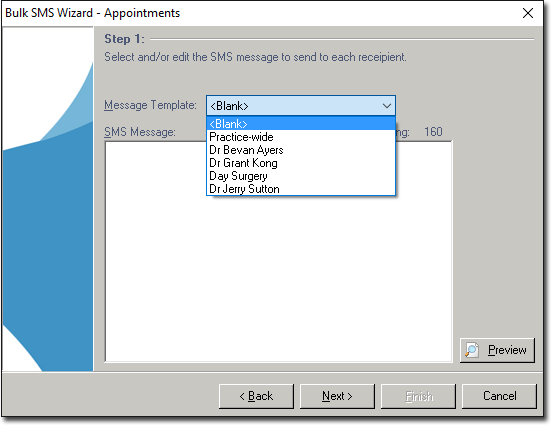
o A predefined message template can be selected from the drop-down list, with a <Blank> template the default option.
o The Message Template drop-down list is selected by default when you first access this window. You can re-select it at any time via the key combination of Alt + M
o The number of characters remaining is indicated, and will have the same presentation as in the Ad-hoc message window (Select SMS > Send Single SMS Message from the Bluechip main window).
o If your message exceeds the maximum number of characters (160), all characters in excess of that maximum are displayed in red.
o It is not possible to enter line breaks in the message body, even if you paste the message in from another application.
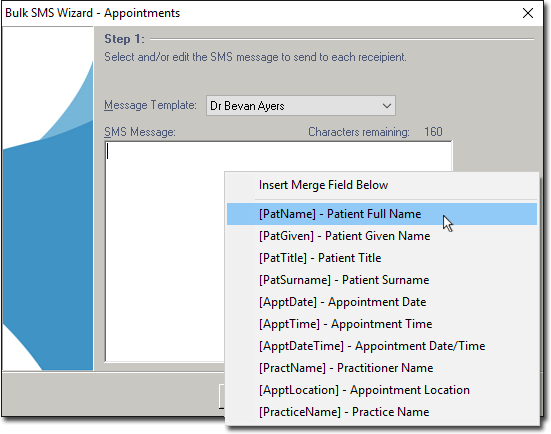
o Merge
fields can be added to the message by right-clicking on the message body.
o To preview
the message, click  or
press This function can be access by pressing Alt
+ F
or
press This function can be access by pressing Alt
+ F
o The wizard will allow you to proceed to Step 2 when the SMS message body contains some text i.e. you cannot proceed if you leave the message body blank.
Step 2: Selecting a Schedule and Recipient Set
In this step you select the recipients who will receive your SMS message.
Unlike sending a single SMS (where you specify the individual recipient), when sending SMS messages in bulk, you must specify a range or scope of recipients. Furthermore, as this is a bulk SMS wizard for Appointments, the scope is based on an appointment schedule, specifying;
o The range of dates and times on which the appointments fall, and
o The practitioner(s) and/or groups of practitioners the appointments are on behalf of.
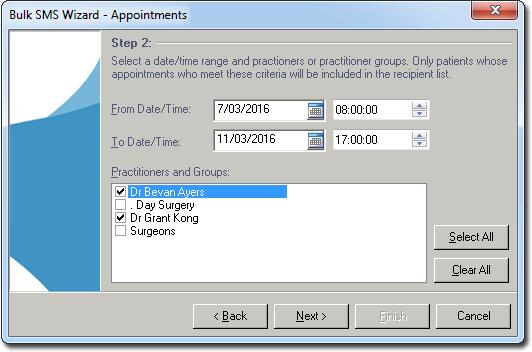
For example, the image above indicates that we want our recipients to consist of patients who have an appointment;
o On or between 7/3/2016 and 11/3/2016,
o Between the hours of 8:00 am and 5:00 pm
o With Dr Bevan Ayres or Dr Grant Kong.
o From and To
dates can be free-typed, or selected via the  button.
• The default From date is the current date.
• The default To date is one day later than the current date.
• The From date must be equal to or earlier than the To date.
• The From date can never be earlier than the current date.
o From and To
times can be free-typed or selected via the  control.
• The default From time and To time is 12:00:00am.
• The From date field can be selected by pressing the Alt + F
• The From date field can be selected by pressing the Alt + S
o The Practitioners and Groups list shows all practitioners and practitioner groups SMS messages can be sent on behalf of. By default, nothing is selected when you access this window.
•  selects all practitioners
and practitioner groups.
selects all practitioners
and practitioner groups.
• ![]() de-selects all practitioners
and practitioner groups.
de-selects all practitioners
and practitioner groups.
• The list of practitioners and practitioner groups can be selected by pressing Alt + P
o To proceed to the next step:
• The From date/time must be less than or equal to the To date/time.
• At least one practitioner/group must be selected.
Step 3: Selecting the Types of Appointments to Send Messages For
In this step you specify the types of appointments that the SMS message relates to.
For example, the image below shows that there are six appointment types available for Dr Grant Kong: New Patient, Review, Post Op, Procedure, Theatre, and Misc. For this SMS message, we want to send messages only to new patients i.e. where the appointment type is 'New Patient'.
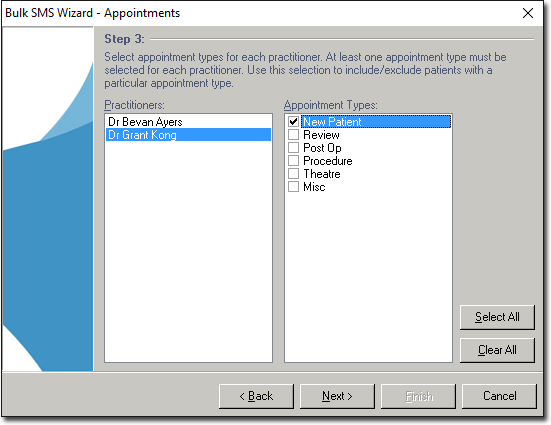
o The Practitioners list displays all practitioners you selected in Step 2, including any practitioners from groups you selected i.e. where a group was selected in Step 2, all members of that group are listed here, individually.
o The Appointment Types
list displays all the appointment types recorded for the selected practitioner.
In the example above, Dr Grant Kong is selected, and we can see that he
has three appointment types (New, Review, and Medico Legal) i.e. the appointments
he has for the period selected in Step 2 relate to one of those categories.
o By default, all appointment types are selected, and for each practitioner.
o
selects all appointment types.
o ![]() de-selects all appointment types.
de-selects all appointment types.
o As each practitioner is selected, the Appointment Types list is refreshed to display their appointment types.
o The Practitioner list can be selected by pressing Alt + P
o The Appointment Types list can be selected by pressing Alt + A
o To proceed to the next step, at least one appointment type must be selected for each practitioner.
Step 4: Review the Recipient List
In this step you have an opportunity to review the list of patients to be sent the SMS message.
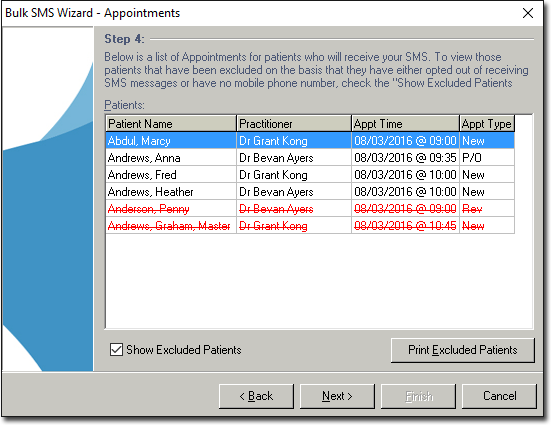
o Initially, only valid recipients are shown in this list. Patients may be excluded because they;
• Do not have a mobile phone number recorded in their record.
• Have elected to opt-out from receiving SMS messages.
o Excluded patients can be revealed by ticking the Show Excluded Patients check box (as shown in the example above).
o The patient list can be selected by pressing Alt + P
o A report
showing details of the excluded patients can be printed by clicking  or by pressing Alt + E
o To proceed to the next step, there must be at least one valid recipient in the list.
Step 5: Checking Available SMS Credit
In this step you have the opportunity to perform a check of your remaining SMS credit.

o Perform
the credit check by clicking  or by pressing Alt + P
o Once a credit check is completed, the result will be displayed.
o Subsequent credit checks can be performed, but are not mandatory, even if the patient list changes - the wizard will automatically update the credit status when this step is accessed.
o A credit check must be completed before proceeding to the next step.
o If you have insufficient credit, you can still attempt to send the SMS messages.
Step 6: Sending the Messages
In this step you can send the SMS messages, and monitor their success or failure.
![]()
o Click
 to start sending the SMS messages.
o Once started,
message sending can be stopped by clicking 
o The progress section displays the success or failure of each SMS message. Failed messages will be highlighted in red. If an error occurs while processing, you have the following options;
• Abort: Cancels the SMS sending operation for the current and all remaining SMS messages.
• Retry: Retry sending the current SMS.
• Ignore: Ignore the current SMS, and continue with the remaining messages.
Appendix 1: Transmit Conditions
The following table lists the conditions that determine whether an SMS message is sent.
Condition |
Value |
SMS Possible |
Where Configured |
Patient Opt-out |
True |
No |
|
False |
Yes |
||
Practitioner Opt-out |
True |
No |
Practitioner settings > Appointment tab |
False |
Yes |
||
Appointment Type Opt-out |
True |
No |
Practitioner settings > Appointment tab |
False |
Yes |
||
Day is Practice Holiday |
True |
No1 |
Practitioner settings > Holidays |
False |
Yes |
||
Day is Plan Absent Day |
True |
No* |
Practitioner settings > Holidays |
False |
Yes |
||
Do not send reminders on closed/absent days** |
True |
Yes |
SMS Reminders settings |
False |
No |
*SMS messages will still be sent if the “Do not send reminders on closed/absent days” option is not chosen.
**SMS messages will only be sent on closed/absent days if this option is selected.
Appendix 2: Schedule Intervals
SMS messages can be scheduled for intervals before the designated appointment date.
The scheduler recognises weekends, public holidays, and designated ‘closed’ days, and will attempt to send messages on the closest preceding ‘open’ day prior to the SMS send date, and up to 3 months in advance of it.
Up to 3 months in advance = From the current date until the end of the month + 2 additional months.
Appendix 3: Example Schedule Scenarios
The following scenarios help to illustrate scheduled SMS messaging. They are based on a fictitious calendar, which incorporates plans/holidays, and closed/absent days (marked in red).
|
M |
T |
W |
T |
F |
S |
S |
Mar-08 |
|
||||||
|
|
1 |
2 |
3 |
4 |
5 |
6 |
|
7 |
8 |
9 |
10 |
11 |
12 |
12 |
|
14 |
15 |
16 |
17 |
18 |
19 |
20 |
|
21 |
22 |
23 |
24 |
25 |
26 |
27 |
|
28 |
29 |
30 |
31 |
|
|
|
Apr-08 |
|
|
|
|
|
|
|
|
|
|
|
|
1 |
2 |
3 |
|
4 |
5 |
6 |
7 |
8 |
9 |
10 |
|
11 |
12 |
13 |
14 |
15 |
16 |
17 |
|
18 |
19 |
20 |
21 |
22 |
23 |
24 |
|
25 |
26 |
27 |
28 |
29 |
30 |
31 |
Example 1
Current Date: |
8th March |
Appointment Date: |
10th, 11th, 14th March |
Selected Intervals: |
1 day, 2 days |
Do not send on closed/absent days? |
True (selected) |
Result: |
SMS messages are sent on 8th Mar for appointments on the 10th and 11th. Appointments on the 14th March are ignored. |
Explanation: |
9th March is an absent/closed day, so it is skipped. The next open day is the 10th, so it becomes the starting point for selecting appointments; o The appointment on the 10th is included, because the 1-day interval was chosen. o The appointment on the 11th is included because the 2-day interval was chosen. o The appointment on the 14th is not included, because the 5-day interval was not chosen. |
Example 2
Current Date: |
|
Appointment Date: |
|
Selected Intervals: |
|
Do not send on closed/absent days? |
|
Result: |
Example 3
Current Date: |
|
Appointment Date: |
|
Selected Intervals: |
|
Do not send on closed/absent days? |
|
Result: |
Example 4
Current Date: |
|
Appointment Date: |
|
Selected Intervals: |
|
Do not send on closed/absent days? |
|
Result: |
|
Explanation: |
o The appointment on the 14th is included because the 1 day interval is selected. |
Example 5
Current Date: |
|
Appointment Date: |
|
Selected Intervals: |
|
Do not send on closed/absent days? |
|
Result: |
Example 6
Current Date: |
|
Appointment Date: |
|
Selected Intervals: |
|
Do not send on closed/absent days? |
|
Result: |
|
Explanation: |
o The appointment on the 26th is included because the 7-day interval is selected, and the 19th is 7 days prior to these appointments. o The appointment on the 27th is included because the 2-day interval is selected, and 2 days prior is a closed/absent day. |
Example 7
Current Date: |
|
Appointment Date: |
|
Selected Intervals: |
|
Do not send on closed/absent days? |
|
Result: |
|
Explanation: |