Bulk Bill Claims are streamlined, paperless, electronic claims to Medicare. A Patient’s Medicare card details and Doctor’s Referral must be recorded within the Patient Details window, for verification purposes, and to assist with the Bulk Bill claim to Medicare.
This section provides the steps to record, invoice, and batch Bulk Bill Claims. The following steps are required:
1. Add Medicare details and Doctors Referral to the Patient Details window
2. Create a Bulk Bill Account and issue the Bulk Bill Claim (invoice)
3. Batch Bulk Bill Claim to Medicare (Batch Bulk Bill & DVA Claims to Medicare procedure is located after DVA Claiming procedure).
Step 1 - Patient Details
A Patient’s Medicare card details and Doctor’s Referral must be recorded within the Patient Details window; for verification purposes, and to assist with the Patient Claim to Medicare.
1. Within Bluechip, open the patient’s record. The Patient Details window appears. Locate the Medicare section. Enter the patient’s Medicare Card Number and Expiry Date. This will automatically generate a Ref number – modify it if necessary.
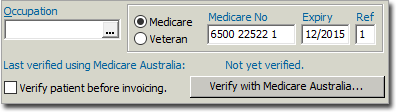
2. Click 
3. If the Patient’s name (as recorded in Bluechip) differs to that as recorded with Medicare, a prompt appears confirming the difference in name. If this occurs;
o Click Yes to update the information in Bluechip with that on the card.
o Click No to leave the name in MedicalDirector Bluechip as-is. This prompt will display for each verification.
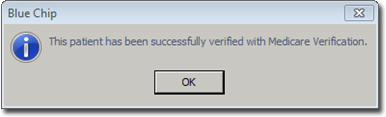
4. Otherwise, you will be prompted with a successful verification.
5. Click 
6. Ensure the Doctor’s Referral is recorded in the Patient’s record. Some Ramsay Departments do not require Referring Doctor details to submit the claim to Medicare; bypass this step.

Step 2 – Create Bulk Bill Account and Bulk Bill Claim
Bulk Bill Account is required to bill the claim for the Medicare Bulk Bill Patient. This verifies Medicare details and fees with Medicare when billing the claim.
1. Within the Patient Details window, select the Accounts margin menu, and then locate an existing Bulk Bill account.
o If one exists; double-click it to open it.
o If one does not exist; create a new account by clicking 
2. The New Account window appears. Select the required Practitioner, and Class of ‘Bulk Bill’.
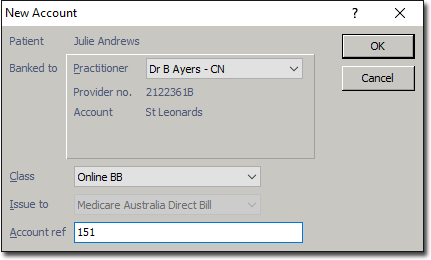
3. Click The Account Details window appears. Ensure the correct Practitioner and Class (Bulk Bill) has been selected.
o If either the Practitioner or Class has been selected incorrectly, click to display the new account screen again for correct selection.
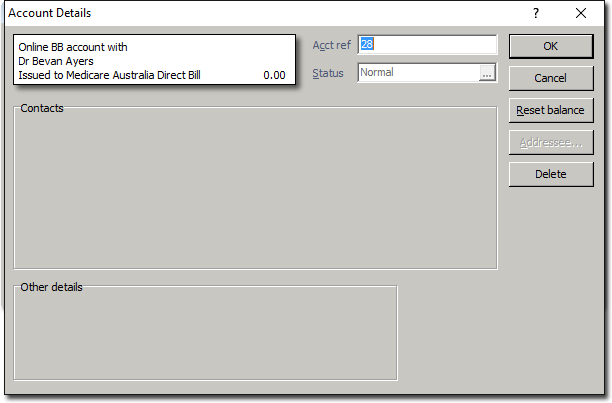
4. Click The new Bulk Bill account is added to the list of accounts in the Patient’s Record. Double-click the account or select it and click  to open the account.
5. Click  to begin issuing a new invoice.
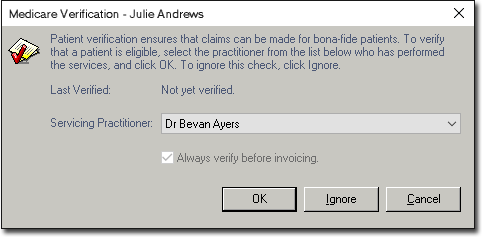
6. The Medicare Verification prompt appears.
o Click if verification is required.
o Click  if already verified.
7. Select the Service Type if required. There will be multiple service types only if you have pre-configured this.

8. Enter the appropriate Service Date and Item Number as desired. A Service Item’s fee will appear automatically. Ensure the fee is correct.
9. Tab to the Service Text field, and double-click in the field to reveal the  button. Click the icon to add text for Medicare if required, and then click
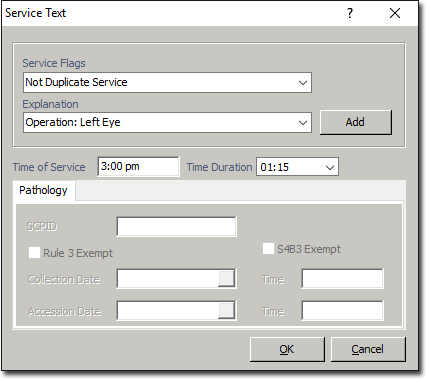
10. Select the appropriate Service Flag from the drop down menu.
11. Select the appropriate Explanation from the drop down menu. If the explanation you wish to select does not exist, enter it manually;
o If the explanation is a once-off, tab to the next required field, or
o If you wish to save this explanation to use again at a later time, click 
12. Enter Time of Service, Time Duration if required, and then click
o Repeat steps 8 – 12 if additional Service Items are required on the invoice.
13. On the New Invoice window; click 
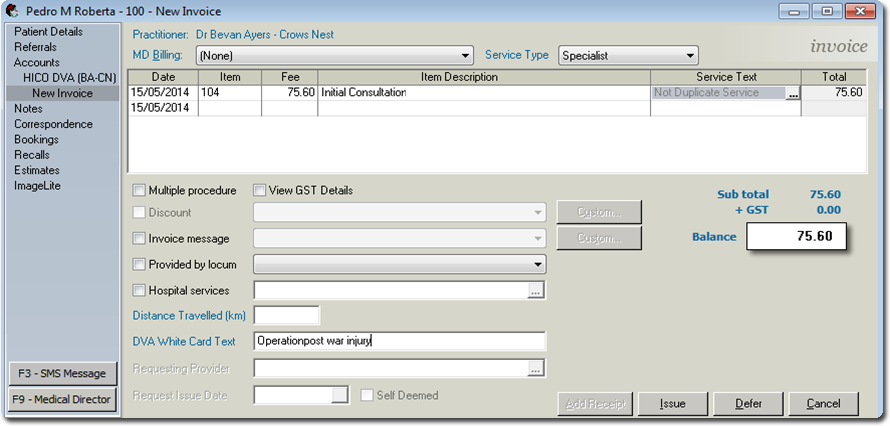
14. When prompted; select the associated Referral, or if a referral is not required select the appropriate Hospital/ No Referral/Not Applicable, and then click
15. You will be prompted to enter the date-of-issue for the invoice. The default is the current date. Click The TYRO Terminal (Easyclaim) process commences.
If your Practice does not have a TYRO Terminal, the Bulk Bill Claim has now transferred to the Medicare module to be manually-batched to Medicare. Disregard Steps 16 to 18.
16. On the TYRO Terminal, you will be prompted to accept the claim. Accept Claim to continue.
o The total amount displayed in the Patient Easyclaim window is an estimate of the benefit only. Medicare may adjust the benefit payable in accordance with the rule set out in the Medicare Benefits Schedule.
17. On the TYRO Terminal, the Patient is prompted to assign their right to the benefit to the Practice by pressing Yes.

18. Once the patient has assigned the right to benefit, the claim will be processed, and if successful is submitted to Medicare. You will have the option to print the submitted claim for the Practice. The TYRO Easyclaim is also transferred to the Medicare Australia module awaiting payment.
Batch Bulk Bill Claim (without TYRO) to Medicare
When Bulk Bill claims (without TYRO) are invoiced within the patient’s account, the claim transfers to the Medicare Australia module. To access, open the Practice Explorer, and from the margin menu select Medicare Australia.
Due to the claims having not yet been submitted, they are not displayed on the main Medicare window. The New Batch selection holds the claims not yet batched, unprocessed, resubmitted either being looked into or ready to action (red in colour).
You can view claims associated with individual practitioner or all practitioners. You can examine claims within a specific date range, individual or all claim types, and indicate to display finalised claims. When changes are made to these options, ensure you click the Refresh button or the Quick Refresh check box is selected to auto-refresh the display. The status of claims determines the action required on the claim.
The following statuses will display once a Bulk Bill claim has been batched to Medicare:
|
Claim Status |
Description and Action |
1. From the Practice Explorer button on the lower-right hand side of the screen, select Medicare Australian from the margin menu.
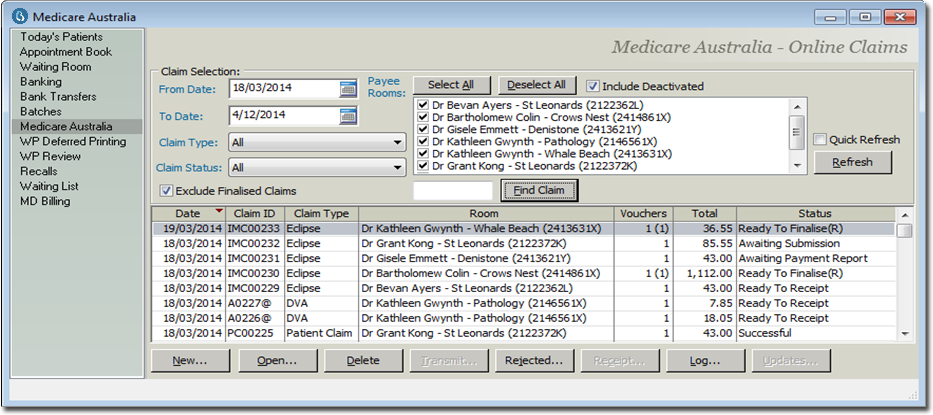
2. Select Practitioner, Claim Type as Bulk Bill and Date Range if required. If not selected from this window, these options can be selected when sending the Bulk Bill or DVA batch (next step).
3. To batch the new Bulk Bill claims, click

o The Claim Type defaults to Bulk Bill. Select the appropriate Practitioner and Service Type (if multiple are available), and Service Location if required.
4. Click ![]() to select a single claim, or
to select a single claim, or ![]() to select all claims. Ensure that the resubmitted claims (red in colour) are not included within the selected invoices to batch, if you are only batching new claims.
to select all claims. Ensure that the resubmitted claims (red in colour) are not included within the selected invoices to batch, if you are only batching new claims.
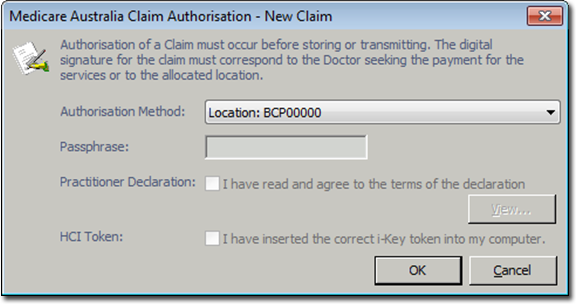
5. Click  The Claim Authorisation window appears. Select the Authorisation Method if required, or click to process.
6. Once the batch has been sent to Medicare, the Medicare Claiming window now displays the batch, along with a status of ‘Awaiting Process Report’.
o To ensure all online claims have been batched to Medicare, refer to the Unclaimed Invoice Report. This report lists any issued invoices/claims that have not yet been submitted or batched to Medicare per Practitioner To access the report; either click the button, or select Reports > Audit Trail Reports Printer > Unclaimed Invoices Report.
Bulk Bill & Easyclaim Reports
Bluechip provides many Medicare Reports that can assist with claims and reconciling. Four reports as a quick reference to assist with Bulk Bill Claims and Bulk Bill Easyclaims are:
o Debtor Detail Report: provides a summary and detailed breakdown of patient account balances by duration of time (ageing). This will generate the outstanding debit for Bulk Bill claim accounts
o Medicare Processing Report (BB, DVA, BB Easyclaim): provides a list of unprocessed and processed Bulk Bill claims. In the Medicare module; these are the Bulk Bill claims with the status Waiting Process Report, Waiting Payment Report, Ready to Receipt, Rejected and Finalised (Receipted), etc.
o Medicare Claim Payment Report (Bulk Bill/DVA): provides a summary and detailed list of processed Bulk Bill claims that generate the payment details via Medicare Online. This report can be used to reconcile the Practitioners bank statement. . In the Medicare module paid Bulk Bill claims generate the status Finalised (Receipted)
o Medicare Easyclaim Payment Report: provides a list of processed Bulk Bill Easyclaims that generate the payment details via Medicare Online. This report can be used to reconcile the Practitioners bank statement. In the Medicare module paid Bulk Bill Easyclaims generate the status Finalised (Receipted)