BC Secure is a utility for managing user program access and permissions in Bluechip. This guide in an overview of the features of BC Secure.
During the initial Bluechip customisation for your Practice at MedicalDirector, access to BC Secure is typically granted to the Practitioner(s) and Practice Manager unless specifically requested to include others.
Opening BC Secure
1. BC Secure is accessed from within Bluechip itself by selecting BC Tools > Utilities > BC Secure.
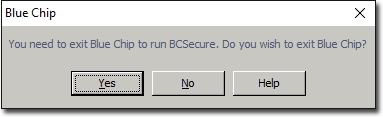
2. Bluechip will close in order to open BC Secure. Click the Yes button to continue.
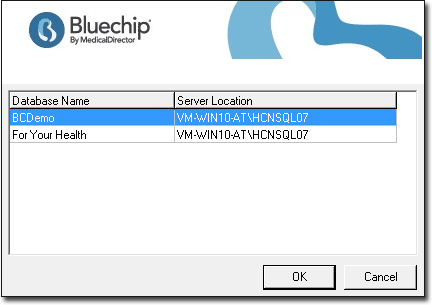
3. If prompted, from the Select Database window, select the Bluechip BC Secure database you wish to open. You will only see this window if you have access to multiple Bluechip databases.
4. Enter your username and password.

5. Click  to enter BC Secure.
The Practice Screen
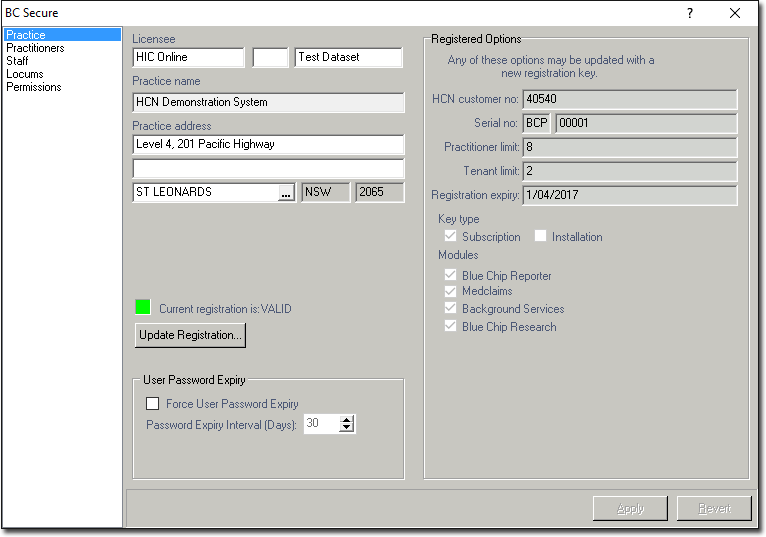
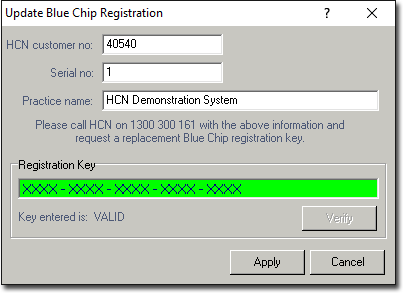
This screen represents the licensing and registration details held by MedicalDirector within Bluechip. White text fields represent details which can be changed without affecting Bluechip’s operation, whereas grey cannot be edited. The Registered Options (on the right-hand side of the window), display the Practice’s MedicalDirector Customer Number, database serial number, practitioner limit (the total number of practitioner and tenant users that can be entered into the system).
Should a new practitioner or tenant licence be required, please contact the MedicalDirector Sales. MedicalDirector will supply you with an updated Licence Key.
1. To update the practice’s registration click 
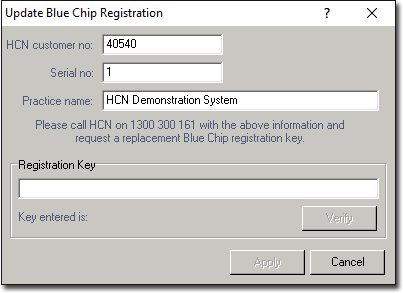
2. Enter the new Registration Key exactly as it was supplied.

3. Click  You will be notified it the verification fails.
4. Click 
5. You will be notified upon a successful registration. Click to continue.
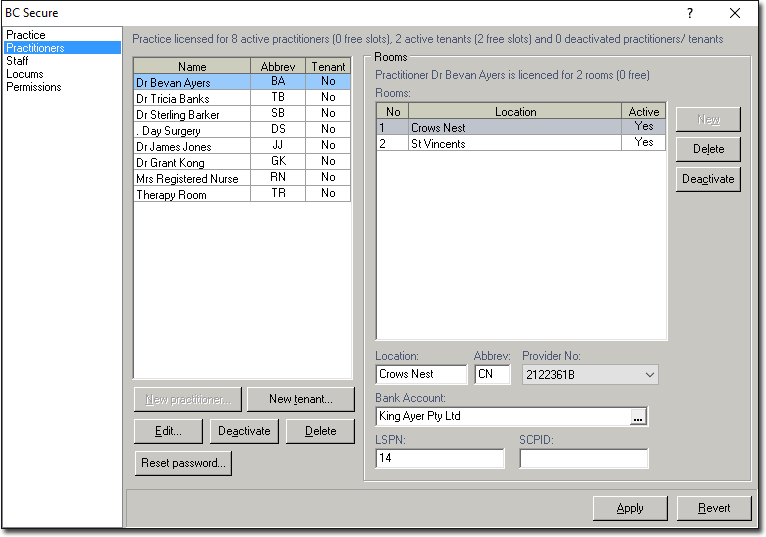
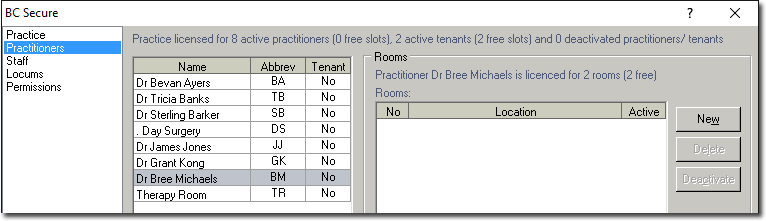
The Practitioners Screen
This screen allows the adding of a new practitioner or appointment book (tenant), deactivating a previously active practitioner, setting up a billing location and associated bank account.
Adding a New Practitioner
The following steps demonstrate how to add a new practitioner to Bluechip. Please call MedicalDirector Customer Service on 1300 300 161 (option 2) to create billing letterheads, billing classes, appointment types, and associated price lists for the new practitioner.
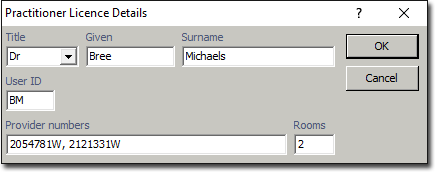
1. Click  The Practitioner Licence Details window appears.
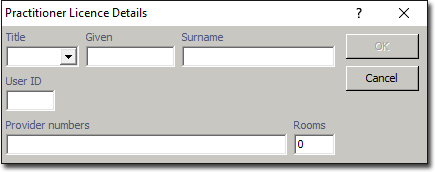
2. Complete their details as necessary. Separate multiple Provider Numbers with a comma. The button becomes available once you have entered the necessary and valid details.
Setting up Locations for a New Practitioner
The terms 'Room' and 'Location' are interchangeable, with both referring to the physical location at which a practitioner resides. There may be instances however where a single location has multiple rooms, and although this is uncommon, Bluechip provides for this scenario.
Rooms are defined by;
o A room number.
o The location at which the room can be found.
o Whether or not the room is 'active'.
Locations are defined by;
o A name, and its abbreviation.
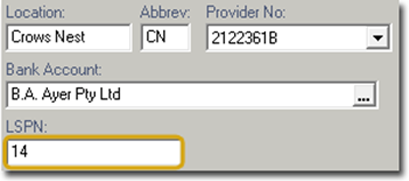
o A Provider Number (a practitioner must record a Provider Number for each location at which they practise)
o An associated bank account
o A Location Specific Practice Number (LSPN) if required, for all diagnostic imaging and radiation oncology sites.
Each location can have a unique letterhead associated with it, and when an account is created in a patient's file, the practitioner and location are both specified. The linking of earnings figures with locations allows you to run separate financial reports for each location. Note also that Rooms/Locations are available to practitioners, but not locums or tenants.
1. Within BC Secure, select the Practitioners menu.
2. Click  to set up a new location.
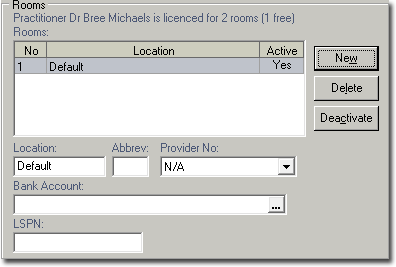
3. In the Location field, replace ‘Default’ with the actual location and include a suitable abbreviation.
4. Click the Provider No. drop down list to associate the correct provider number with the billing location.
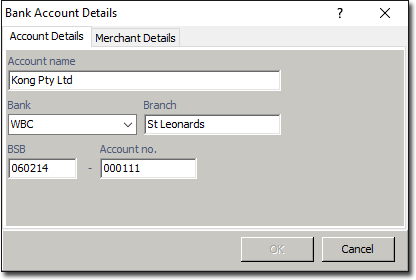
5. Click the  button at the end of the Bank Account field.

6. The Bank Accounts window appears.
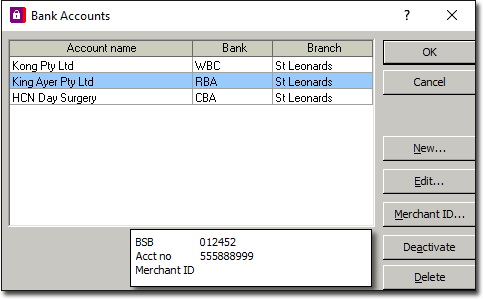
o Select the existing bank account and click (for when all monies are paid into a single practice account and the practitioners draw a wage).
o Alternatively, if a new bank account is required for the new practitioner, click  to enter the new Bank Account details.
o The Merchant Details tab is used when the practice is using an integrated payments system.
7. Click to continue.
8. You will be returned to the main BC Secure window.
o A Location Specific Practice Number (LSPN) is a number allocated by Medicare to a registered diagnostic imaging and/or radiation oncology premises or base for mobile facilities. Enter if required.
9. Click the Apply button to accept the changes.
Adding a New Tenant
1. On the BC Secure window, click  The Tenant Licence Details window appears.
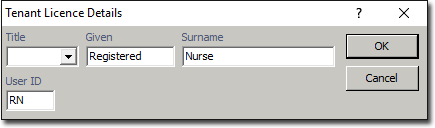
2. Enter in the Tenant details (a Tenant is a non-billing entity like a Registered Nurse).
3. Click
|
|
With the tenant selected allows the name and logon initials to be changed. With a practitioner selected allows the name, logon initials, provider numbers and number of rooms to be added to or changed. |
|
|
Deactivating a practitioner will prevent any billing to occur on behalf of that practitioner, and remove their appointment book from the installation. In the practitioner screen, the deactivated practitioner will appear in italic. Clicking the Reactivate button and then clicking Apply will reinstate the practitioner. o Deactivating a Tenant will remove their appointment book from the Bluechip installation. o To reactivate a practitioner or tenant, please contact MedicalDirector Customer Service. |
|
|
With a practitioner or tenant selected, forces a password change at the BC Secure screen rather than from within Bluechip |


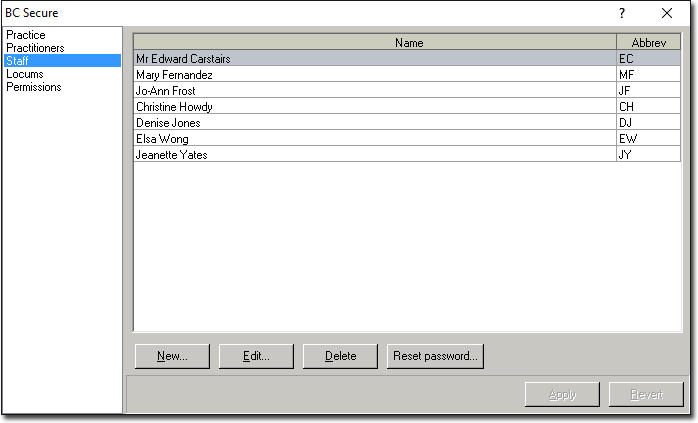
The Staff Screen
Adding New Staff
The Staff screen allows the entry of new staff members, editing their names or logon initials, deleting previous employees and resetting their passwords without logging into the Bluechip program.
1. To enter a new staff member, click The Staff Licence Details window appears.
2. Enter the staff member’s particulars.
o If their initials conflict with those of another user, a warning message will prompt for a different set of initials.
o The user id field can accept up to 3 characters, so using a middle initial is acceptable compromise.
3. When an acceptable, non-conflicting name is entered, click
4. Click  to accept and confirm the change(s), Click Revert to cancel the changes.
|
|
Opens the Licence Details window of the selected record. When modifications have been performed, click the OK button then the Apply button to confirm. |
|
|
Deletes the selected record. Note that you will not be prompted to confirm this action. If the deletion is performed in error, click the Revert button to undo the deletion. |
|
|
Forces a password change for the selected record. |

The Locum Screen
Adding a Locum
The Locum window is used to add Locums practising on behalf of a regular practitioner. Before beginning, ensure the Locum’s provider number is supplied.
1. Click  The Locum Licence Details window appears.
2. Enter the practitioner’s details at the Locum Licence Details panel
3. Click
4. Click to confirm the entry or Revert to cancel.
o Although both the Locum’s and Practitioner’s details have been recorded in BC Secure, they cannot log into Bluechip until they have been granted permission to do to. This is covered in the Permissions section, below.
|
|
Allows the Locum’s name, title and or provider number to be changed. |
|
|
Removes the ability to use the Locum in billing, along with any permissions previously assigned. Deletion of the Locum’s details is immediate with no confirmation message. There is no need to click apply, and the revert button does not retrieve a deletion in error. |
|
|
Forces a password change for the selected record at the BC Secure screen rather than from within Bluechip |
The Permissions Screen
Setting Permissions
Bluechip provides for permission-level access to certain functions and modules. You can view which permissions each user has from within Bluechip, via the Permissions Tab of the Practitioner Setup window.
User permissions are managed via BC Secure’s Permissions menu. Permissions can be granted to a given user by selecting a pre-defined set of permissions from the Permission Template drop-down list, or by customising a selection of permissions by enabling/disabling permission check boxes. The following example indicates that Dr Bevan Ayres has been granted a 'Customised' set of permissions.
Permission Templates
1. Select the staff member.
2. Click the Permission Template drop down menu.
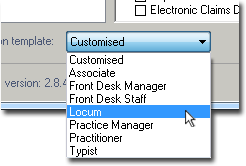
3. Select the role closest to the staff member’s role at the Practice.
4. To grant further permissions, click in the check box alongside the description. To rescind a permission, click a previously granted permission (marked with a tick), which will clear it. Any change to the permission template will be regarded as customised, and reflect this in the permission template drop-down list
5. Click to confirm the permissions (revert to cancel).
Explanation of Permissions
|
|
Enable login |
Enables the staff member to login to the system. If this permission is not checked, the user is informed that their login has been disabled. |
|
General |
View patients |
Allows the user to view patient records. |
|
Edit patient details/referrals |
Enables patient details data to be edited. |
|
|
View patient notes |
The patient notes menu option doesn’t appear in the patient explorer. |
|
|
Edit patient notes |
Enables the user to type in the notes field. |
|
|
Print to screen/file |
Provides an option in the printing engine to direct the output to the screen or to be saved to disc as a file. |
|
|
Accounting |
View accounts |
Enables the Accounts menu item to appear in the left margin menu of the Patient Explorer. With the ability to view accounts, and new accounts can be created. |
|
Create invoices/receipts |
When disabled, a user can still access account details and print labels. MedicalDirector recommends enabling Low Level Financial Reports in the Reports section, otherwise the invoice and/or receipt cannot be printed. |
|
|
Adjust invoices/unbanked receipts |
Only allows adjustment of unbanked receipts. The option to reverse is disabled. |
|
|
Reverse invoices/unbanked receipts |
Only allows a reversal of an invoice (the ‘adjust’ and ‘reverse’ permissions are independent of each other). Similar panels appear when reversing an unbanked receipt. |
|
|
Reverse banked receipts |
This only pertains to banked receipts. ‘Unbanked receipts’ are covered by the previous permission. |
|
|
Amend invoice referral |
Allows amendments to an invoice to be made without adjusting it. Typically, referrals can be amended (amend invoice) and the service item description (amend invoice item) can be amended, but not the service date. The amend button is controlled by activating the permission here and in the code of a system file, with both needing to be activated for the feature to appear in Bluechip. |
|
|
Manage Split Receipts |
A ‘split receipt’ is where a single payment is made for separate services made by separate practitioners; separate invoices may have been issued, but the patient pays for service using one payment (using the add items button during receipting). This permission also controls Bank Transfers, which occur when payments are transferred between practitioners with separate bank accounts, without changing patient accounts. For example, a patient prepays for planning and management of a pregnancy, and another practitioner within the practice (part of the Bluechip system) assists with elements of the treatment, or takes over treatment for a period of time. A Bank Transfer allows for payment of those elements or period of time to be resolved between the practitioners, without adjusting and reissuing invoices and receipts. |
|
|
Receipt debt collection items |
Removes the Debt Collection option from the payment method types when creating a new receipt. |
|
|
Write-offs/credit refunds |
Allocating a Credit or Refund allows funds to be either refunded to the patient or allocated against another outstanding invoice. |
|
|
Allocated payment refunds |
Allows a payment that has been allocated to an invoice to be refunded. Being a refund, it is presumed that banking has been finalised. Changes here are reflected in the Refunds History tab and the Refunds section of the Banking. The invoice reverts outstanding. The refunded amount is presumed to be returned to the patient, as it is not recorded as a credit (pre) payment. |
|
|
Receipt batches |
Batches can be created and sent without this permission. However a user cannot open the batch in order to receipt the batch. This permission does not affect viewing, reprinting the summary, or changing the batch number. |
|
|
Adjust/finalise deactivated practs |
When a practitioner is deactivated, no new business can be conducted on their behalf. This permission only allows adjustments of previously-issued invoices and receipts, new receipts for existing invoices, and the finalisation of banking for these practitioners. |
|
|
Banking |
View/edit banking |
Controls access to the Banking screen via the Practice Explorer. If this permission is not granted, then the Banking menu item is unavailable. |
|
View banking history |
Access past bank deposit slips and EFTPOS settlements in the Banking window. This permission cannot be used without the above permission granted. |
|
|
Appointments |
Cancel appointments |
Allows the user to cancel appointments in the appointment book. |
|
Reports
*Selecting a higher-level report permission does not automatically grant users access to lower-level reports. |
Low level financial reports |
In addition to the reports that can be printed for this level, the user can print Invoices, Receipts, and Bookings. See Reports Permissions Matrix. |
|
Medium level financial reports |
||
|
High level financial reports |
User can print bank deposit slips, EFTPOS statements and past bank account settlements in addition to those items listed in the Reports Permissions Matrix. |
|
|
Management level financial reports |
See See Reports Permissions Matrix |
|
|
Bluechip Reporter |
Users have to login to this area of Bluechip to run non-standard reports. Granting this permission will allow users to log in. |
|
|
Setup |
BC Secure |
Allows users to access the BC Secure area and modify all of the settings represented in this table. |
|
Change practice setup |
With the exception of the Practitioner Details section under the Setup menu within Bluechip, all other items are locked. |
|
|
Change billing setup (fee lists) |
Allows users to access the Service Item List to upgrade Health Fund fees, edit the miscellaneous items list, and change the practitioner’s fees in the Practitioner Details option, under the setup menu in Bluechip. |
|
|
Change WP setup |
Allows users to access the WP and Recall templates screen from the setup menu. Within this screen you can change default titles, create or edit templates, export letters from Bluechip, import RTF files into MedicalDirector Bluechip, copy and delete templates. |
|
|
Change appointments setup |
Allows the user to change the appearance of the Appointment Book. See the Appointments Setup section for more detail. |
|
|
Change general setup |
Allows users to access User Preferences under the setup menu. User Preferences affects settings only for that particular user. |
|
|
Change SMS setup |
Restricts access to this area. In this area the practice can register for SMS reminders via MessageNet. This area also provides the means to change the wording of the Standard Message, when the SMS will be sent prior to the appointment, and also proxy server configurations if required. |
|
|
Backdate Setup |
Manage month close-off |
Allows the user to close off months to restrict backdating of transactions. This is useful for maintaining accuracy in financial/tax reporting. Month Close-off is found under the Setup menu > Practice. The year can be selected from the drop down list, and individual months can be clicked (ticked) to close-off the month, or clicked (unticked) to reopen the month. The Close All button (see over) will close off all the months. The years 2008 and before are locked by default. |
|
Backdate invoices/receipts |
The backdating functionality does not affect service dates, only issue dates. An invoice can record service dates in the past, but can only be issued on the current date (to which the computer is set). Granting the Backdate permission allows backdating of the Issue Date. As receipting doesn’t require service dates, a receipt can only be issued on the current date when this permission in rescinded. |
|
|
Forward-date invoices |
Prevents users from creating and issuing invoices to a future date. |