Introduction
MedicalDirector releases incremental updates to its software applications from time-to-time. These updates are provided to customers as a download, made available to registered users via either;
o MedicalDirector Automatic Update: This utility uses your active Internet connection to automatically download incremental updates for Clinical, Pracsoft, and Bluechip. It can also download and automatically install updated content for Clinical. This topic refers specifically to MedicalDirector Automatic Update.
o The MedicalDirector Web Site: If you choose not to take advantage of the MedicalDirector Automatic Update utility, you can always download an incremental update manually from the MedicalDirector web site if you wish.
Note: Once MedicalDirector Automatic Update has been installed, you may need to configure your firewall to allow it Internet access in order to search for and download updates to MedicalDirector software.


Stage 1 – Configuring Automatic Updates on the Server
The following information describes the process for configuring your server computer such that it detects and downloads updates to MedicalDirector Software Applications. This process will not interrupt users working in MedicalDirector software on their workstation. This step involves telling your server computer;
o Whether or not you wish it to check for updates
o How often you wish the check to occur
o When you want the download to occur
On your Server Computer:
1. Locate and right-click the MedicalDirector Automatic Update icon ![]() in your Windows System Tray. If the MedicalDirector Automatic Update is not active, it is available via;
in your Windows System Tray. If the MedicalDirector Automatic Update is not active, it is available via;
o Windows 7: Start > All Programs > MedicalDirector > Automatic Update > Automatic Update.
o Windows 8.1 and Window 10: Windows key  > Type ‘Automatic Update’.
2. Select Preferences from the menu that appears.

3. The Preferences window appears. Tick the Schedule check box (Check for updates every…), and indicate how often you wish to automatically check for updates (Month/Week/Day/Hour).
4. Choose when to download available updates; as soon as they become available, or at a pre-determined time (and set the time if you select this option).
5. The Applications to Update section lists the installed applications that can be updated. Indicate which applications you want MedicalDirector Automatic Update to auto-check for, by ticking the associated checkbox(es).
6. Click  to locate and select a location on your Server to save the downloaded file(s) to. Note that this cannot be a shared location (e.g. \\My_Shared_Folder), or any network resource.
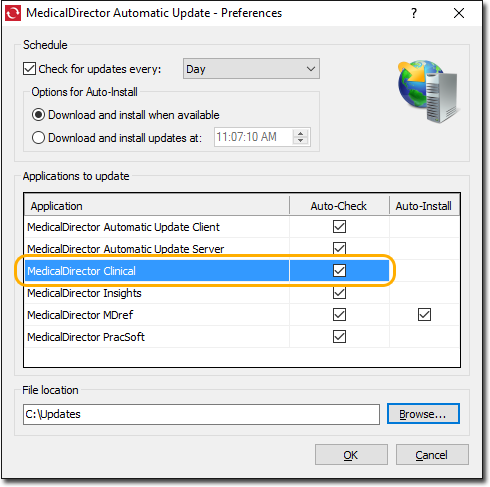
7. Click  to save your settings.
To view a history of updates, right-click the MedicalDirector Automatic Update icon ![]() and select History.
and select History.
Stage 2 – Using MedicalDirector Automatic Update
These instructions cover the following typical network scenarios:
o A server computer with workstation computers, all of which have an active Internet connection.
o A server computer with workstation computers, where only the server has an active Internet connection.
o A stand-alone computer (or Terminal Server environment) with an active Internet connection.
1. When a computer discovers that an update is available, MedicalDirector Automatic Update prompts you, as shown in the image below.

2. To view the updates that are available to install, either;
o Click the prompt, or
o Right-click the MedicalDirector Automatic Update icon ![]() in your Windows System Tray and select View Updates. The MedicalDirector Automatic Update program opens, an example of which is shown below.
in your Windows System Tray and select View Updates. The MedicalDirector Automatic Update program opens, an example of which is shown below.
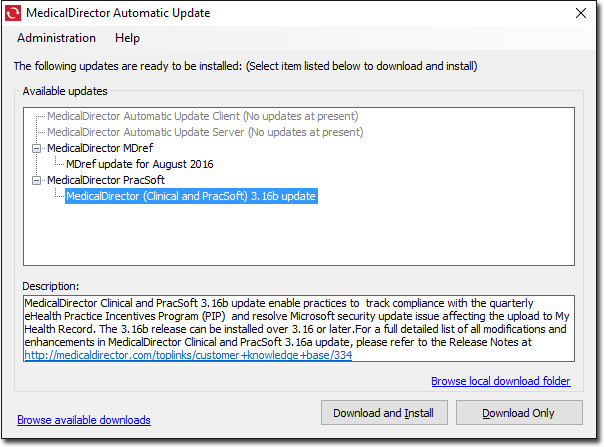
3. At this stage you have the following options:
o If you are on your Server computer (where all MedicalDirector updates are recommended to be downloaded and installed first), you can select an update to download. The update will be downloaded from MedicalDirector via your Internet connection. If you wish to do this, proceed now to Step 4.
o If you are on a Workstation computer;
• You can use your workstation to browse your server computer's download folder for updates that were downloaded to it that you have not yet copied to your workstation for installation. This is the recommended method. If you choose this method, continue now to Step 4.
• If your server is not accessible by your workstation at this time, the workstation will attempt to download the update directly from MedicalDirector itself via your Internet connection. If your workstation cannot access your server, and you choose to download a MedicalDirector update to it, the entire update is downloaded from MedicalDirector. This will occur for each workstation you download the update to whilst your server remains inaccessible.
4. Select the item you wish to update. Then either;
o If you are on the server computer, click 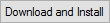 This downloads the update from MedicalDirector via your Internet connection, to your MedicalDirector Automatic Update Server computer, and immediately installs the update. Typically, this action is only performed on the server (but can be performed on a workstation computer when the server does not have an active Internet connection, downloading the update to the workstation, but then copying it to, and installing it on the server computer first).
o Click  This downloads the update from MedicalDirector via your Internet connection, to your MedicalDirector Automatic Update Server computer. The update file will reside on your computer at a pre-defined location (set by right-clicking the MedicalDirector Automatic Updates icon and selecting Preferences) until you install it manually, later. Typically, this action is only performed on the Server (but can be performed on a workstation computer when the server does not have an active Internet connection, downloading the update to the workstation, but then copying it to, and installing it on the server computer first).
o Click the Browse Local Download Folder link to browse your computer for updates that you downloaded previously, but have not yet installed. Typically, this action is performed on the server computer (but can be performed on a workstation computer, where the server did not have an active Internet connection, and you had to download the update to the workstation).
o If you had previously downloaded updates to your server computer, and now wish to install them to your workstation computer, on your workstation computer click the Browse Available Downloads link to open a list of updates that were downloaded to your server computer, which are now available to install to your workstation. Click any update link to proceed with the installation.
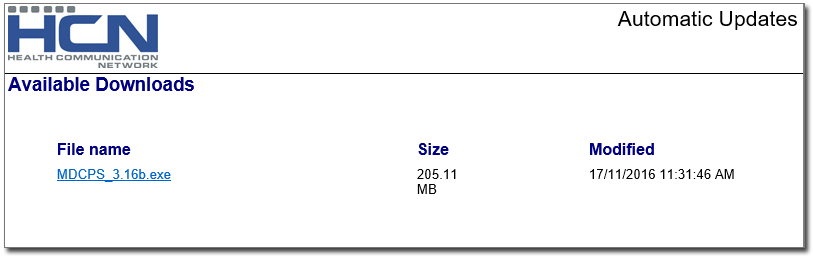
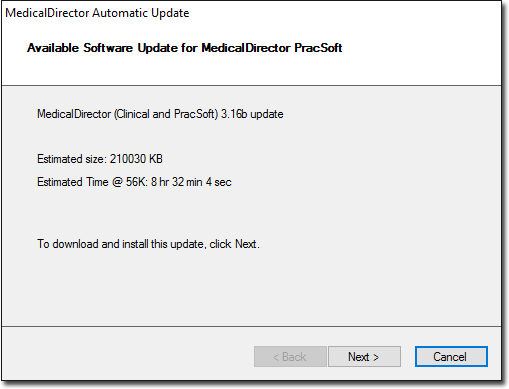
5. On commencing the update installation, you will be given an opportunity to check the details of the download including its size and estimated time to download, as shown below.
6. Click  to continue. The download commences.
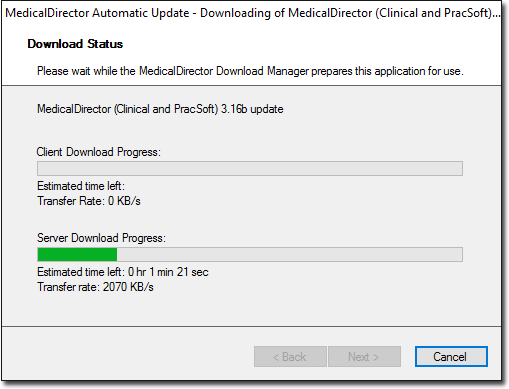
This window indicates the progress of the download from MedicalDirector to your MedicalDirector Automatic Update Server computer first (as indicated by the lower progress bar), and then from your MedicalDirector Automatic Update Server to your workstation computer across your network (as indicated by the upper progress bar).
7. After the download has completed;
o If you had elected to download and install the update, the update will now be installed. An installation wizard guides you through the process.
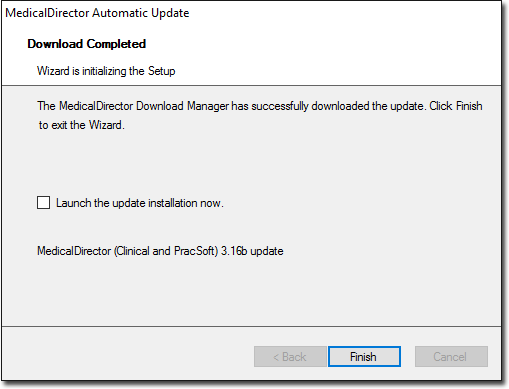
o If you had elected to download only, you will now be presented with an opportunity to launch the update installation regardless, as indicated below. You do not have to install the update at this time - you can install it manually, later.
8. Click  to continue.