Before You Begin
Introduction
When installing SQL Server , ensure you select the correct installer for the Operating System platform you will be using (32bit only, 64bit only or the combination 32/64bit version).
Ensure you have checked the "Recommended System Requirements for MedicalDirector Products " BEFORE you begin.
Prerequisites for SQL Server
Microsoft SQL Server setup requires the following prerequisites to be installed:
o Windows Installer 4.5
o Microsoft .Net Framework 3.5 SP1
o Powershell v2.0 (For XP & 2003 operating systems)
The Windows Installer 4.5 and .Net Framework 3.5 SP1 can be installed independently, or they can be installed by the SQL Server 2008 installer.
It is advisable that you refer to Microsoft SQL user guide for the version of SQL you are installing.
HCN SQL Specific Options for HCN Instances
o Instance Name: must match those listed above (i.e. HCNSQL07 and ESP)
o Service Account: must use the built-in System Account – Local System
o Authentication Mode: must be Mixed Mode
o SA Password: must adhere to the strong password rules (e.g. HcnTemp123$)
o Collation Settings: leave as the defaults automatically detected by the Microsoft Installer
Upgrade instances using SQL Server
|
The screen shots shown below may differ to those displayed in your environment, depending on the version of SQL you are installing. Always refer to Microsoft support help if you are unsure. |

1. Perform a full backup via MedicalDirector Maintenance. If you encounter any errors please contact MedicalDirector Customer Service.
2. Stop the following services;
o Start > Run > Services.msc
o Locate and highlight each service (where available, depending on software version), and select ‘Stop’.
• HCN Service Manager
• HCN Integrated service
• HCN Automatic updater
• MDXi
• SMS Scheduling Agent
3. Start the SQL Server installer.
4. Select the Upgrade option.
5. Step though the wizard to the Select Instance Screen.
o Use the drop down box Select HCNSQL07.
6. Click Next to upgrade the database.
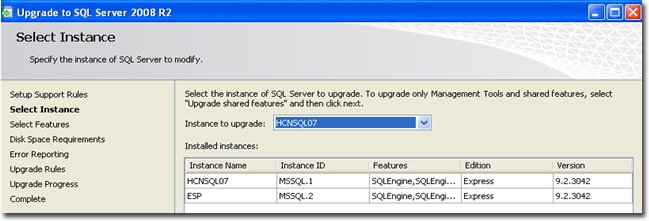
7. Repeat steps 3 to 5 for the ESP instance.
8. Once completed close the Installer and open Clinical / Pracsoft to test.
9. Run Clinical / Pracsoft to ensure all is working correctly and that the most recent patient data is available, including any correspondence recorded.
Upgrade Instances via a Full Uninstall and Reinstall
1. Perform a full backup via MedicalDirector Maintenance. If you encounter any errors please contact MedicalDirector Customer Service .
2. Does the site have a default (C: drive) install of the Medical Director Clinical/Pracsoft program? You will need to check and make note of where the following is installed, for the reinstallation.
SQL location. If unsure, check the following:
o MedicalDirector Maintenance > Common > Database Properties > Database Tab
o 32-bit OS: HKey_Local_Machine > Software\Health Communication Network\Server Components\Database\HCN key
o 64-bit OS (3.12+): HKey_Local_Machine > Software\WOW6432Node\Health Communication Network\Server Components\Database\HCN key
Medical Director Clinical/Pracsoft installed location e.g. C drive, D drive
o 32-bit OS: HKey_Local_Machine > Software\Health Communication Network\Medical Director\Path
o 64-bit OS (3.12+): HKey_Local_Machine > Software\WOW6432Node\Health Communication Network\Medical Director\Path
ManageEzy installed location. If unsure check the configuration:
o Open MedicalDirector Maintenance > Configuration, Document Server to display the Manage Ezy location
o 32 Bit OS: HKey_Local_Machine > Software\Health Communication Network\Manage Ezy Server
o 64 Bit OS (3.12+): HKey_Local_Machine > Software\WOW6432Node\Health Communication Network\Manage Ezy Server
3. Insert the Medical Director Clinical/Pracsoft DVD. When the Installation Wizard starts, follow the prompts through to the ‘Computer Role’ Screen
o Click ‘Enable Advanced Options’ and then click ‘Uninstall Role’.
4. Start > Control Panel > Add/Remove Programs or Programs & Features
o Uninstall any remaining items beginning with HCN, Manage Ezy or Medicare Online.
5. Rename the following folders and Windows Registry Keys, by adding a suffix consisting of the current date. For example, the ‘Health Communication Network’ folder becomes ‘Health Communication Network 25-03-11’.
For 32 Bit Operating Systems:
o Folder: C:\Program Files\Health Communication Network\
o Registry Key: HKey_Local_Machine > Software\Health Communication Network\
o Registry Key for TS sites: HKEY_Current_User > Software\Health Communication Network\
For 64 Bit Operating Systems (3.12+):
o Folder: C:\Program Files(x86)\Health Communication Network\
o Registry Key: HKey_Local_Machine > Software\WOW6432Node\Health Communication Network\
o Registry Key for TS sites: HKEY_Current_User > Software\WOW6432Node\Health Communication Network\
SQL Installation Steps
1. Ensure you are logged in as a user with Administrator privileges.
2. Start the SQL Installer.
3. Planning Menu Screen
o Run the System Configuration Checker
This will identify any potential issues that could prevent a successful installation. Any issues discovered must be fixed before continuing with the installation.
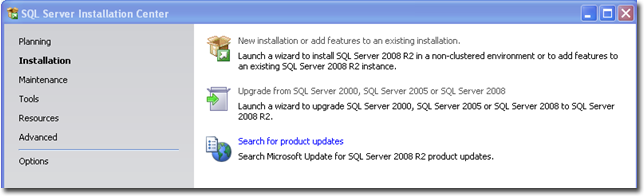
4. Installation Menu Screen
o Run the New SQL Server stand-alone installation or add features to an existing installation option.
This will identify any potential problems that might occur when installing SQL Server Setup support files. Any issues discovered must be rectified before continuing with the wizard.
o If no issues are discovered, click the OK button to continue with the installation.
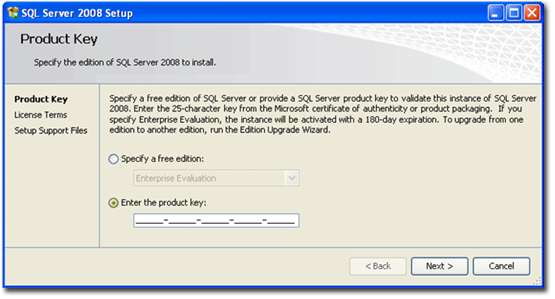
5. Product Key Screen
o If you are installing one of the Full variations of SQL Server (i.e. not the Express version) you will be prompted to enter a Product Key.
o Alternatively you can install as an evaluation version (subject to Microsoft’s policy on evaluation versions, which can include a trial period), by selecting from the drop down box.
6. Feature Selection Screen
o Select the components of SQL Server which you wish to install. Select a feature to read a brief description about it in the right-hand panel.
Note: The Analysis Server and Reporting Services items can be de-selected, as they are not required for MedicalDirector software.

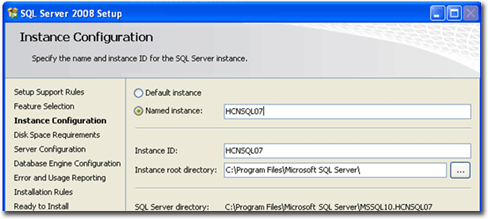
7. Instance Configuration Screen
o Specify a named instance. MedicalDirector software requires the following instance names be used:
o HCNSQL07
o ESP
o HCNMOB07 (for HCN Mobility role installs)
8. Disk Space Requirement Screen
o You will be notified of the disk space required for the installation of SQL Server. Resolve any disk space issues before continuing.
9. Service Accounts Tab
o SQL Server Browser entry has the Account Name of the built-in System Account – Local System
o Startup Type is set to Automatic.

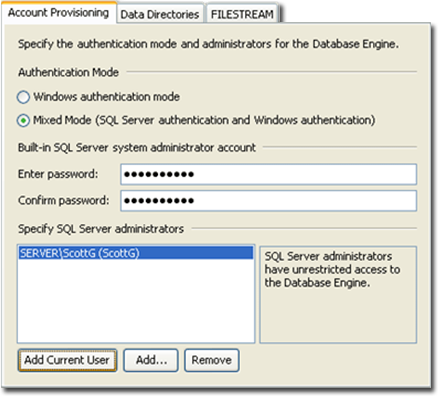
10. Database Engine Configuration Screen, Account Provision Tab
o Select Mixed Mode authentication.
• The SA Password must adhere to ‘strong password’ rules (e.g. HcnTemp123$).
• SQL Server Administrators, click the Add Current User button.
o Optional: Data Directories Tab, to specify a non-default installation directory. If required, you can select to install the Databases in a different folder other than the default location. If you are unsure, leave the folder locations with their default values.
11. Error and Usage Reporting Window
o Read the options provided and select as desired.
12. Installation Rules Windww
o A summary will appear, if there are no issues identified, click Next to continue with the installation
o Should any issues be identified, they must be resolved before setup can proceed.
13. Ready to Install Window
o Review the features selected, click the Install button to begin the installation of SQL Server.
14. Installation Progress screen
o Progress can be monitored on this screen, click the Next button to see the installation summary report.
15. Complete window
o The location for the SQL Server Installation Summary log is provided.
o Click Close to complete the SQL Server installation.
16. SQL Server Configuration Manager, via Start > All Programs
o Click on Protocols for HCNSQL07SQL Server Network Configuration.
o Make sure the following protocols are enabled;
• Shared memory
• Named Pipes
• TCP\IP
o Repeat on the ESP instance
17. Restart the Instance Services
o Start > Run > Type Services.msc
o Locate, highlight & restart the following services
• SQL SERVER (HCNSQL07)
• SQL SERVER (ESP)
18. Reinstall Clinical and/or Pracsoft using the CD for the version of Medical Director Clinical/Pracsoft you originally had installed.
o Remember to access ‘Advanced Options’ during the installation, if you do not use a default C: Drive
o Install all MedicalDirector updates and MDref updates to match what is installed on the workstation computers.
Note: If the computer is a Terminal Service computer, you will need to ensure that the Terminal Service Manager (Control Panel > Administrator Tools > Terminal Service Manager) lists only the ‘Console’ login. No other login should be displayed (even if it is in a disconnected state).
19. Install any secondary software required (MedicalDirector GPRN Extractor, NSW HealthELink, etc).
20. Restore your Medical Director Clinical/Pracsoft Backup.
21. Run Clinical / Pracsoft to ensure all is working correctly and that the most recent patient data is available, including any correspondence recorded.