This process allows a site to recreate its Online Claiming Certificate Store using the most recent Medicare CD you have available, and the most recent certificates downloaded from http://www.certificates-australia.com.au/
You may be required to follow this process if:
o You have installed a new server computer, but didn't save the file.
o You forgot the store password.
o You accidentally deleted the store.
o The store otherwise became corrupted.
The Process in Brief
1. On the MedicalDirector Database Server, create a new PKI Store.
2. Import old certificates to the PKI Store.
3. Download and import the current public certificates.
4. Export a full fac_sign.p12 and fac_encrypt.p12, and backup.
Before You Begin
In order to recover your Online Claiming Location Certificate Store you will require:
o An active Internet connection.
o The most recent location certificate CD you have in your possession, and the RA number which is printed on the cover.
o The associated PIC [personal Identification Code] secure letter that accompanied that CD
In Detail
A: Create a new PKI Store
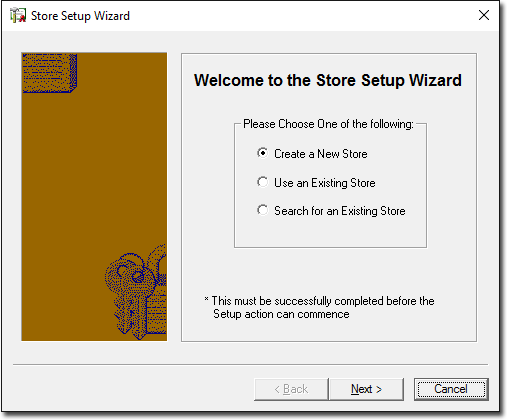
1. On your MedicalDirector Database Server computer, select Start > Control Panel > PKI Certificate Manager. The Store Setup Wizard appears.
2. Select the Create a New Store option.
3. Click  When prompted to select the Store's Location, browse to C:\Program Files\Common Files\PKI\
o It may be located in \Program Files (x86)\
o Enter File Name = hic.psi and click 
4. Set a store password.
o MedicalDirector recommends using your Minor ID.
5. Click  You are presented with the PKI Certificate Manager. Continue now to Step B.
B: Import Old Certificates to the PKI Store.
1. In the PKI Certificate Manager, click Import. You will be prompted for the password you created earlier.
2. When prompted to select the file to import, click the  button, and browse to the Location Certificate CD.
3. Select the fac_sign.p12 file, and click
4. Enter PIC Passphrase, and click
o The first certificate will now be in the certificates window.
5. Repeat steps 1-4, this time selecting the fac_encrypt.p12 file
o There should be two certificates now listed.
C: Download and Import the Current Public Certificates.
1. In your web browser, go to http://www.certificates-australia.com.au/
2. Locate the Certificate Search menu, and within it, click the Healthcare Public Directory link.
3. You will be presented with a facility for searching for the certificates you require. Locate the certificates.
o RA Number is the most accurate, and this can be obtained from the Location Certificate CD.
4. Download the located Signing and Encryption .CER files.
o These are incomplete public certificates, and require importing to the certificate store, containing full certificates, before they can be used.
5. Open the PKI Certificate Manager again (select Start > Control Panel > PKI Certificate manger).
6. Click Import.
7. Enter the Store Password you created earlier.
8. Click the button, and browse to the location of the downloaded .CER files.
9. Select the Location_name_SIGN.CER file, and click
o The most recent certificates will now appear in the certificates window.
10. Repeat, importing the Location_name_ENCRYPT.CER this time.
o There should be two in date certificates now listed.
D: Export and Backup the Full fac_sign.p12 and fac_encrypt.p12 Files.
1. Open the PKI Certificate Manager again (select Start > Control Panel > PKI Certificate manger).
2. On the Personal Tab, highlight the Signing Certificate (little pen on certificate) > Export.
3. Enter the Store Password you created earlier.
4. Browse to C:\HCN\Backups.
5. Enter the file name fac_sign.p12, and click .
6. Tick the Include Private Key option, and click
o 'Include Private Key' must be ticked when exporting the certificates, or you will experience errors with IHI Validation.
7. Enter a PIC Passphrase of your choosing, and click
o This password will be required if the certificates are ever imported.
8. Repeat for the Encryption Certificate (little lock on certificate), naming the file fac_encrypt.p12