PKI NASH and Location Certificates Expiring 2022
PKI certificates are required by many businesses for maintaining access to digital health tools including electronic prescribing and My Health Record. Two such certificates are about to expire for some practices. These are the National Authentication Service for Health's certificate (commonly referred to as a 'NASH' certificate), and Medicare's 'Location' certificate.
o The NASH certificate provides secure transactions between your practice and My Health Record and other digital health tools. This certificate is used by MedicalDirector Helix and Clinical, and must be renewed for continued communication between these applications and My Health Record.
o The Location certificate is used for secure online claiming, amongst others functions, and is used by MedicalDirector Helix, Clinical, Pracsoft and Bluechip. This certificate must be renewed for continued communication between these applications and Medicare or My Health Record.
These changes may affect your MedicalDirector applications. In some instances, updating your practice's PKI certificates is required for continued secure communication between your MedicalDirector applications and Medicare or My Health Record. New certificates have been issued, and are available to download and install. Further information, including instructions, is available below.
Does This Affect My Practice?
This change will affect any practice running the following MedicalDirector applications. Click for information.
Updating Certificates for Helix
Updating Your Helix Location Certificate
For MedicalDirector Helix users, there is nothing required on your part - MedicalDirector will install your Location certificate for you.
Updating Your Helix NASH Certificate
Step 1: Check Certificate Expiry in MedicalDirector Helix
To view the expiry date for NASH certificates in MedicalDirector Helix:
1. Log into Helix as an Admin user.
2. Locate
and click ![]() at the lower-left.
at the lower-left.
3. Select the Settings
option.

4. Within
the Centre section, locate
and click  The
Certificates window
appears.
The
Certificates window
appears.
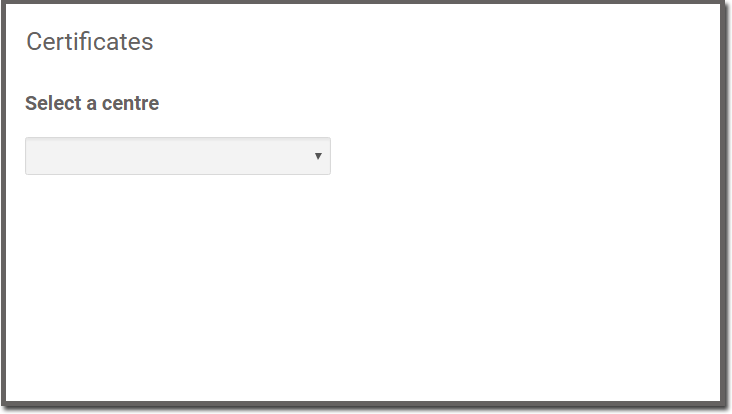
5. Select
the centre you wish to manage certificates for. The certificates
installed for that centre (if any) are displayed.
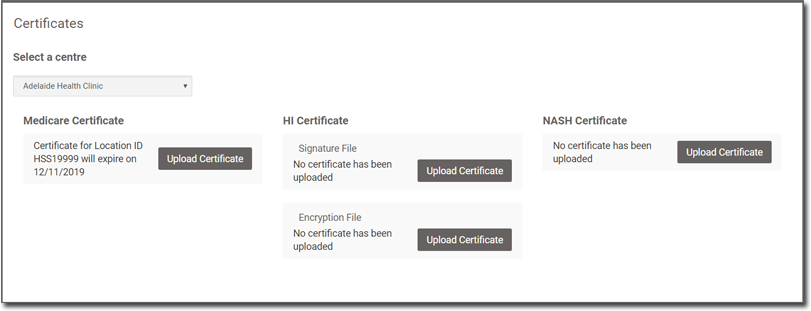
6. Observe the expiry date on NASH certificates.
Step 2: Download the New NASH Certificate
Certificates are downloaded directly via HPOS (Health Professional Online Services) web site, as explained below.
Please note that if you encounter any issues obtaining your new NASH Certificate, please contact Medicare directly for assistance.
1. Login to HPOS > My Programs > Health Care Identifiers > My Orginisation Details > NASH > Download (Action column far right).
2. Provide a mobile number for the PIC to be sent to.
3. Tick to revoke existing within 2 months.
4. Save the changes.
o You will be sent an SMS containing the Certificate password/passphrase*.
o The downloaded Certificate file has the name format of "site.p12".
*MedicalDirector has been made aware that the SMS can take up to 2-3 days to arrive. You will be unable to download your new NASH Certificate until you receive this SMS containing your password/passphrase. We are also aware of an issue with certain phones not displaying the password characters correctly, displaying boxes (☐) instead. Medicare's recommendation is to have the password sent to a different phone (preferably different make and model) or to call Medicare directly to have the password provided over the phone.
Step 3: Import the New NASH Certificate
o Before you begin, ensure you have downloaded your new NASH Certificate and have received its associated password/passphrase (See Step 2)
o If the following instructions don't reflect what you see in your version of Clinical, please update to the latest version.
1. Locate
and click ![]() at the lower-left.
at the lower-left.
2. Select the Settings
option.
The Settings window appears.

3. Within
the Centre section, click
The Certificates
window appears.
4. Select
the Centre you wish to
manage certificates for. The certificates installed for that centre
(if any) are displayed.
5. Locate
the section relating to the certificate you wish to install/upgrade
(NASH Certificate), and click 
6. Click
 to locate and select the
certificate you wish to import.
to locate and select the
certificate you wish to import.
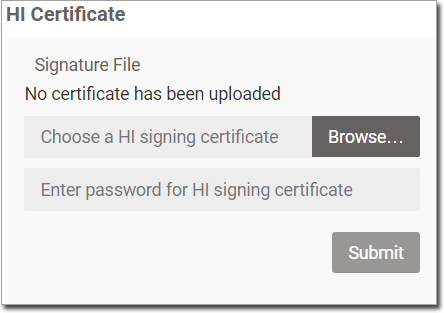
7. Enter the password associated with the certificate you selected.
8. Click
 to upload the certificate.
You will be notified of its success or failure.
to upload the certificate.
You will be notified of its success or failure.
9. Repeat this process for each Centre.
To confirm the expiry date for a NASH certificate in Helix:
1. Log in to MedicalDirector Helix as an Admin user.
2. Select Settings > Centre > Certificates.
3. Select Centre.
4. Note the expiry date on your NASH certificate.
Updating Your Clinical NASH Certificate
Step 1: Download The New NASH Certificate
Certificates are downloaded directly via HPOS (Health Professional Online Services) web site, as explained below.
Please note that if you encounter any issues obtaining your new NASH Certificate, please contact Medicare directly for assistance.
1. Login to HPOS > My Programs > Health Care Identifiers > My Orginisation Details > NASH > Download (Action column far right)
2. Provide a mobile number for the PIC to be sent to.
3. Tick to revoke existing within 2 months.
4. Save the changes.
o You will be sent an SMS containing the Certificate password/passphrase*.
o The downloaded Certificate file has the name format of "site.p12".
*MedicalDirector has been made aware that the SMS can take up to 2-3 days to arrive. You will be unable to download your new NASH Certificate until you receive this SMS containing your password/passphrase. We are also aware of an issue with certain phones not displaying the password characters correctly, displaying boxes (☐) instead. Medicare's recommendation is to have the password sent to a different phone (preferably different make and model) or to call Medicare directly to have the password provided over the phone.
Step 2: Install The New NASH Certificates
Before you begin, ensure you have downloaded your new NASH Certificate and have received its associated password/passphrase.
1. 1. Open MedicalDirector Clinical on any computer on your network.
2. Select Tools > Options.
3. Select
the Practice tab.
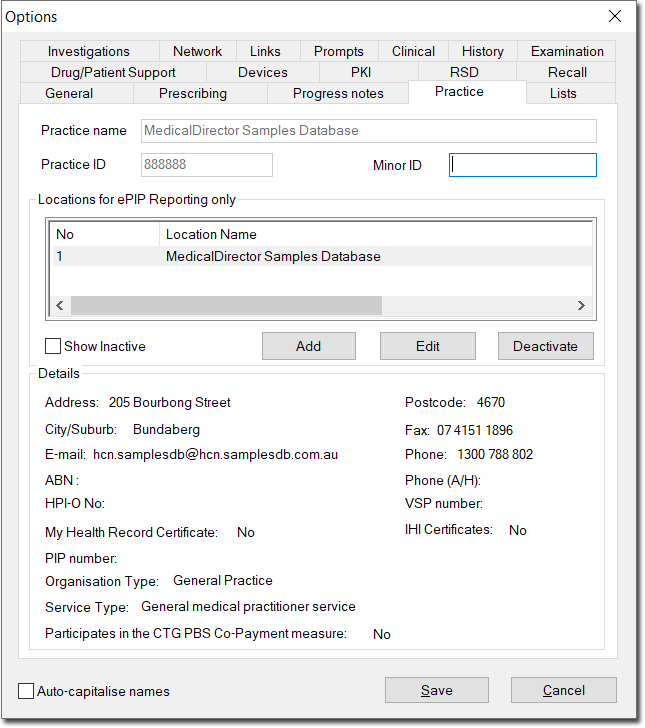
4. Within the Practice Locations section, locate and select the Location that requires the updated NASH certificate.
5. Click

6. Within
the Location Details window,
locate and click 
![]()
7. Select
MyHealthRecord from the drop-down list.
8. Click
 to browse to the Certificate file you downloaded earlier.
9. Locate
and select the 'site.p12'
file and click 
10. Enter the PIC Passphrase from the SMS message you received.
11. Click

Updating Your Pracsoft Location Certificate
The Personal pane in the PKI Certificate Manager holds the certificates issued to a customer. These certificates can be a combination of Individual, Location and Known Customer.
1. Close Pracsoft and Clinical on all computers, including the Server.
2. Navigate to the Windows Control Panel via Start > Settings > Control Panel and double-click the PKI Certificate Manager icon.
Select the Current Store Location
Upon opening the PKI Certificate Manager, you may encounter one of the two following scenarios:
Scenario One: If the PKI Certificate Manager already knows the location of your PSI Store, the PKI Certificate will load this store automatically.
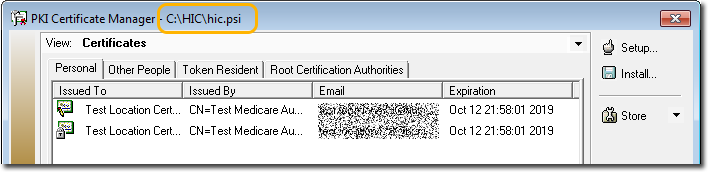
Check the PSI Store Location listed on the title bar. In the example above, the Store location would be: C:\HIC\hic.psi. If you are unsure of the Store location, please consult the information outlined above. Proceed to the next step (Import the Location / Personal PKI Certificates) if the location listed is correct.
If the location listed is not correct:
1. Click
 and proceed to Scenario Two
(below).
and proceed to Scenario Two
(below).
2. If you are unsure of the Store Location;
o For Pracsoft: Select Setup > Workstation Settings. Confirm the store location and close Pracsoft.
o For Bluechip: Select Setup > Practice > Batch types, select the batch type, and click the Configure Medicare Australia button. Then select the Location and Authentication tab.
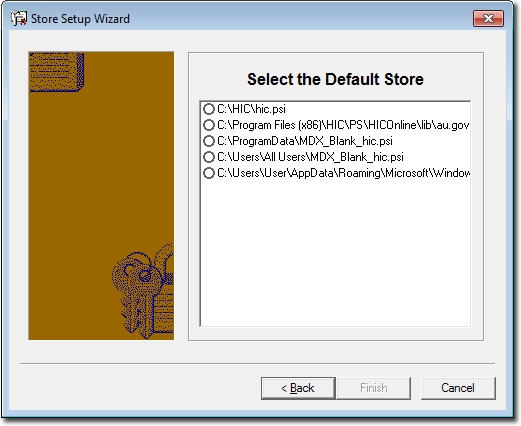
Scenario Two: If you are opening the PKI Certificate Manager for the first time or need to specify a new store location, you will need to select your current PSI Store location. The following prompt appears:
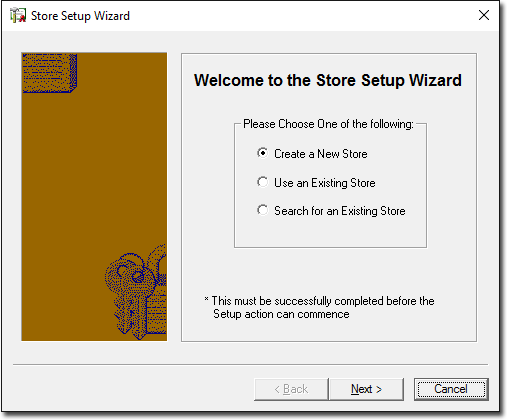
The recommended options are to either:
o Use an Existing Store: This option will ask you to browse to the PSI Store (the location of the certificate database); you will need to know where the store is located in order to browse to it.
o Search for an Existing Store: This option will attempt to search your computer automatically for a PSI store. If you choose this option, you will then be prompted to select the drive letter you wish to conduct a search on and click the Next button to conduct the search. From the search results returned, select the store location you wish to use and click the Finish button to confirm.
• Note the default PSI Store location is C:\Program Files\Common Files\PKI\hic.psi
Once you have found and selected the PSI store, the PKI Certificate
Manager will remember this location. The next time you open the
PKI Certificate Manager in the Control Panel it will automatically
know where your PSI Store is, and will not ask you to locate it
again.
Import the Location / Personal Certificate
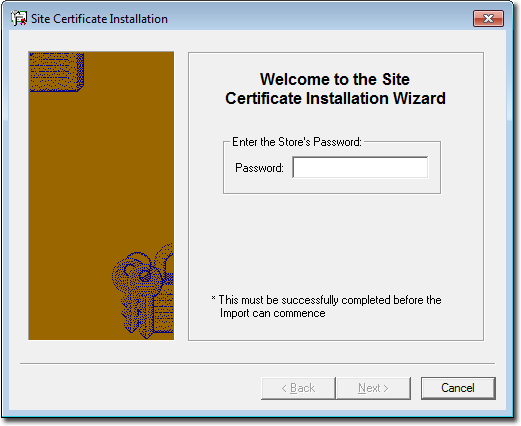
To import the location / personal certificate through the PKI Certificate Manager:
1. Once
the PKI Certificate Manager is open, click 
2. You will be prompted for your Store
password. The Store password was first set when installing the
certificates.
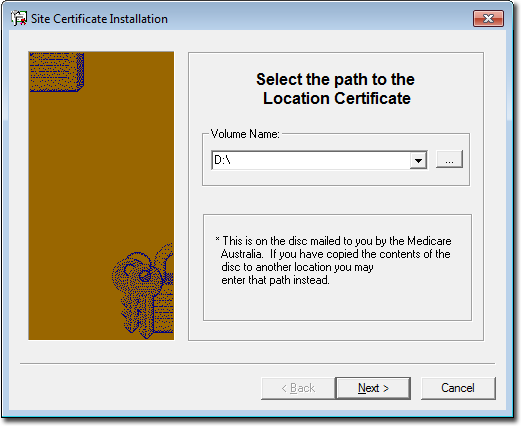
3. Select
the location of the HIC certificates. If you are installing the
certificate from a CD, please change the drive to the appropriate
drive letter, i.e. D:\
4. Enter the new PIC pass phrase.
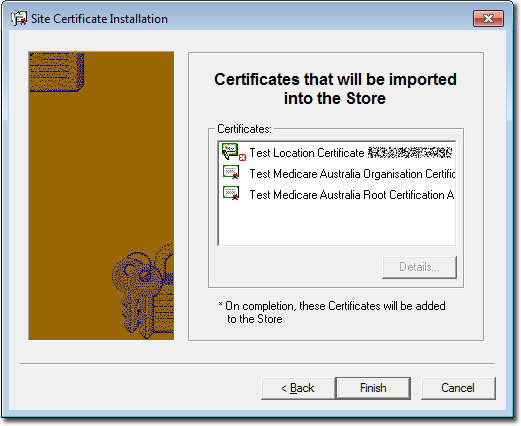
5. You
will be presented with a list of certificates that will be imported.
Click  to continue.
Import the Medicare Australia PKI Certificates
If you have successfully navigated to your PSI Store, you should be presented with a window similar to the following. This image indicates that the PKI Certificate Manager has already located the PSI store.
1. Once
the PKI Certificate Manager is open, click  and select ‘Initialise Defaults’.
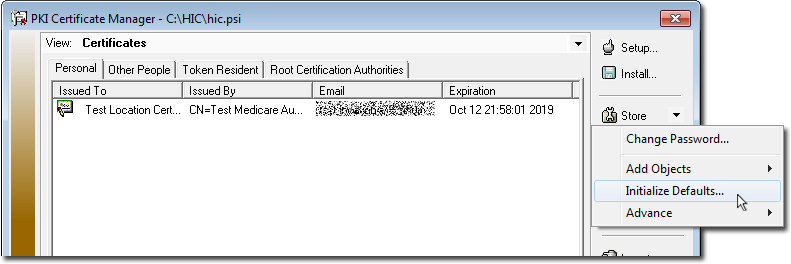
2. You will be prompted for your Store password. The Store password was first set when installing the certificates.
3. You
will be presented with a list of certificates that will be imported.
Click to continue.
4. After these certificates have been imported, you should be able to see two Medicare Australia certificates, plus two Catherine Argall certificates under the Other People tab (below). This confirms that you have completed this task successfully.
Updating Your Bluechip Location Certificate
Please consult the article PKI Certificate Installation and Renewal for Pracsoft and Bluechip