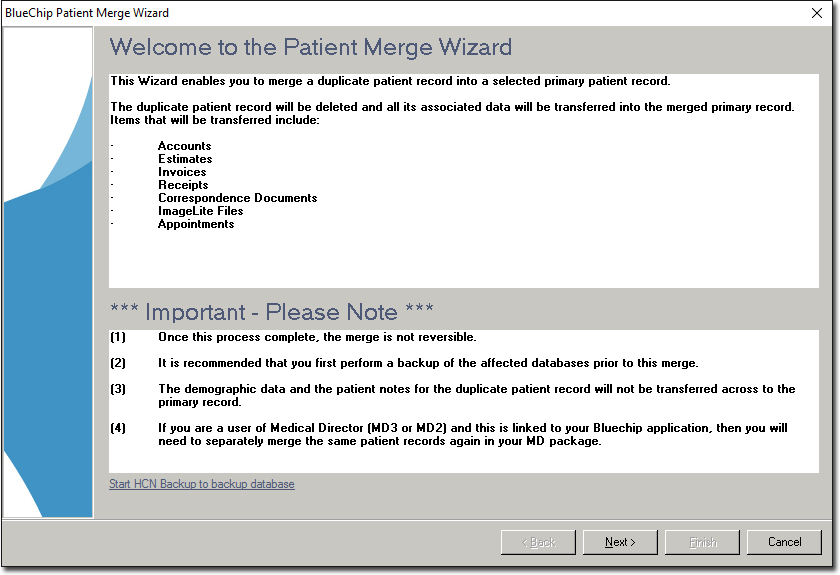
Merging Patient Records in Clinical
Identifying Potential Duplicate Patient Records in Clinical
The easiest way to identify duplicates is to review patients with the same or similar details. Facilities for searching for patient records are available in each of the Clinical, Pracsoft, and Bluechip applications. If you identify a patient that might be a potential duplicate, make a note of it and review both records before using the Patient Merge tool, to ensure they are actually duplicates. Currently there is no report available that identifies potential duplicates.
Merging patients may assist in correcting any missing or incorrect patient demographics, whilst ensuring the correct linking of patient details between Bluechip and Clinical. It is advisable that any new patient record is first created within Bluechip and then automatically synchronised with the Clinical database.
What is Merged in Clinical?
Records are compared field by field, with clinical data only copied if deemed not a duplicate. If data is found in a field in the destination patient record, no change to that data is made. Otherwise the data from the source patient field is copied to the destination. The exception to this rule regards text fields, where the data from the source patient record is appended to the destination patient record.
An Overview of the Process
1. Examine the two patient records you wish to merge, ensuring that you carefully select the destination record; it is this record that other records will be merged into.
2. Initiate the merge; the source patient record will be merged into the destination patient record.
3. Confirm the commencing of the merge process; you will be given an opportunity to confirm the merge or cancel it Remember: once a merge has commenced, it cannot be cancelled or reversed.
To Merge Patient Records in Clinical
1. Either;
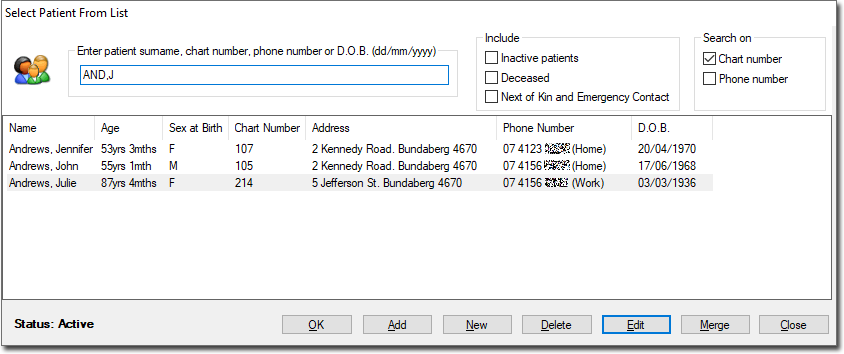
o Select Patient > Open from the MedicalDirector Clinical main screen (or press F2) to open the Select Patient from List window.
o Select Patient > Open from the patient's Clinical Window (or press F2).
2. The Select Patient from List window appears.
3. Locate and select one of the two patient records (the primary patient) you wish to merge.
4. Click  The Merge Patients wizard appears.
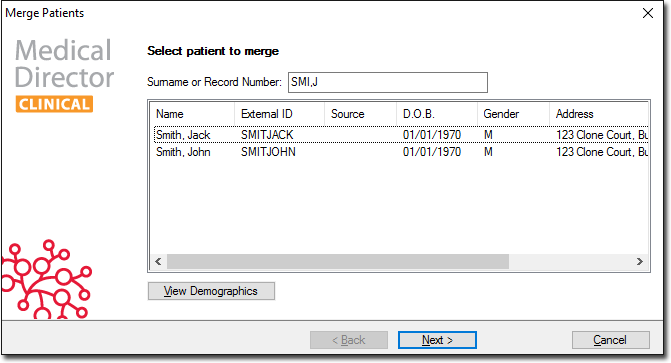
Clinical assumes that the patients you wish to merge have the same or similar names. This window lists the patient you selected, and any other patients whose surnames (first three letters) and first initial match that of the selected patient. If the second patient record is not listed, use the Surname or Record Number field to search for the patient. The patient's External ID number, Date of Birth, and Address are listed to assist with identification.
5. (Optional) Use the Source field to see where the secondary patient record has come from. This assists you in determining exactly which patient record you need to keep. The following options may be present:
o Billing If the second patient has come from a billing package.
o External If the second patient was imported from another file (perhaps from another surgery).
o Locum If the second patient was imported using a third-party locum service.
o MedicalDirector Clinical If the second patient was originally created in Clinical.
o Pathology If the second patient was created automatically upon importing Investigation Results; if you import results for a patient that doesn't exist in your patient database, Clinical will automatically add the patient to the Patient Database.
6. (Optional) Click  button to open a window of more-detailed demographic information for the selected patient.
7. Select the second patient to merge from the list.
8. Click  The Merge Patients ('select the patient you want to keep') window appears.
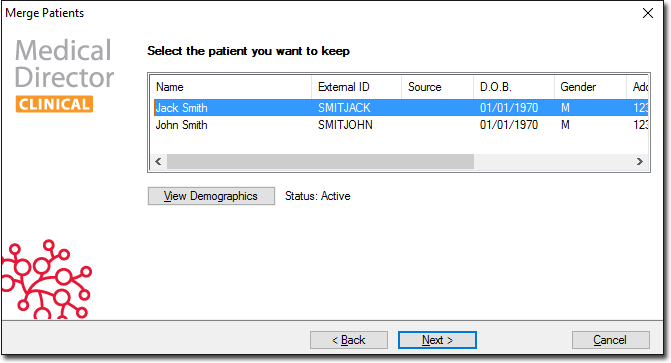
9. Select the patient that you wish to keep.
10. Click You are prompted to confirm that you are ready to merge to the patient records.

11. Click to start the merge process. The time taken to perform the merge is proportional to the amount of data stored in the patient records.
12. When prompted, click  to complete the merge process. You are returned to the Select Patient from List window. Open the resulting single-patient record to check the information is correct.
Merging Patient Records in Bluechip
Accessing the Patient Merge Tool for Bluechip
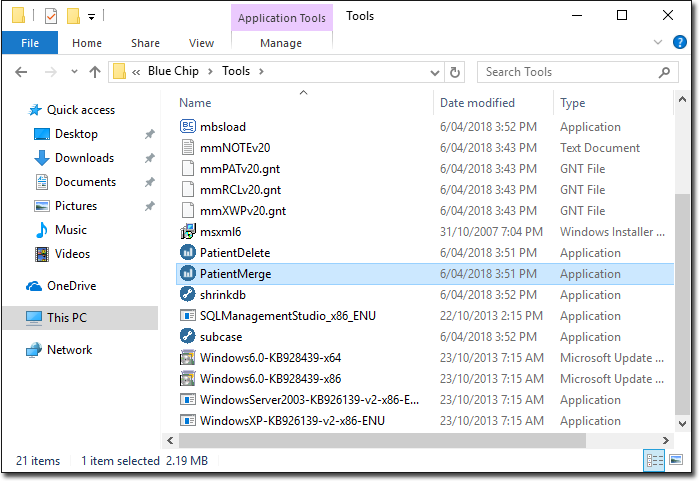
The Patient Merge tool is not accessible from within the Bluechip application itself. Rather, it is located in the Tools folder of the Bluechip installation location folder.
Example: C:\Program Files (x86)\Health Communication Network\Bluechip\Tools
Identifying Potential Duplicate Patient Records in Bluechip
The easiest way to identify duplicates is to review patients with the same or similar details. Facilities for searching for patient records are available in each of the Clinical, Pracsoft, and Bluechip applications. If you identify a patient that might be a potential duplicate, make a note of it and review both records before using the Patient Merge tool, to ensure they are actually duplicates. Currently there is no report available that identifies potential duplicates.

What is Merged in Bluechip?
The following list of demographic data is not merged, and only demographic data of the primary patient is retained:
o Patient Name
o Gender
o File No
o Phone Number
o Address
All other information such as accounts, appointments, scanned documents, recalls and so forth, are copied from the source patient record (i.e. the patient to merge) and appended to the primary patient record.
To Merge Patient Records in Bluechip
The Patient Merge tool is a wizard; a step-by-step process until the merge is completed.
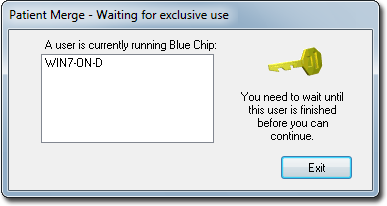
1. Ensure all users are logged out of Bluechip.
2. Locate and run the PatientMerge.exe application. Typically, this is located at C:\Program Files (x86)\Health Communication Network\Blue Chip\Tools
The Bluechip Patient Merge Wizard appears.
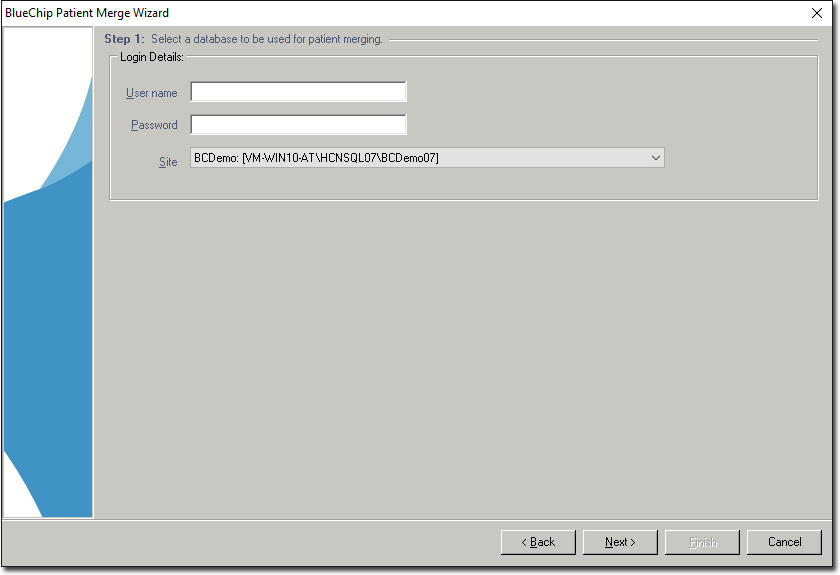
3. Click  Step 1 of the Wizard appears. You will be prompted to select your database, and to enter your username and password.
If the wizard detects that any users are logged into Bluechip, you will be prompted accordingly. All users must be logged out of Bluechip before you can continue with the Wizard.
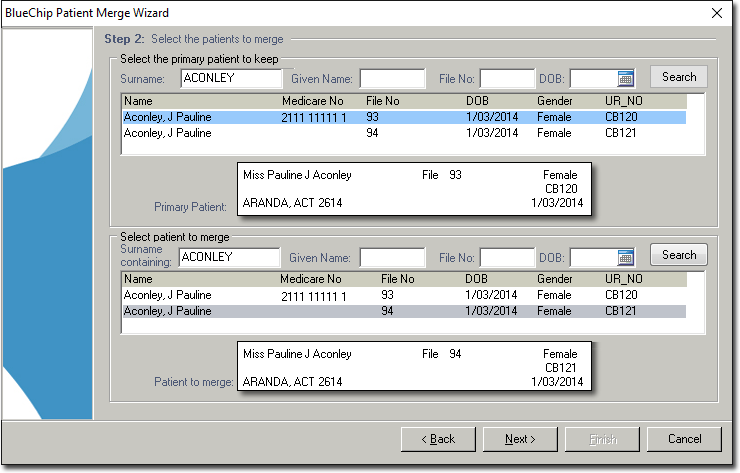
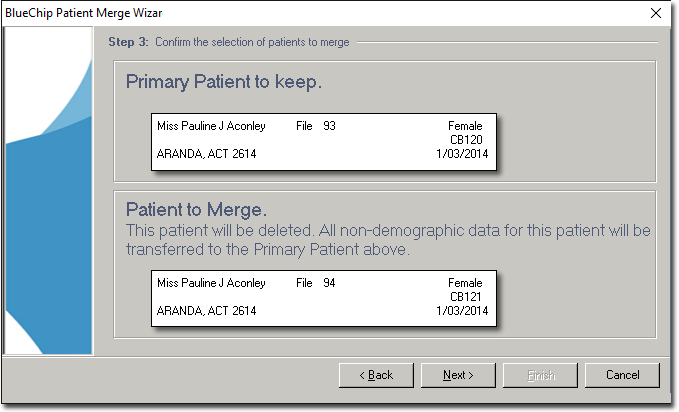
4. Click Step 2 of the Wizard appears. In this step you must select the two patient records you wish to merge.
o Within the upper section of this window, locate and select the primary patient record. This is the record you will ultimately keep. To locate the patient record, enter one or more demographic details in the fields provided, and then click the Search button to retrieve patient records that match your criteria.
o Within the lower section of this window, locate and select the patient record to merge. This is the record that will be merged into the primary record you selected. To locate the patient record, enter one or more demographic details in the fields provided, and then click the Search button to retrieve patient records that match your criteria.
In the example below, the user has searched for a patient named Pauline Aconley, and the upper section of this window indicates that there are two results for patient records with this name. The user has determined that the record they wish to keep is that with a Medicare Number recorded, and therefore it is this record that has been selected as the primary record. In the lower section of this window, the same search was conducted. This time the user selected the record without a Medicare Number recorded. It is this record that will be merged into the primary.
5. Click to continue. You are given the opportunity to confirm the patient selections you have made.
6. Click to proceed with the merge. The merge commences, and upon completion you will be asked whether you wish to conduct another merge.
7. Click  if you wish to exit the Wizard.