SQL Server – Information for all Users
Both Clinical and Pracsoft use Microsoft SQL databases. Clinical and Pracsoft require two SQL Server Instances called:
o HCNSQL07: Hosts the clinical and financial data.
o ESP: Hosts the HCN Extensibility System and Plug-ins modules.
The MedicalDirector installation wizard can install these SQL Server instances for you automatically using the free, supplied Microsoft 2014 SP3 Express Edition with all the features of full SQL but limited to 4GB per database, 1GB RAM, and 1 CPU core. This is sufficient for most General Practices.
If you do not have full SQL 2005, 2008 or 2008 R2, or you otherwise wish to use the free Microsoft SQL Express 2005, please bypass the instructions below and proceed with the Getting Started section.
Instructions for Full SQL Server
If you have your own full SQL and wish to use it rather than the supplied 2014 SP3 Express Edition with Clinical and/or Pracsoft, the following information is for you.
The MedicalDirector Suite cannot install if your SQL Instance does not have the correct service pack applied:
o SQL 2005 - requires Service Pack 2
o SQL 2008 – requires Service Pack 2
o SQL 2012 - requires Service Pack 1
MedicalDirector-specific options must be adhered to.
Please follow the instructions supplied by Microsoft to configure your full SQL with the following settings:
o Instance Name: must match those listed above (i.e. HCNSQL07 and ESP)
o Service Account: must use the built-in System Account – Local System
o Authentication Mode: must be Mixed Mode
o SA Password: must adhere to the strong password rules (e.g. Hcn123$)
o Collation Settings: leave as the defaults automatically detected by the Microsoft Installer
Getting Started
Both Clinical and Pracsoft are implemented as client-server applications i.e. if you wish to use Clinical and/or Pracsoft on more than one computer in your practice, one computer must adopt the role of ‘Server’, while the remaining computers adopt the role of clients (or ‘Workstations’).
The Clinical/Pracsoft patient database (a single, shared database) resides on the Server computer where it is shared out to connected Workstation computers. This is the typical configuration for a multi-user practice. Having said this, the Clinical and Pracsoft applications and Server components can reside on a single computer. In this configuration, the computer's role is said to be ‘Standalone’.
Furthermore a fourth role known as ‘Mobile’ is adopted by computers that act primarily like Workstations, but occasionally must act as Standalone so that they can be used external to the practice network. A laptop is an example of a computer that might adopt the role of ‘Mobile’, to be used for Nursing Home visits, for example.
If you are installing Clinical and/or Pracsoft on more than one computer in your practice, it is important to note that the Server software components must be installed on the Server computer before installing Clinical and/or Pracsoft on other computers.
New Installation Checklist
It is highly recommended that you review the following checklist and use it as a basis for preparing your system for the installation of MedicalDirector Clinical and/or Pracsoft.
o Do your computers meet MedicalDirector's system requirements for running Clinical and/or Pracsoft?
o A registration key is required for new users of Clinical and/or Pracsoft. Contact Sales on 1300 300 161 for a new registration key.
o You have identified a suitable location on your computer for the installation, taking into account the amount of data you have and the necessary free space this requires on your hard drive. See the Hardware section of our System Requirements.
o You have adequate Windows Administrative privileges to perform backups and installations on your system before commencing the installation.
o Are you installing to the default C:\Program Files\Health Communication Network path? Unless someone in your organisation understands the implications of non-standard installations, MedicalDirector recommends that you install to the default location. This can save valuable time in your practice should you need to contact MedicalDirector Customer Care.
o Ensure you install the Server Role (from the installation DVD or download) on your dedicated server, even if you wish to use your own full SQL Server and not the supplied 2014 SP3 Express Edition. This creates the necessary databases and sets up the Document Management system.
Download the Installation File
1. Go to the MedicalDirector web site and to the Updates page.
2. Locate
the Ready to Upgrade
section, and select the option for I'm
installing a new system.
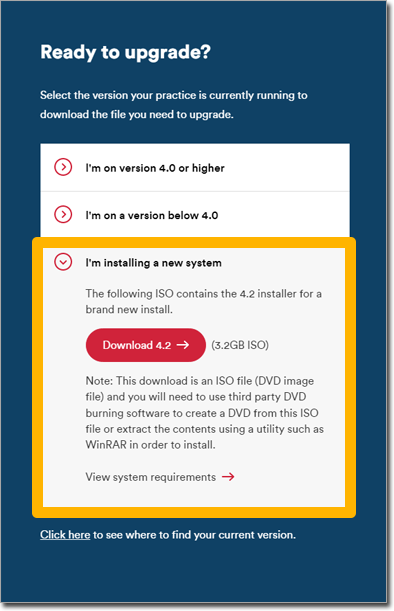
3. Download the ISO for the latest version of Clinical/Pracsoft.
Installing Clinical / Pracsoft for New Users
o If you have your own full SQL and wish to use it rather than the supplied 2014 SP3 Express Edition, please refer to Instructions for Full SQL Server information above. You must configure SQL according to these settings before you can proceed with the installation of MedicalDirector Clinical and/or Pracsoft.
o Please ensure you have read the Getting Started section above before continuing.
o Please ensure you have followed the New Installation Checklist above before continuing.
o If you receive any error messages during the installation routine, contact MedicalDirector Customer Service for assistance. It is recommended that you do not attempt to resolve any issues without assistance from MedicalDirector Customer Care.
o Perform the installation routine on the Server computer first, after which you can perform the installation on all workstation computers where you wish to run Clinical and/or Pracsoft.
o If you have existing Pracsoft 1.x or 2.x data and you wish to upgrade to 3.x, please contact MedicalDirector Customer Service now for assistance.
1. Mount the installation ISO. Alternatively you can burn a DVD of the ISO. The MedicalDirector Installer application should commence immediately. If it does not, browse to and double-click Setup.exe on the DVD. The Installation Wizard appears.
• Mount the ISO. See Creating and Using Images of MedicalDirector Applications for information.
• Extract the contents of the ISO into a folder on your computer. To do this, you will require archiving software such as 7-Zip (free). With such software installed, simply right-click the ISO file, and select 'Extract to'. When prompted, specify a locating (a new, empty folder is recommended), and then run Setup.exe from within this folder.
For Terminal Server Users:
o If the MedicalDirector Installer window is open, click the Cancel button to close it now.
o When installing onto a Terminal Server, the software cannot be installed directly from the DVD, or it may not be available to all users.
o Ensure there are no active or disconnected sessions listed within the Session Manager. If there are, you must remove them before beginning the install or they may not be able to use the software successfully.
o Advise all users not to log into the Terminal Server (recommend temporarily blocking access) until the installation has completed successfully. Failing to do so may result in the installation process failing or those users that do log in may not be able to use the software successfully.
o The installation of software must always be performed whilst the Server is in ‘Install Mode’. This is usually achieved by launching the MedicalDirector Installer through Add / Remove Programs by clicking on the Add New Programs button, then browse to and double-click Setup.exe on the DVD. During this procedure a Window should open instructing that it NOT be closed until the install has been completed.
Refer to your Operating System help or Microsoft for more information on installing software onto a Terminal Server.
2. Click
 to continue. You will be
presented with a list of Important Installation Tasks. Information
about each of these is available by clicking on an associated
link. It is recommended that you read this information and perform
tasks as necessary.
to continue. You will be
presented with a list of Important Installation Tasks. Information
about each of these is available by clicking on an associated
link. It is recommended that you read this information and perform
tasks as necessary.

Once you are satisfied that you have performed
the tasks necessary to continue with the installation, tick the
associated checkbox to acknowledge that you have read and understood
these recommendations and then click to continue.
NOTE: Failure to address these issues may result in being unable to install the software.
A note about Antivirus software and Firewalls:
Virus scanners look for two things;
o Known file signatures that matches a virus, and
o Virus-like behavior. Some virus scanners confuse activities involved in the installation of software with being virus-like.
Firewalls have been known to be a major source of installation issues. For example, they can block the discovery of Databases that need upgrading. As there are numerous Antivirus / Firewall products available, and they are constantly changing, it is impossible to reliably detect them.
A note about Opportunistic Locking:
The Installation Wizard may detect that Windows Opportunistic Locking is enabled on the computer. Opportunistic Locking has been shown to affect the performance of software like MedicalDirector Clinical, and MedicalDirector recommends disabling it. If you choose to disable Opportunistic Locking at this time, the computer will be restarted after which the Installation Wizard will continue.
3. You will be presented with the Licence Agreement.
o Read
the Licence Agreement, and if you agree to the terms, tick the
associated check box, and then click to continue.
4. At
this stage the Installation Wizard will determine if your system
requires the installation of additional third-party software,
and if so you will be prompted accordingly.
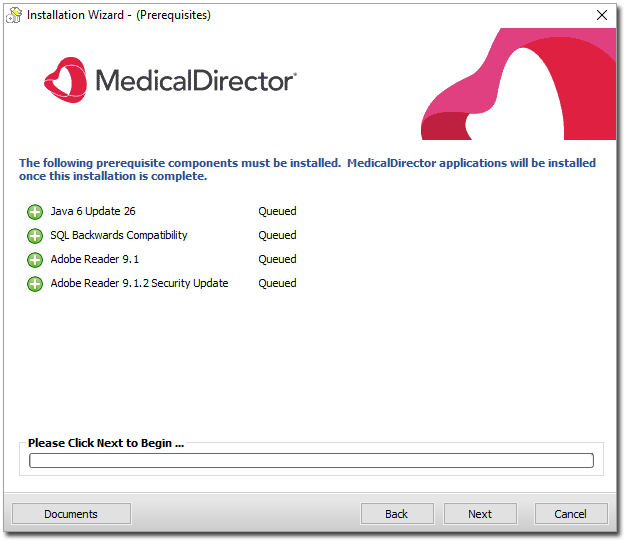
o If
it is determined that you do need to install additional third-party
software, click
to proceed with the installation(s). The installation routines
for each listed application will commence in sequence, with the
overall progress displayed in the main window.
Note that this process may take some time, depending on the requirements of the third-party software, and the number of applications you will be required to install. Note also, that this process may require you rebooting the computer, after which the Clinical / Pracsoft Installation Wizard will continue.
For
Terminal Server Users: If the computer has restarted and
the MedicalDirector Installer has restarted, click  to close the MedicalDirector Installer.
Launch the MedicalDirector Installer through Add / Remove Programs
again, as described in Step 1 above, to ensure the Terminal Server
is returned to ‘Install Mode’ before continuing.
to close the MedicalDirector Installer.
Launch the MedicalDirector Installer through Add / Remove Programs
again, as described in Step 1 above, to ensure the Terminal Server
is returned to ‘Install Mode’ before continuing.
o You will be prompted upon the completion of all required third-party software installations as to whether they were successful. If any were unsuccessful, please consult your Systems Support for assistance.
5. Click
when you are ready to continue.
You will be prompted to select the type of installation you would
like to perform, based on the role the computer will take.
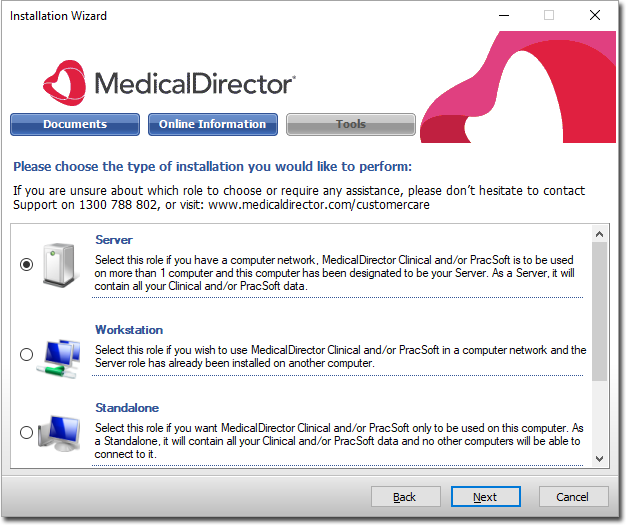
The remaining installation steps are virtually identical, regardless of which type of installation you select from the options above. Subtle differences between each type are explained in the text associated with the images above, and in the following descriptions;
Server: For a computer that will act as your MedicalDirector Server, where your patient database is stored. The MedicalDirector applications will also be installed. ManageEzy (used for document and letter storage) will be installed in a shared folder and referenced by a network path, allowing workstation computers to access the folder remotely. This option requires an active network connection.
Workstation: For a fixed computer on which you will run the MedicalDirector applications, but not store the patient database. Workstation computers access the patient data from a database stored on the Server computer. This option requires an active network connection.
Standalone: For a computer that will act as your MedicalDirector Server, where your patient database is stored. The MedicalDirector applications will also be installed. ManageEzy (used for document and letter storage) will be not be shared, and will referenced by a local path (C:\...).
Mobile: For a mobile workstation computer (a laptop, for example) on which you will run the MedicalDirector applications. Primarily this computer will act like a workstation, accessing the patient database on your Server. However, to account for use outside the surgery a second SQL database will be installed on the mobile computer itself, with an instance name different to that of your Server’s. This second database will be used for storing downloaded patient data for use whilst disconnected from your network. Upon reconnecting to the network, the patient data must be transferred (uploaded) to your Server’s database. This option requires an active network connection.
7. Select
the role you wish this computer to take, and click to continue.
8. You
will be prompted to select an instance of SQL on which to install
the patient database. The following image will vary slightly,
depending on the type of installation you have selected. If you
intend to use full SQL you must have installed and configured
it correctly before proceeding with this step. If you have not,
stop now and read the Instructions for Full SQL Server above.
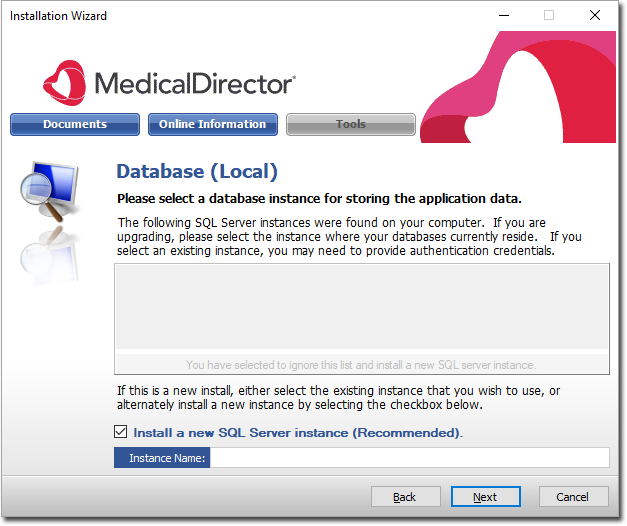
o If you have chosen Server or Standalone you will be offered the options to either install a new MedicalDirector Server (as indicated in the image above), or use one of the SQL Servers you already have installed. If you installed FULL SQL as described earlier, then you will see HCNSQL07 and ESP listed and the HCNSQL07 will be selected automatically as the SQL Instance to install into.
o If you have chosen Workstation or Mobile, you will not be offered the option to install a new MedicalDirector server, as it is assumed that with these types of installations you will be connecting to an existing SQL instance on your Server computer.
9. Once
you have made a selection, click to continue.
10. Select
the applications you wish to install from the options provided.
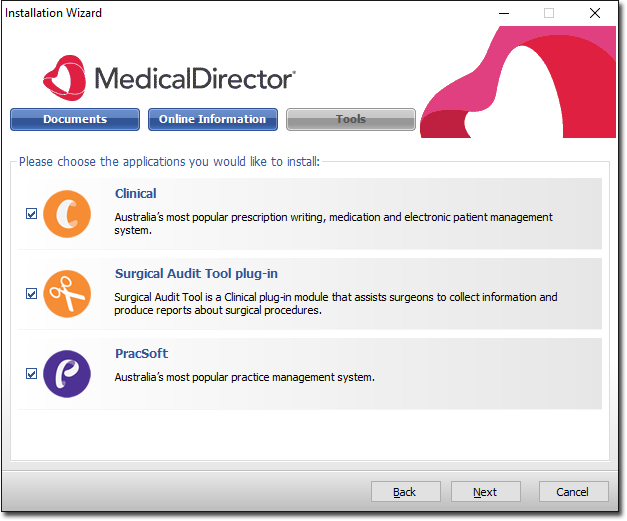
The Surgical Audit Tool is a component of Clinical, and is only
available with an installation of Clinical. If you choose not
to install the Surgical Audit Tool now, you can always install
it at a later date.
11. Click
when you are ready to proceed.
You will be presented with an installation summary. It is recommended
that you review it.
12. (Optional) Two different locations will be used for the installation of:
o The SQL Server Data Files
o The document storage location
o The MedicalDirector Application Suite (Clinical and/or Pracsoft).
If you need to change the default
installation locations of these components, you can do so now
by clicking  (available only for Server/Standalone Installations). Note that
although you have the flexibility of choosing different installation
locations for these components, they must all be installed on
the local computer, not to locations across your network.
(available only for Server/Standalone Installations). Note that
although you have the flexibility of choosing different installation
locations for these components, they must all be installed on
the local computer, not to locations across your network.
Important Note: If you choose to install the document storage location to a drive other than your primary/system drive, you must ensure that the drive has a Volume Label.
13. When
you are ready to proceed, click 
o The installation commences. You will be able to monitor its progress.
o Secondary installation windows will appear periodically as individual components are installed, and require no action on your behalf.
14. You
will be prompted when the installation is complete. Click  to exit the MedicalDirector Installation Wizard.
15. (Optional)
If you also intend to install Bluechip with MedicalDirector Clinical,
you will need to install the legacy ManageEzy Document Management
System. This comes supplied with the Installation Wizard, and
is accessed via 
o If
the Installation Wizard detects that the ManageEzy Document Management
System is not installed, the following button will be available
to you. Click it to install ManageEzy.
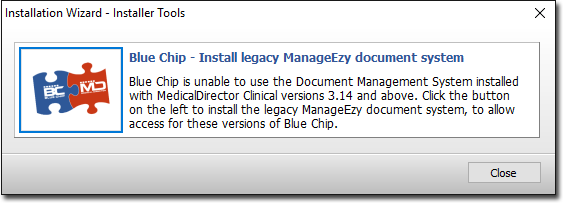
o If this button appears unavailable (greyed-out), then ManageEzy is already installed. After ManageEzy has been installed, you can commence installing Bluechip.
Create a Backup
See Backup / Restore