The RACGP Standard for General Practices (4th edition) defines a ‘Recall’ system as a system to ensure that patients receives further medical advice on matters of clinical significance.
The Recall and Reminders System is a core function in MedicalDirector Clinical. The tool is very useful when used correctly and maintained regularly.
This fact sheet was created with the aim of aiding GPs and Practice Managers in utilising the Recall and Reminder system effectively and efficiently.
PART 1: Creating Effective Recall and Reminder Reasons
A key factor in helping ensure an effective and manageable recall and reminder system is to create and define a clear and concise list of reasons. Ensure that staff members recognise the difference between a reminder and recall.
The RACGP Green Book (2nd edition) states: “Reminders are used to initiate prevention, before or during the patient visit. They can either be opportunistic or proactive. Recalls are proactive follow-up to a preventive or clinical activity.”
To do this:
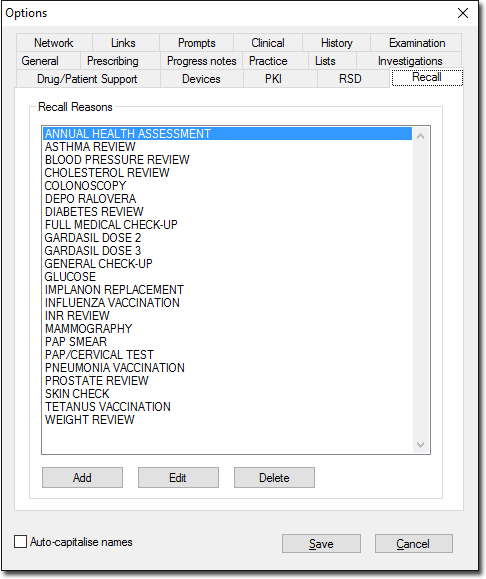
1. From the main screen select Tools > Options.
2. Select the Recall tab.
3. Add, Edit, Delete to create an effective recall reason.
o Some sites use an asterisk * to indicate a recall, whilst others clearly define it in the reason itself, e.g. Cervical Screening RECALL and Cervical Screening REMINDER
o Reasons found in this list are not limited to recalls and reminders; the list is also available for creating Action List items.
o One way of fully utilising the reason list is to include “Review” or “Follow-Up” in the list – this enables the clinician to add these reasons in their Action Items and them for following-up test results.
PART 2: Knowing when to use Actions, Recalls, or Reminders
Action Items
Treat the ‘Action List’ feature in Clinical like a reminder system. If there are any clinical items that need to be discussed with the patient such as reviewing weight and blood pressure, or referring them to a dietician, and, upon the patient’s return a reminder is needed by the clinician, the ‘Action List’ is where this information needs to be stored.
When information is stored in the list, a pop-up reminder appears on-screen upon opening the patient’s record.
To add to a specific patient’s action list:
1. From the within the patient’s clinical record, select the Clinical menu > Action List.
2. Click
Add. A list of pre-defined
recall and reminders reasons will appear.
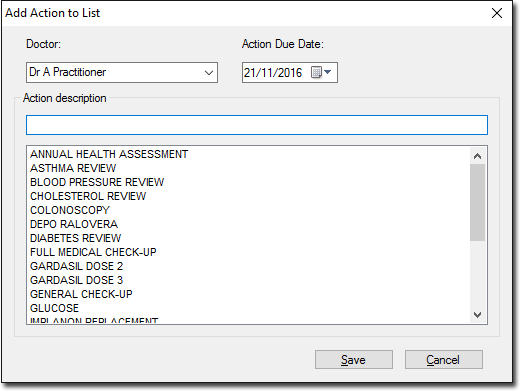
3. Select from the list or create a new one. Note that adding a new reason here will not automatically add it to the main list of reasons and reminders.
4. Enter the Action Due Date.
5. Click the Save button.
If anything is due in the next 7 days, you will be prompted upon opening the patient’s record.
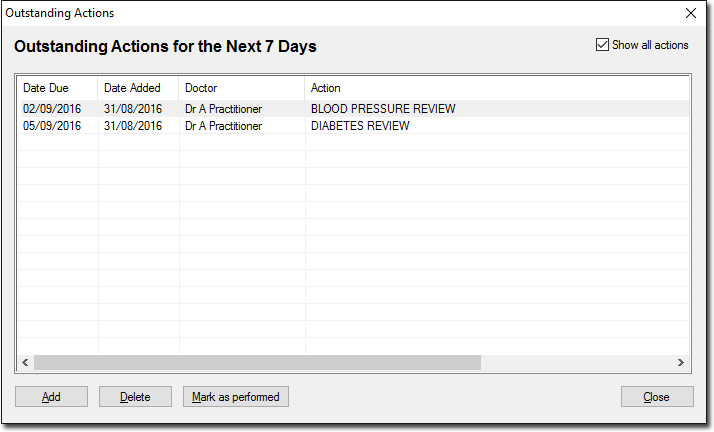
o The Action List can also be used to remind clinicians and staff if they need to chase any test result. For example, you can use the Action List to add a reminder message for yourself to remind you to follow-up any Pathology or Imaging exams (for example) that you have requested.
o Actions need to be marked as performed when the action is complete. This ensures that the list is kept clean and organised. For social reminders such as ‘Thank patient for Christmas Card’, click ‘Delete’.
o Once an action has been marked as complete, it is removed from the list.
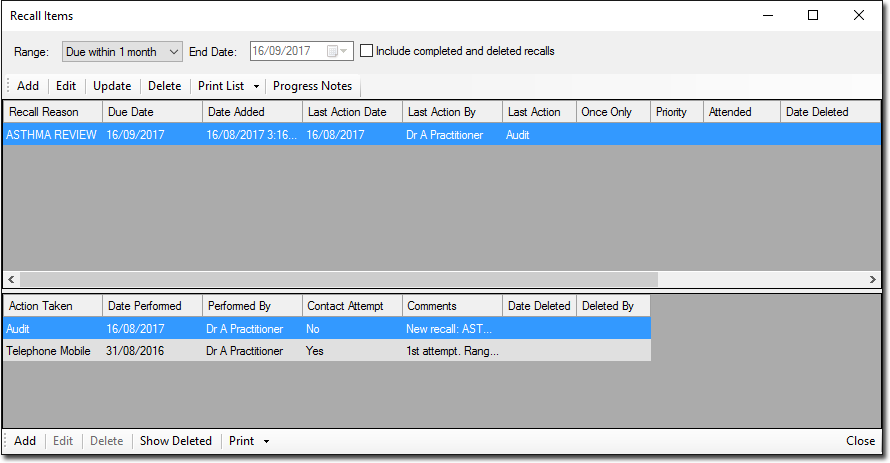
Recall Items
If there is a clinically-significant request, or tests that need to be recorded or followed-up, this type of information needs to be added as a ‘Recall’.
To add Recall items:
1. Open the patient’s record.
2. Click
 If
a patient already has a recall due, a ringing telephone icon appears
beside the button.
If
a patient already has a recall due, a ringing telephone icon appears
beside the button. 
3. The Recall Items window appears.
4. Click
the Add button. The Add Recall window appears.
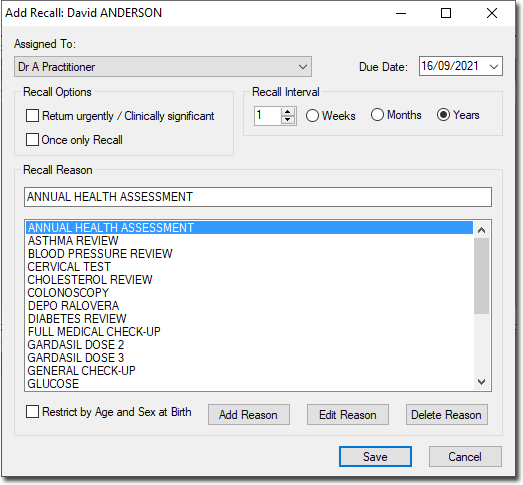
5. Choose the reason from the list. Unless the reason is new do not click ‘Add’. Use discretion when clicking ‘Add’, as it means that the reason will be saved in the main list of Recall reasons, and hence can be seen by all users.
o Please be mindful when clicking ‘Return Urgently’, as this may work differently for every patient. For example, it may be urgent for a 50-year old patient to return for mammography in 2 years’ time, whilst for another patient it may be that it is very urgent that the patient returns the same week.
o If the reminder is one-off, tick the Once only Recall option.
6. Click the Save button.
Reminder Items
Reminders are entered in the same way as recalls. Reminders are either opportunistic or proactive, as these reminders are targeted at patients who need to be prompted to have their test or shots taken.
PART 3: Following-up
There are several access points in Clinical to follow-up on outstanding test results, referrals, and recalls.
Usually Admin Staff manage the recall and reminder system. A user may opt to print a list for the clinicians to check, or use mail merge and send said letters to the patients.
A: Generating the Recall List
The recall list is helpful in following a patient’s clinical progress; the list can be used to send out reminders to patients who are at risk (e.g. biennial recall for all women aged 50-59, due for a mammogram) or to target serious and urgent recalls (e.g. abnormal results).
To generate the Recall list:
1. From Main Screen select Search > Recall.
2. Select the reasons and intervals from the list.
3. Tick on any other criteria applicable to your search.
4. Click the OK button.
5. Urgent Recalls are shown in red. If you want to see only urgent recalls, tick the ‘Show Urgent Recalls’ box.
B: Tracking Recalls Marked as ‘Urgent’
It is advisable to print a list of urgent recalls every day, with all reasons selected. If a recall is marked as urgent, it is imperative that contact is made with the patient.
To track contact with the patient:
1. Select a Recall entry from the list.
2. Click the Recall Actions button.
3. Click the Add button.
4. Enter
necessary information.

5. Click the Save button.
Note: Any saved recall actions can be seen in the lower section of the Recall Items window.
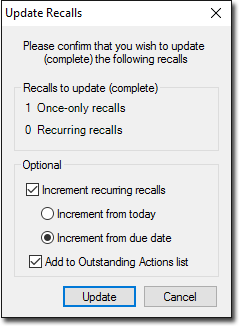
C: Update, Remove, or Cancel Recall Items
After making contact with patients, the user has three options regarding what to do with the recall list; Update, Remove, or Cancel.
o Update will delete any ‘once-only’ recalls and reset the dates for those that repeat. E.g. Current year is 2014 - a recall that occurs every 2 years will be reset to come up again in 2016.
o Remove will delete the recalls from appearing in future.
o Cancel will not do anything, and recalls will remain in the list with the same information.
By ticking the Add recalls to action list check box, recalls are added to the Outstanding Action Item list and hence will come up each time the clinician opens the patient’s record.
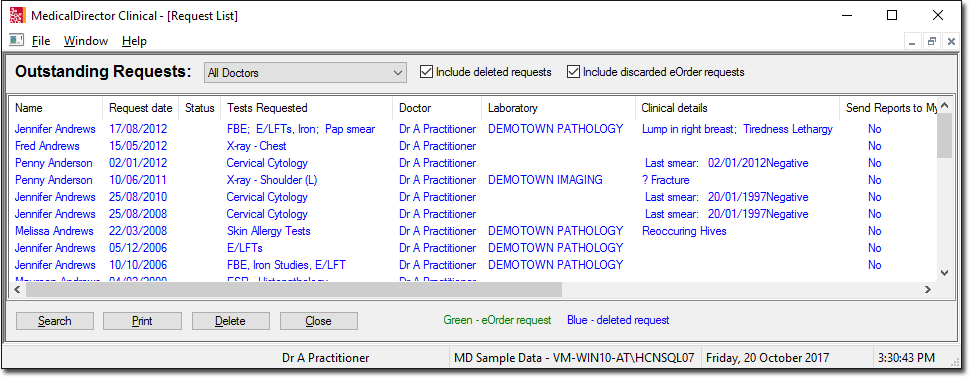
D: Following-Up Test Requests
Using the Outstanding Request List
The list of outstanding requests can be found under Correspondences > Outstanding Requests. A user can print this list and follow-up accordingly.
Using the Action List
Aside from being able to view an Action List per-patient, a user can see all items that are not yet completed, by accessing the list from the main menu, by selecting Clinical > Action List.
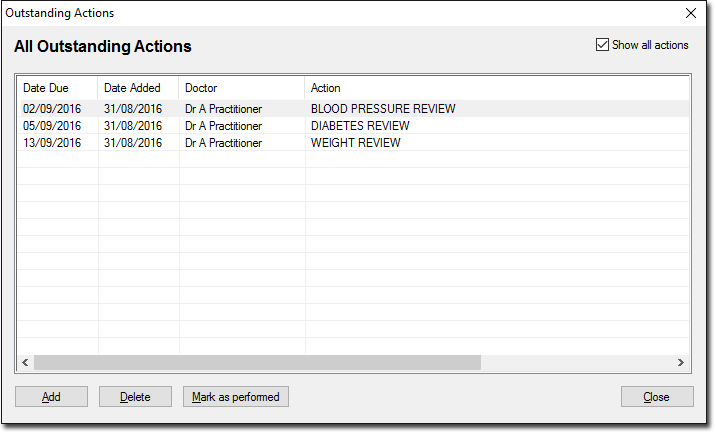
o As mentioned above, the Action List can also be used to remind clinicians and staff if they need to chase any test result.
o The list can be filtered by ‘Clinician’ or ‘Action’. There is also the option to include inactive patients and past actions.
o Check the list regularly. Keep the list current by marking any completed items and deleting any duplication or past social reminder.
Using the Holding File
Test results can be received by the system electronically or manually. Test results are stored in the ’Holding File’ area. Admin staff can import or scan test results, and assign them to a patient and clinician. The clinician needs to review this list and, depending on the result, take action.
For example if a blood test result has come back for a patient and it indicates a dangerously high cholesterol level, the clinician should mark it as ‘Return Urgently’ and ‘Add Recall’. In this way the result will show both in the patient record as a ‘Recall’ and also in the ‘Recall List’ for use by Administration staff.
From the main menu select Correspondence > Check Holding File…

Some Options in the Holding File:
Action: Calls the Action window, and allows the user to assign certain actions such as 'Discuss', 'Return Urgently' and others. It can also be customised.
No Action: Click to indicate that no actions are required regarding the selected Result.
Discuss: Click to indicate that there is a need to discuss the result with the patient.
Return Urgently: Marks the selected item as 'Return Urgently'.
Add Recall: Click to create a Recall notification for the patient.
Using the Actioned Items List
Once an item has been actioned i.e. a notation (Action, No Action, Discuss, Return Urgently or Add Recall) from Holding File, the item is moved to the ‘Actioned Items’ area. This can be accessed by selecting Correspondence > Actioned Items.
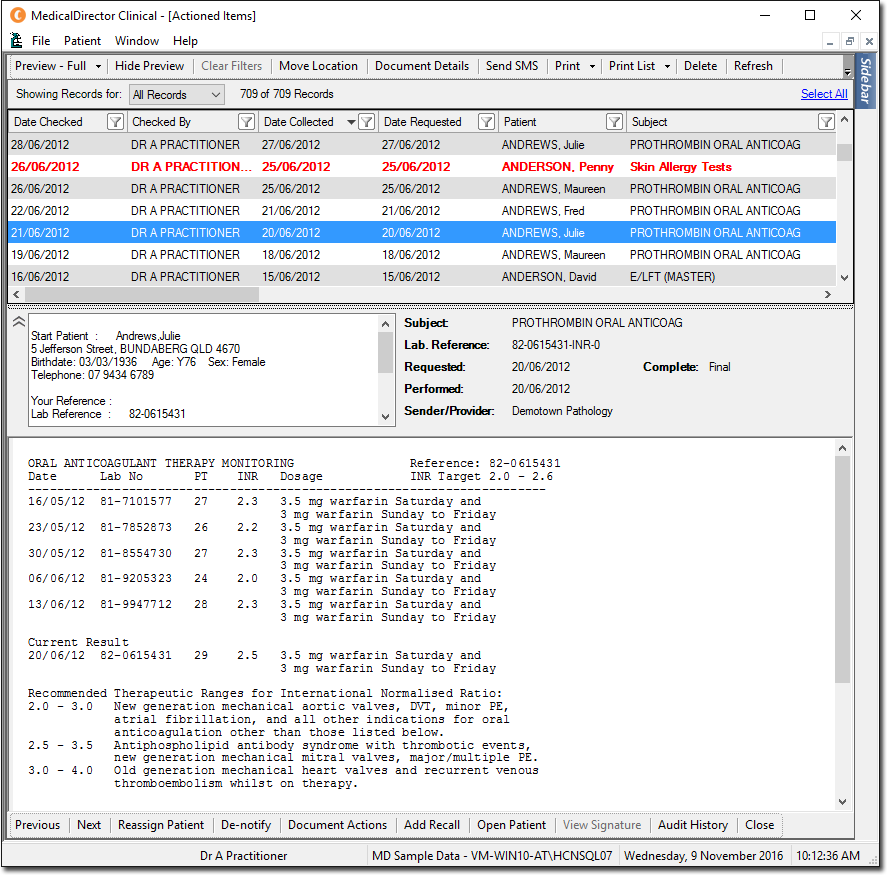
Similar to a recall list, a user can print a list of actioned items and use this list as a way to identify patients who need to be notified. Please note that only un-notified records will be printed.
Some Options in Actioned Items:
Notify: To indicate that the patient has been notified about the result, click Notify. If an error was made, the record can be un-notified.
Add Recall: The results can also be added to recall items, by clicking Add Recall.
Audit History: If there is a need to view the audit history of a particular item, click Audit History, and you will be presented with a list of actions performed on the item.