This guide is intended to assist you in quickly becoming familiar with MedicalDirector Clinical’s core functionality, the basic features of Clinical that you will use every day.
It is important to note before exploring this guide, that;
o This guide is a high-level overview, and merely compliments the in-depth online Help.
o You have already configured Clinical for first-time use.
Should you require further assistance relating to your MedicalDirector Clinical software, please contact MedicalDirector Customer Service.
What This Guide Covers
o How to create and open patient records.
o How to record a patient’s Progress Notes.
o How to record and print a prescription.
Managing Patient Records
Creating Patient Records
If you run Pracsoft in conjunction with Clinical, add new patients via Pracsoft only; patients added this way are transferred to Clinical automatically.
For Clinical-only users, new patient records are created by pressing Ctrl+F2 from the Clinical front screen. Enter the patient’s information, ensuring to include their Medicare/DVA number if available. See Managing Patient Records.
Further, when creating a new patient via Clinical, it is recommended that you validate their IHI Number at that time. This is done via the patient details window (Ctrl+D from within the patient’s record). Note however, this requires that you have first;
o Imported both your IHI Signing and IHI Encryption certificates via PKI options.
o Recorded the patient’s Medicare/DVA number (validation is not possible for patients missing this number).
Opening Patient Records
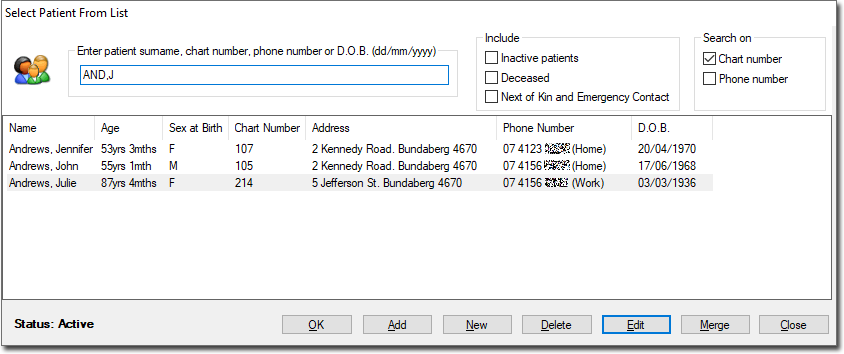
Select Patient > Open or press F2.
o You can filter patients by Name, Chart No. or Phone No.
o Where there are multiple patients with the same surname, enter a partial surname followed by a comma and the first letters of a first name (e.g. entering ‘ANDR,J’ finds the patient ‘Andrews’ whose first name begins with ‘J’).
Progress Notes
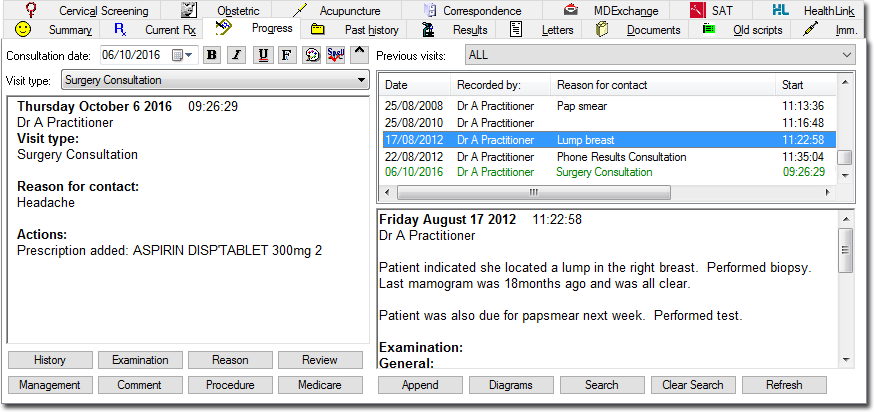
Progress Notes is the component of the patient's record in which you record notes about their visit to the practice; their reason for visiting, examinations performed on them, medications you prescribed on the day, and so on. To manage a patient's Progress Notes, select the Progress tab in the Clinical Window.
The Progress Notes window is divided into two main sections;
o The left-hand section is where notes are recorded. Text can be typed directly in this area, and can be formatted by altering font, colour and appearance (bold, italics and underline) if required. Many notes are recorded here automatically by Clinical as you use its various tools, and notes are automatically saved when you leave a patient's record (provided this option is enabled).
o The right-hand section is where past progress notes are stored, with the upper-right displaying the progress note history, and the lower the details of any selected historical note.
If no notes have been recorded and no actions performed whilst in the patient's Progress Notes, you will be prompted as to whether to save a record of their visit. Upon closing a patient's record, the elapsed time the notes were open, as well as the start and finish times are recorded in the database.
Comments
A Comment is essentially 'frequently used text that you can insert into Progress Notes using a shortcut key combination'. Each practitioner can store an unlimited number of comments of up to 250 characters each, and share them with other practitioners on your network.
Click  The Comments window
appears. The example shows several saved comments, ready for use.
The Comments window
appears. The example shows several saved comments, ready for use.
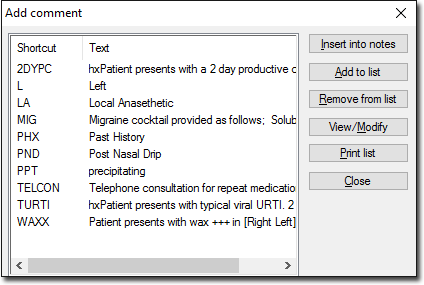
o Insert
a comment into Progress Notes either by highlighting the comment
and clicking  or typing the associated shortcut (the Add Comment window
must be closed).
or typing the associated shortcut (the Add Comment window
must be closed).
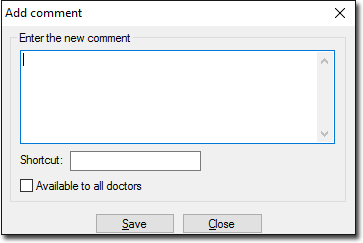
o Add
a new comment by clicking  The Add Comment window appears.
Enter the comment text and shortcut key for it. Optionally make
this comment available to all practitioners on your network. Click
The Add Comment window appears.
Enter the comment text and shortcut key for it. Optionally make
this comment available to all practitioners on your network. Click

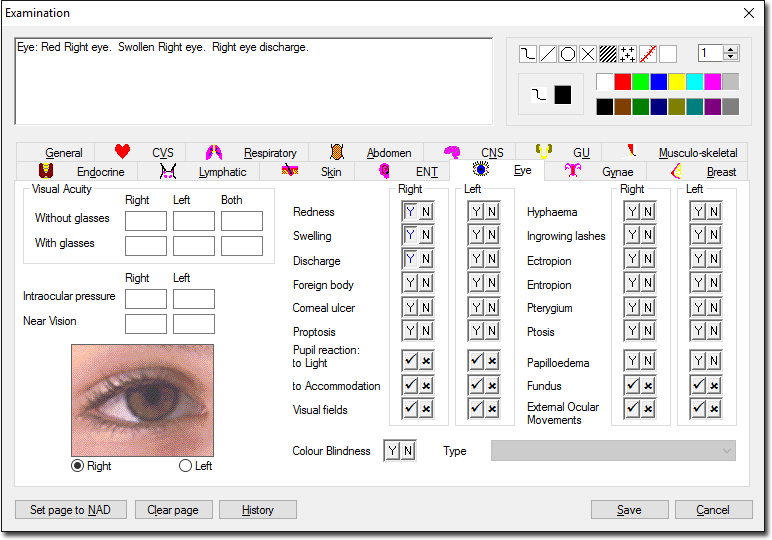
Examinations
Record the findings of a single consultation via a variety of controls for recording information. Some data may also be appear automatically on this window, if it was recorded previously using other components of Clinical, such as the Blood Pressure module. Information recorded using any of the tools within the Examination module appears in the text box at the upper-left of the window, and upon saving is added to the Progress Note for the consultation.
History
Similar in appearance to the Examinations window, here you record the patient's clinical history. Not to be confused with the Past History tab in the Clinical Window, the History module records symptoms that have become evident since the patient's last consultation, whereas the Past History tab records past conditions. Data recorded using the History module is saved to the current Progress Note, and is valid only for that Progress Note, and has no bearing on any other modules or functionality within Clinical. Data recorded via the Past History tab is used in functionality such as drug interaction checking and immunisation checking.

Management
Management items are essentially 'frequently-used text that you can insert into Progress Notes using a shortcut key combination'. Each practitioner can store an unlimited number of Management items of up to 250 characters each, and share them with other practitioners on your network. Management items are similar to Comments, with the former also displaying a heading when added to Progress Notes.
1. Click
 The Management
window appears.
The Management
window appears.
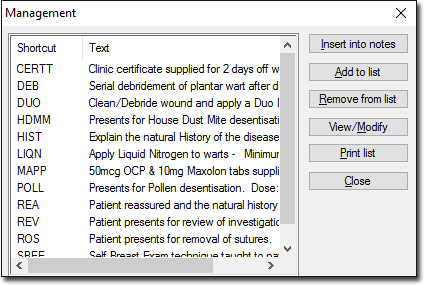
o Insert
a saved Management item into Progress Notes by either highlighting
the item and clicking
or typing the associated shortcut (the Management window must
be closed).
o Add
a new Management item by clicking Enter
the management text (maximum of 250 characters) and a shortcut
key combination. You can make this item available to all practitioners
on your network by ticking the associated check box. Click
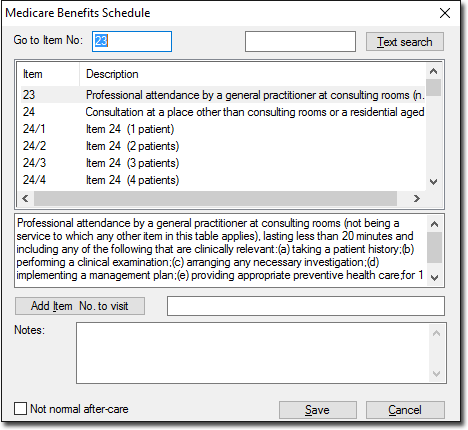
Medicare Benefits Schedule
Associate a Medicare Item Number with a visit.
1. Click
 To locate an Item Number, either:
Enter the Item Number into the Go to Item No: text box,
Manually scroll through the list of items, or
Enter a keyword into the field provided at the upper-right of
the window and then click  Repeated clicking
of this button jumps to the next item containing the search text.
Repeated clicking
of this button jumps to the next item containing the search text.
2. Select
an item and click 
3. Click
to
save the items to the patient's record (including Progress Notes).
This information can optionally be fed back to the Pracsoft Consultation
Viewer or a third-party billing package using MedicalDirector
Clinical's VISITS.OUT
file. There is also provision for the entry of Notes/Comments
on this window. Notes entered here are also saved to the VISITS.OUT
file.
Procedures
Record details of procedures performed on the patient during a consultation. The Procedure module uses a subset of the DOCLE coded list.
1. Click

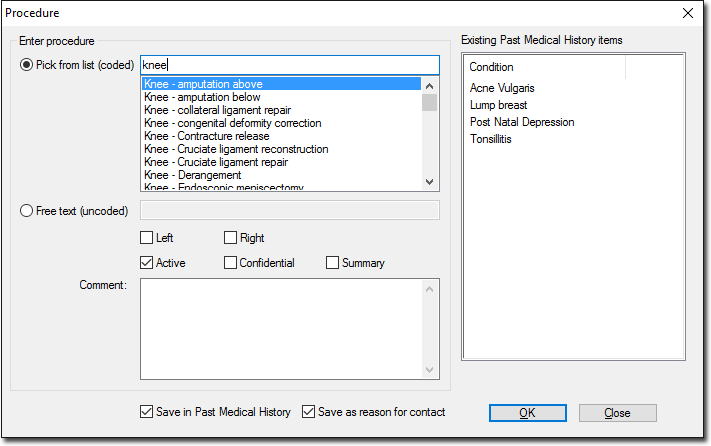
2. Enter the first few letters of the procedure name in the Pick from List text box.
3. Double-click the required item from the list of choices.
o Alternatively select from previous procedures or conditions listed in the Existing Past Medical History Items list, or free-type a procedure into the Free Text box.
4. Optional Modifications:
o By default, the procedure is marked as Active. To change this, un-tick the Active check box.
o Select either Left or Right or both to mark whether the procedure is for the Left, Right or both sides.
o By default the record is saved in the Past Medical History list and as the primary reason for visit. Modify if required.
o To list this procedure on printed letters and summaries, select the Summary check box.
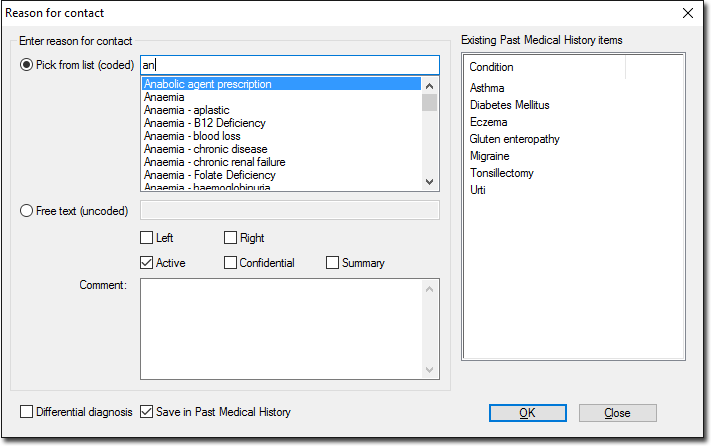
Reason for Contact
Record a diagnosis with the DOCLE list of conditions.
1. Click
 Enter the procedure name in the Pick from List (uncoded) box.
o Alternatively select from previous procedures or conditions listed in the Existing Past Medical History Items list.
2. Double-click an item from the list of choices.
o Alternatively free-type a reason into the Free Text text box.
3. Optional Modifications:
o By default the procedure is marked as Active.
o Select either Left or Right or both to mark whether the procedure is for the Left, Right or both sides.
o Indicate whether you wish the record saved to the Past Medical History list and as the primary reason for visit.
o To list this procedure on printed letters and summaries, tick the Summary check box.
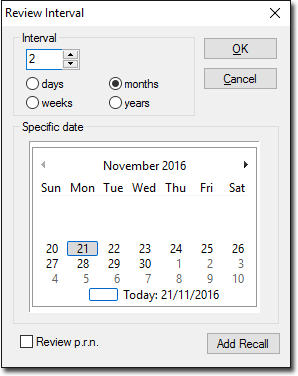
Review Notifications
Record Progress Note review
notifications via  A review notification takes the form of text within the
Progress Note
itself, and a Recall
notification. Record the review time by either selecting an interval,
or selecting a specific date using the calendar.
A review notification takes the form of text within the
Progress Note
itself, and a Recall
notification. Record the review time by either selecting an interval,
or selecting a specific date using the calendar.
Select either the Review p.r.n. check box to add the abbreviation p.r.n. to the Review section in the Progress Note, or the Add to Recall Database check box to generate a Recall notification.
Prescribing
Creating New Prescriptions - Overview
There are numerous ways to prescribe, all of which can only be performed from within a patient's record. The following steps cover the standard method of prescribing. For detailed information about the different methods of prescribing, consult the topic Creating New Prescriptions.
1. Within
the patient’s record, select the Current
Rx tab. To initiate a new prescription click the  button or
press F3. The Select
Drug window appears.
button or
press F3. The Select
Drug window appears.
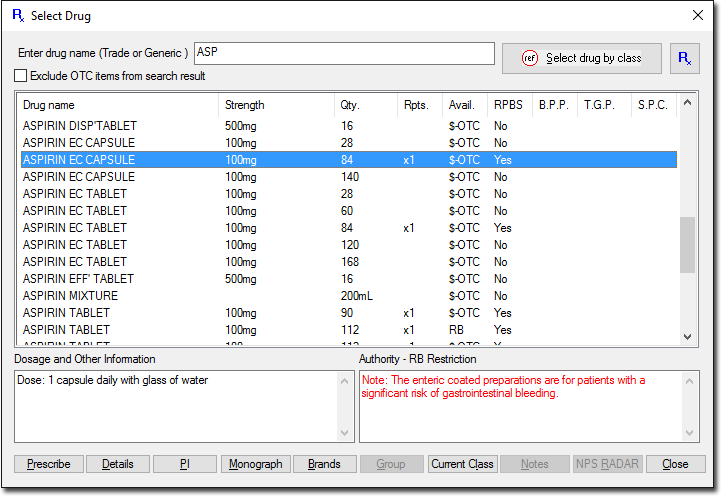
2. Select an item by either:
o Typing
the item name in the Enter Drug Name box and double-clicking it,
or selecting it and clicking
o Accessing
the MDref Class Browser by clicking  and
selecting a drug from there.
and
selecting a drug from there.
o Accessing
your favourites list by clicking 
3. (Optional) You can further filter the list of medications via;
o The Exclude OTC check box for refreshing the medications list to hide Over-The-Counter medications,
o The Brands button for showing generic brand names with the same strength as the highlighted item,
o The Group button for displaying members of the Therapeutic Group to which the medication belongs.
o The Current Class button for displaying all items from MDref of the same therapeutic class as the item.
4. Click
 to
prescribe your medication of choice. You may be notified of any
possible drug interactions.
to
prescribe your medication of choice. You may be notified of any
possible drug interactions.
5. (Optional) If you have an existing Limited Prescription for this patient, you will be prompted to;
o Continue: Updates the Script date to today's date.
o Make Regular: Changes the prescription to a regular prescription.
o Completed: Updates the script record to mark this script as completed.
o Remove: Removes the script from the Current Rx tab.
o Ignore: Ignores the prompt. This prompt will appear again next time you access this Patient's Clinical Record.
6. The
Enter Dose window appears.
Record dosage data for the medication you are prescribing. Set
the dose and a frequency.
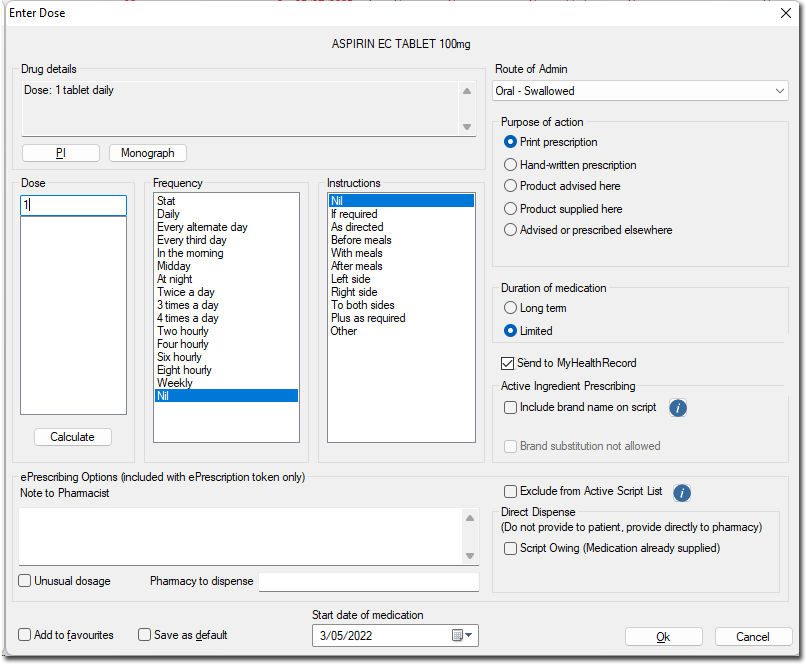
7. Indicate instructions as required.
8. Choose a Route of Administration.
9. Select a Purpose of Action;
o Product Advised here for recommending items that do not require a printed script.
o Product Supplied here for administering items without printing a script, e.g. items from your surgery.
10. Select the Duration of Medication; Long Term or Limited.
o Long Term for on-going medications. When the medication runs out it is assumed it will be renewed. Long Term medications remain on the Current Rx tab until manually deleted.
o Limited for once-off or limited duration medications. Limited medications remain on the Current Rx tab even when the estimated duration expires, at which time a prompt notifies you.
11. (Optional) Indicate if you wish to send this medication to the patient’s My Health Record with their consent. This check box is only available if the following conditions have been met;
o You have enabled My Health Record
o The patient has not withdrawn consent to upload their clinical documents to the My Health Record System
o You have enabled ePrescribing
12. (Optional) Add to Favourites adds the drug to a favourites list.
13. (Optional) Save as Default saves the dosage, instructions and duration, for when next the drug is selected.
14. Record the start date of the medication. The default date is the current date.
15. Click
 continue.
16. (Optional) If the medication is an Authority Item you will be prompted accordingly.
17. You
will be prompted to confirm the drug quantity and repeats. Modify
if necessary and click to continue.
18. (Optional) If you are prescribing a PBS/RPBS Restricted Benefit medication, you will be prompted accordingly.
19. The Reason for Medication window appears, prompting you to record a reason for the medication. Either;
o Enter the first few letters of the reason into the Pick from List (Coded) text box.
o Free-type a reason via the Free Text (Uncoded) option and corresponding text box.
o Select an existing reason from the Existing Past Medical History Items list.
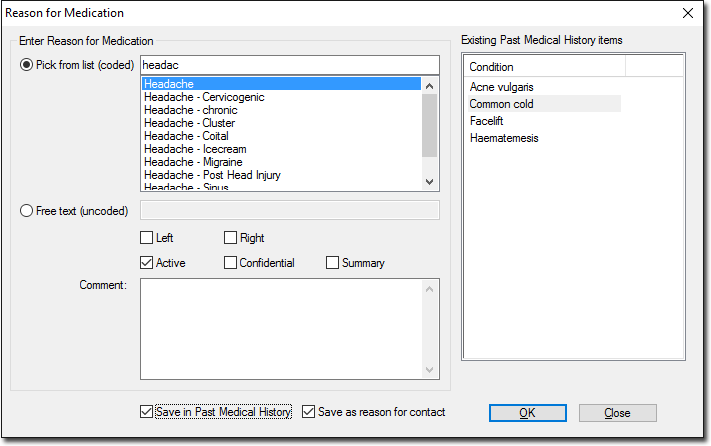
Save in Past Medical History saves the Reason for Medication to the patient's Past History tab.
Save as Reason for Contact adds a corresponding note to the patient's Progress Notes.
Left and Right allow items to be marked as either on the left side of the body, right side of the body or bilateral.
Active saves the Reason for Prescription to the patient's Past History tab as an active condition.
Confidential prevents the item from being printed on letters, Pathology/Radiology requests, or history summaries.
Summary allows items to be marked as summary items, to be printed summaries and on letters/request forms.
20. Click
when you are ready to continue. The
Select Drug window reappears,
awaiting further prescriptions. Proceed with prescribing further
items, or click  to cease. Prescriptions that
you have added appear within the patient's Current Medications
List (Current Rx tab), and are flagged as ready for printing.
to cease. Prescriptions that
you have added appear within the patient's Current Medications
List (Current Rx tab), and are flagged as ready for printing.
Printing Prescriptions
Prescriptions ready for printing are marked with the  icon on the Current Rx tab.
1. To select/de-select an existing item for printing, double-click the item. You can select multiple items for printing, and mix PBS Pharmaceutical Benefits Scheme, Authority, RPBS and Non-PBS items, which are printed separately.
2. Either click the Print button in the toolbar, press F9, type Ctrl + P, or simply close the patient's record at which time you will be prompted to print. If you choose to Print Later, you can print the prescriptions via Batch Printing.
o If the printer is on and loaded with paper, the prescription prints.
o In accordance with PBS regulations, only 3 items are printed on each prescription.
o Items of different types (PBS, RPBS, non-PBS) are automatically sorted onto separate prescriptions.
o Only a single Authority and Schedule 8 item is printed on a prescription.
o Any Pension, DVA or Safety net numbers in the patient's file are added to the script at the time of printing where appropriate.
o After
printing, the printer icon next to each
printed medication is removed.
o Any items that were selected as hand-written prescriptions are not printed, but are recorded on the Old Scripts tab.
3. Both the original and the duplicate of the printed script must be signed. Your signature should be as close to the last item on the script as possible and above the name and qualifications.
o A reminder is displayed when printed schedule medication items require hand-written endorsement with the name, strength, instructions for use, quantity and number of repeats in the practitioner's handwriting.
o If repeats are ordered for a Schedule 8 item, you are prompted to enter the interval between repeats where required.